Adjusting your Throttle Position Sensor (TPS) is one of those tasks that sounds technical but can be handled by almost anyone with patience and care. Many guides tell you to use a multimeter—but not everyone has one. You might wonder: Is it possible to adjust the TPS without this tool and still get good results? The answer is yes, but you need to rely on careful observation, common sense, and a few smart tricks.
This guide will walk you through every step of adjusting your TPS without a multimeter. You’ll learn how the TPS works, why it matters, and how to use sound, feel, and the vehicle’s own feedback to achieve a reliable adjustment.
Along the way, you’ll discover practical tips, common mistakes, and insights that most beginners overlook. Whether you’re fixing a rough idle, poor throttle response, or just want your engine running right, this article will give you the full picture.
Understanding The Throttle Position Sensor (tps)
The Throttle Position Sensor is a small but crucial part on your engine. It sits on the throttle body and tells the Engine Control Unit (ECU) how far the throttle is open. This information helps the ECU manage fuel injection, timing, and air-fuel mixture. A badly adjusted TPS can cause issues like:
- Rough idle
- Hesitation during acceleration
- Poor fuel economy
- Stalling
- Check Engine Light (CEL) activation
Most vehicles from the 1980s onwards use a TPS, especially with fuel-injected engines. Older carbureted cars may not have this sensor.
A properly set TPS ensures the ECU knows when the throttle is at idle, part throttle, or wide open. Even small errors in adjustment can throw off engine performance.
Why Adjust Tps Without A Multimeter?
You might not have a multimeter, or maybe you want to handle things with the tools you have. There are situations where a multimeter is not practical—like roadside repairs, or when you’re just starting with car maintenance.
Adjusting TPS without a multimeter relies on mechanical methods and listening to your engine. While not as precise as using electronic measurements, many DIYers and old-school mechanics have used these methods successfully for years. It’s especially helpful if you’re troubleshooting and want to see quick results before investing in tools.
But remember: This approach works best for older vehicles (pre-2005) with simple, analog TPS sensors. Modern cars with drive-by-wire or digital sensors may not respond to manual adjustment.
Tools And Materials You’ll Need
You don’t need much. Here’s what you should gather:
- Basic hand tools – Usually, a Phillips or flathead screwdriver, or a small socket set.
- White correction fluid or a sharp marker – For marking TPS position.
- Small mirror – Helps you see under the throttle body.
- Flashlight – Better visibility while working.
- OBD-II scanner (optional) – To read and clear codes, if your car supports it.
- Rags – To clean the area.
- Safety gloves – Protect your hands.
Having these ready will make your work smoother and prevent accidents.
Locating And Preparing The Tps
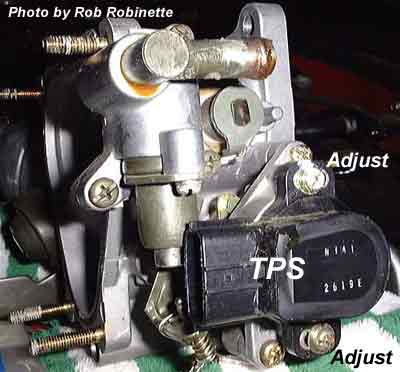
Before you start adjusting, find the TPS on your engine. Usually, it’s attached to one end of the throttle shaft, near the throttle cable. It will have a wiring connector plugged into it. Check your vehicle’s manual or a repair guide for the exact location.
Here’s how to prepare:
- Disconnect the battery – Always a good safety step to avoid accidental shorts.
- Remove the air intake duct – This gives you a clear view and access to the throttle body and TPS.
- Clean the area – Dirt and grime can fall into the throttle body if you’re not careful.
- Mark the current TPS position – Use a marker or correction fluid to draw a line across the TPS and throttle body. If you ever need to go back, you’ll know the original position.
A small but important tip: Take a photo of the TPS setup before you start. If you get lost, you’ll have a reference.
How The Tps Adjustment Works Without A Multimeter
Normally, a multimeter tells you the voltage at the TPS as you move the throttle. Without it, you’ll use the engine’s idle quality, throttle response, and sometimes the Check Engine Light as your feedback.
The TPS is usually slotted, allowing slight rotation. Turning it clockwise or counterclockwise changes how the sensor sits on the throttle shaft. Your goal: Set it so the engine idles smoothly, and throttle response feels crisp.
Most TPS sensors have two screws. Loosening them allows the sensor to rotate slightly.
Step-by-step Guide: Adjusting Tps Without A Multimeter
Follow these steps carefully for best results.
Step 1: Warm Up The Engine
Start the engine and let it reach normal operating temperature. This ensures all adjustments are made under real-world conditions. Cold engines idle differently, so don’t skip this step.
Step 2: Turn Off Engine And Prepare
Once warm, turn off the engine. Disconnect the battery if you haven’t already. Remove the air intake duct for access.
Step 3: Loosen The Tps Screws
Locate the two mounting screws holding the TPS. Loosen them just enough so the sensor can rotate, but not so loose that it moves on its own.
Step 4: Mark The Starting Position
Mark the current position of the TPS with your marker or correction fluid. This is your “home base”—if things get worse, you can return to this point.
Step 5: Rotate The Tps Slightly
Rotate the sensor a tiny amount—just a millimeter or two. Clockwise or counterclockwise, depending on which way you want to adjust. Most often, turning counterclockwise raises the voltage (or the signal the ECU sees), and clockwise lowers it, but this can vary. If you’re not sure, try each direction in small steps.
Step 6: Tighten Screws Lightly
Lightly tighten the screws so the sensor doesn’t move while you test.
Step 7: Reconnect Battery And Start Engine
Reconnect the battery. Start the engine and observe:
- Idle quality – Is it smoother or rougher?
- Throttle response – Does the engine react quickly to pedal input?
- Check Engine Light – Did it come on?
- RPM changes – Did the idle speed go up or down?
Step 8: Fine-tune As Needed
If the result is not ideal, turn off the engine, loosen the screws, and adjust the TPS again. Repeat the process—small movements, check engine response, and observe results.
You may need to do this several times. Don’t rush.
Step 9: Final Tightening
When you’re happy with the idle and throttle response, tighten the TPS screws securely. Double-check that the sensor did not move during tightening.
Step 10: Reassemble And Test Drive
Replace the air intake duct. Take the car for a short drive. Pay attention to:
- Engine hesitation or stuttering
- Idle speed when stopped
- Acceleration feel
If you notice problems, repeat the adjustment. Sometimes a tiny change makes a big difference.
Tuning By Sound And Feel
Without electronic feedback, your ears and hands become your tools.
Idle speed should be stable—no surging, hunting, or dropping. The engine should react instantly to throttle input. If the idle goes very high or the car stalls, the TPS is likely too far off.
Many drivers miss this: TPS adjustment can affect the transmission shift points in automatic cars. If shifting feels delayed or harsh, try adjusting the sensor slightly back toward its original position.
Using Check Engine Light As Feedback
If your car has an OBD-II system (1996 and newer in the US), the ECU will often set a code if the TPS signal is out of range. After each adjustment, look for a Check Engine Light.
If it appears, you’ve likely set the TPS too far from the expected range. Move it back toward your mark and try again. An OBD-II scanner can clear codes after each change.
Credit: www.reddit.com
Common Mistakes (and How To Avoid Them)
Many beginners make these errors:
- Over-rotating the TPS – Small changes have a big effect. Always move in tiny steps.
- Forgetting to mark original position – It’s easy to get lost. Always mark before starting.
- Not warming up the engine – Adjusting on a cold engine leads to poor results when fully warmed.
- Leaving screws loose – The sensor can shift from vibration, ruining the adjustment.
- Ignoring other problems – TPS issues can mimic vacuum leaks or bad idle air control valves. Always rule out other causes.
One insight most people miss: If your TPS is very far out, it may be a symptom of another issue, like a worn throttle shaft or binding linkage. Always check for smooth throttle movement first.
When Manual Adjustment Is Not Enough
Some cars will not respond well to manual TPS adjustment. This is common with:
- Drive-by-wire systems – No manual adjustment possible.
- Digital or non-slotted TPS sensors – Sensor cannot be rotated.
- Sealed sensors – Some TPS units are not designed to be moved.
If this is your case, consult your service manual or a professional. For these cars, specialized tools or dealer service may be required.
Credit: robrobinette.com
Practical Tips For Best Results
- Make only one change at a time; don’t adjust and move on before testing.
- If you can, have a helper watch the tachometer or listen to engine RPMs while you adjust.
- If the car has a diagnostic mode (some Japanese cars), you may be able to get feedback from the ECU without a multimeter. Check your manual.
- Keep a log of each change and result. This helps you track what works.
- If idle or throttle response never improves, the TPS may be faulty and need replacement.
Comparing Tps Adjustment Methods
To help you see the difference, here’s a comparison of adjusting with and without a multimeter:
| Method | Accuracy | Tools Needed | Best For | Common Risks |
|---|---|---|---|---|
| With Multimeter | High | Multimeter, basic tools | Precise adjustment | Requires knowledge of voltage specs |
| Without Multimeter | Medium | Basic tools, observation | Quick fixes, no tools | Less precise, more trial and error |
Signs Your Tps Adjustment Was Successful
After adjusting, look for these signs:
- Stable idle at normal RPM (check your manual for the spec)
- Smooth acceleration without hesitation or flat spots
- No Check Engine Light
- Normal fuel economy
If you achieve these, your TPS adjustment is likely good. For added confidence, compare before and after results:
| Symptom | Before Adjustment | After Adjustment |
|---|---|---|
| Idle RPM | Rough, fluctuating | Stable, steady |
| Throttle Response | Sluggish, delayed | Quick, sharp |
| Engine Light | On | Off |
| Fuel Economy | Poor | Improved |
Real-world Example: Toyota Corolla 1998
Many Toyota owners adjust their TPS this way. A common symptom is erratic idle or stalling at stoplights. After cleaning the throttle body and checking for vacuum leaks, adjusting the TPS restores normal idle.
A beginner might over-rotate the sensor, causing a high idle (over 1500 RPM). By moving the TPS back just a hair, idle returns to normal (around 750 RPM), and throttle response is much better.
This method works for Hondas, Mazdas, and many other makes from the 90s and early 2000s.
What If The Adjustment Doesn’t Help?
If adjusting the TPS makes no difference, consider:
- The sensor itself may be bad (worn tracks, open circuit)
- The throttle body may be dirty or sticking
- There could be a vacuum leak
- Idle air control valve may be faulty
Don’t keep adjusting endlessly. If nothing changes, it’s time for further diagnosis or professional help.
The Role Of Diagnostic Tools (optional)
While you can do this job without a multimeter, a cheap OBD-II scanner is a good investment. It can read live data, showing TPS percentage, and help you confirm your adjustment. Even a smartphone app with a Bluetooth adapter can do this for under $20.
For more detailed information on how the TPS works and common codes, refer to this Wikipedia page.

Credit: www.youtube.com
Frequently Asked Questions
How Do I Know If My Tps Needs Adjustment?
Common signs include rough idle, hesitation, engine stalling, or poor fuel economy. If you’ve checked for vacuum leaks and cleaned your throttle body but still have issues, the TPS may need adjustment.
Can I Damage My Car By Adjusting The Tps Without A Multimeter?
If you work slowly and always mark the original position, risk is low. However, over-adjusting or forcing the TPS can cause poor running or trigger the Check Engine Light. Return to your marks if problems appear.
How Often Should I Adjust The Tps?
Usually, you only adjust the TPS if you’ve replaced it, removed the throttle body, or are fixing a drivability issue. It’s not a regular maintenance item.
Is This Method Safe For All Cars?
No. It works best on older, analog systems. Modern cars with digital or drive-by-wire throttle bodies cannot be adjusted this way. Always check your vehicle’s service manual.
What If I Cannot Improve Idle Or Throttle Response After Adjustment?
If you see no improvement, the problem may lie elsewhere—like a faulty sensor, dirty throttle body, or vacuum leak. Consider replacing the TPS or seeking professional diagnosis.
Adjusting your TPS without a multimeter is possible, and for many DIYers, it’s a practical skill. With patience, careful observation, and the right approach, you can restore smooth running and better performance to your car—all without special tools. Just remember: Small changes, test often, and always mark your starting point. If in doubt, don’t hesitate to ask an experienced mechanic for help.