Is your fuel gauge acting up and leaving you guessing how much gas you really have? You’re not alone, and fixing it might be simpler than you think.
By learning how to test a fuel gauge with a multimeter, you can quickly find out if the problem is with the gauge itself, the sending unit, or the wiring. This hands-on approach saves you time and money, and puts you in control of your vehicle’s health.
Keep reading, and you’ll discover easy steps to check your fuel gauge like a pro—even if you’ve never used a multimeter before.
Tools Needed
Testing a fuel gauge with a multimeter requires the right tools. Having the correct equipment makes the task easier and more accurate. Below, find the essential tools needed for this job.
Choosing The Right Multimeter
Select a multimeter that measures voltage, resistance, and continuity. Digital multimeters are simple to read and offer better accuracy. Check that the multimeter has a clear display and easy controls. A model with a hold function helps capture readings. Ensure the device can measure low voltage, common in fuel gauges.
Additional Equipment
Prepare a pair of insulated test leads for safe connections. A set of alligator clips can hold wires steady during testing. Keep a small screwdriver handy to access the fuel gauge wiring. A wiring diagram of your vehicle helps identify correct terminals. Wear safety gloves to protect your hands while working.
Credit: marinehowto.com
Safety Precautions
Testing a fuel gauge with a multimeter requires careful attention to safety. Vehicle electronics are sensitive and can cause shocks or damage if handled incorrectly. Taking the right precautions protects both you and your vehicle. Read these tips before starting your test.
Working With Vehicle Electronics
Always disconnect the car battery before testing. This stops electric shocks and short circuits. Avoid touching metal parts together while testing. Use insulated tools to prevent accidents. Keep the work area dry to avoid slips and electric hazards. Be gentle with wires and connectors. Damaging them can cause costly repairs.
Protective Gear Tips
Wear safety glasses to protect your eyes from sparks. Use gloves to avoid cuts and electric shocks. Choose gloves that allow you to handle small parts easily. Wear closed-toe shoes to protect your feet. Avoid loose clothes or jewelry that can catch on parts. Keep a fire extinguisher nearby for emergencies.
Locating The Fuel Gauge Components
To test a fuel gauge with a multimeter, first find its main parts. These parts work together to show the fuel level in your vehicle. Knowing their locations helps you check them carefully. This step avoids mistakes and saves time.
Fuel Gauge Sender Unit
The fuel gauge sender unit sits inside the fuel tank. It has a float that moves with the fuel level. This float connects to a variable resistor. As the float moves, it changes the resistance. This change tells the gauge how much fuel is in the tank. To find it, open the fuel tank or access the area under the rear seat. Look for a round plate with wires attached. Handle it gently to avoid damage.
Dashboard Gauge
The dashboard gauge shows the fuel level to the driver. It is behind the dashboard panel. To locate it, remove the dashboard cover carefully. The gauge looks like a small meter with a needle or digital display. It receives signals from the sender unit. Check the connections and wiring here before testing with a multimeter.
Preparing The Multimeter
Preparing the multimeter is the first step in testing a fuel gauge. The multimeter needs to be set up correctly to get accurate readings. This process involves choosing the right mode and making sure the device is calibrated. Proper preparation helps avoid errors and saves time during testing.
Setting The Correct Mode
Turn the multimeter on and check the dial. Select the mode for measuring voltage, usually marked as “V” with a straight line. Use the DC voltage mode because the fuel gauge works with direct current. Setting the wrong mode can give false readings or damage the multimeter.
Calibrating The Device
Before starting, check if the multimeter needs calibration. Calibration ensures the readings are accurate and reliable. Some models have a calibration button or require adjusting the dial. Follow the manual to calibrate properly. Without calibration, test results may be incorrect and lead to wrong conclusions.
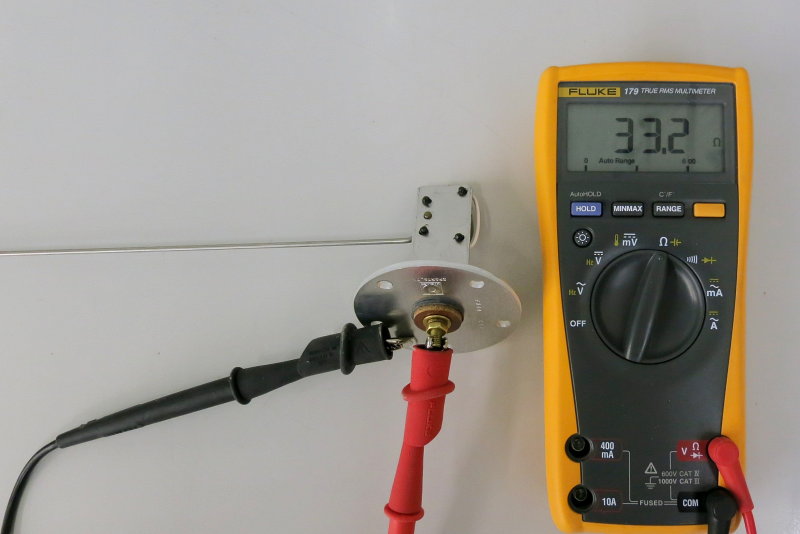
Testing The Fuel Gauge Sender
The fuel gauge sender is a small part inside your fuel tank. It measures how much fuel is left. Testing this sender helps find out if the fuel gauge shows the right level. You can test it using a multimeter. This tool measures electrical resistance, which changes as the fuel level changes.
Start by locating the fuel gauge sender. It is usually attached to the fuel tank. You will test its resistance to see if it works correctly. Follow safety steps before starting the test.
Measuring Resistance
Turn off the vehicle and disconnect the sender’s wire. Set your multimeter to measure resistance (ohms). Connect the multimeter leads to the sender’s terminals. Move the sender arm gently while watching the multimeter. The resistance should change smoothly as you move the arm.
Interpreting The Results
If the resistance does not change or jumps suddenly, the sender may be faulty. Compare your readings with the vehicle’s service manual. The manual shows the correct resistance values at different fuel levels. If your readings are far off, the sender needs replacement. A smooth change in resistance means the sender is good.

Credit: www.youtube.com
Testing The Dashboard Fuel Gauge
The dashboard fuel gauge shows the fuel level in your tank. Testing it helps find issues early. A multimeter is a simple tool for this job. It measures voltage and resistance. This lets you check the gauge’s electrical parts. Follow clear steps to test the gauge safely and correctly.
Start with the power supply. Then check how the gauge reacts to changes. These checks reveal if the gauge works or needs fixing.
Checking Voltage Supply
Turn the car ignition to the ON position. Set the multimeter to measure voltage (DC volts). Find the fuel gauge connector behind the dashboard. Touch the multimeter’s positive lead to the power terminal. Touch the negative lead to a ground point. The voltage should match the car battery, around 12 volts. If no voltage appears, check the fuse or wiring. A good voltage supply means the gauge can get power.
Verifying Gauge Response
Next, test how the gauge needle moves. Connect the multimeter to the gauge terminals. Slowly change the fuel sender resistance using a variable resistor or by simulating it. Watch the gauge needle as resistance changes. The needle should move smoothly from empty to full. If it jumps or stays fixed, the gauge or sender may be faulty. This test shows if the gauge reads fuel levels correctly.
Troubleshooting Common Issues
Troubleshooting common fuel gauge issues is key to ensuring accurate fuel readings. Many problems stem from simple faults that a multimeter can help identify. Understanding these issues saves time and prevents costly repairs. Focus on the most frequent problems to get your fuel gauge working properly again.
Inconsistent Readings
Inconsistent readings often mean a poor electrical connection. Check the wiring for loose or corroded contacts. Use the multimeter to test voltage stability across the gauge terminals. Look for fluctuating numbers that indicate bad wiring or a failing sender unit. Cleaning or tightening connections can fix this problem quickly. Always test the resistance of the fuel sender. It should change smoothly as the fuel level changes.
Gauge Not Moving
A fuel gauge that does not move may have a broken needle or a faulty sender. First, use the multimeter to check for voltage at the gauge. No voltage means a power supply issue. If voltage is present, test the sender unit’s resistance. A constant reading suggests the sender is stuck or damaged. Replace the sender or gauge if tests show no change. Inspect the fuse and wiring to ensure proper power flow.
When To Replace Components
Knowing when to replace fuel gauge components saves time and money. It keeps your vehicle running smoothly. Faulty parts cause wrong fuel readings. This leads to unexpected stops and engine problems. Testing with a multimeter helps find these faults early.
Signs Of A Faulty Sender
The sender unit sends fuel level data to the gauge. Watch for these signs of a bad sender:
- Fuel gauge stuck at full or empty.
- Fuel level jumps randomly.
- Gauge shows wrong fuel levels.
- Fuel gauge does not move.
If you see these, the sender may need replacing. A multimeter test can confirm this by checking resistance changes.
Dashboard Gauge Replacement Indicators
The dashboard gauge shows fuel level visually. Replace it if you notice:
- Gauge needle stuck or slow to respond.
- Gauge shows no movement during testing.
- Inconsistent readings despite a good sender.
- Gauge flickers or behaves erratically.
Testing with a multimeter verifies the gauge’s electrical parts. Replace the gauge if tests fail consistently.

Credit: sailmagazine.com
Frequently Asked Questions
How Do I Test A Fuel Gauge With A Multimeter?
To test a fuel gauge, first disconnect the fuel sender wire. Set your multimeter to Ohms, then measure resistance at the sender. Compare your reading with the manufacturer’s specifications to determine if the gauge is working correctly.
What Multimeter Setting Is Used For Fuel Gauge Testing?
Use the Ohms (Ω) setting on your multimeter to test a fuel gauge. This measures resistance, which helps determine if the sender and gauge are functioning properly.
Can A Faulty Fuel Sender Affect Gauge Readings?
Yes, a faulty fuel sender can cause inaccurate or stuck fuel gauge readings. Testing the sender’s resistance with a multimeter helps identify if it needs replacement.
Why Is The Fuel Gauge Important In Vehicles?
The fuel gauge shows how much fuel remains, preventing unexpected refueling issues. Accurate gauges ensure you monitor fuel levels safely and avoid running out of gas.
Conclusion
Testing a fuel gauge with a multimeter is simple and useful. You can find problems early and fix them fast. Just follow the steps carefully and stay safe. A working fuel gauge helps avoid running out of gas. Use your multimeter to check the wires and connections.
This saves time and money on repairs. Remember to double-check your readings for accuracy. Practice makes perfect, so try testing a few times. Stay patient and focused during the test. This skill helps keep your vehicle in good shape.