If you work with heating systems or temperature controls, knowing how to test a thermocouple with a multimeter is a skill you can’t afford to miss. Your thermocouple might be the reason your equipment isn’t working right, but checking it yourself can save you time and money.
In this guide, you’ll learn simple steps to find out if your thermocouple is faulty or still good. Keep reading, and by the end, you’ll feel confident handling this test like a pro.
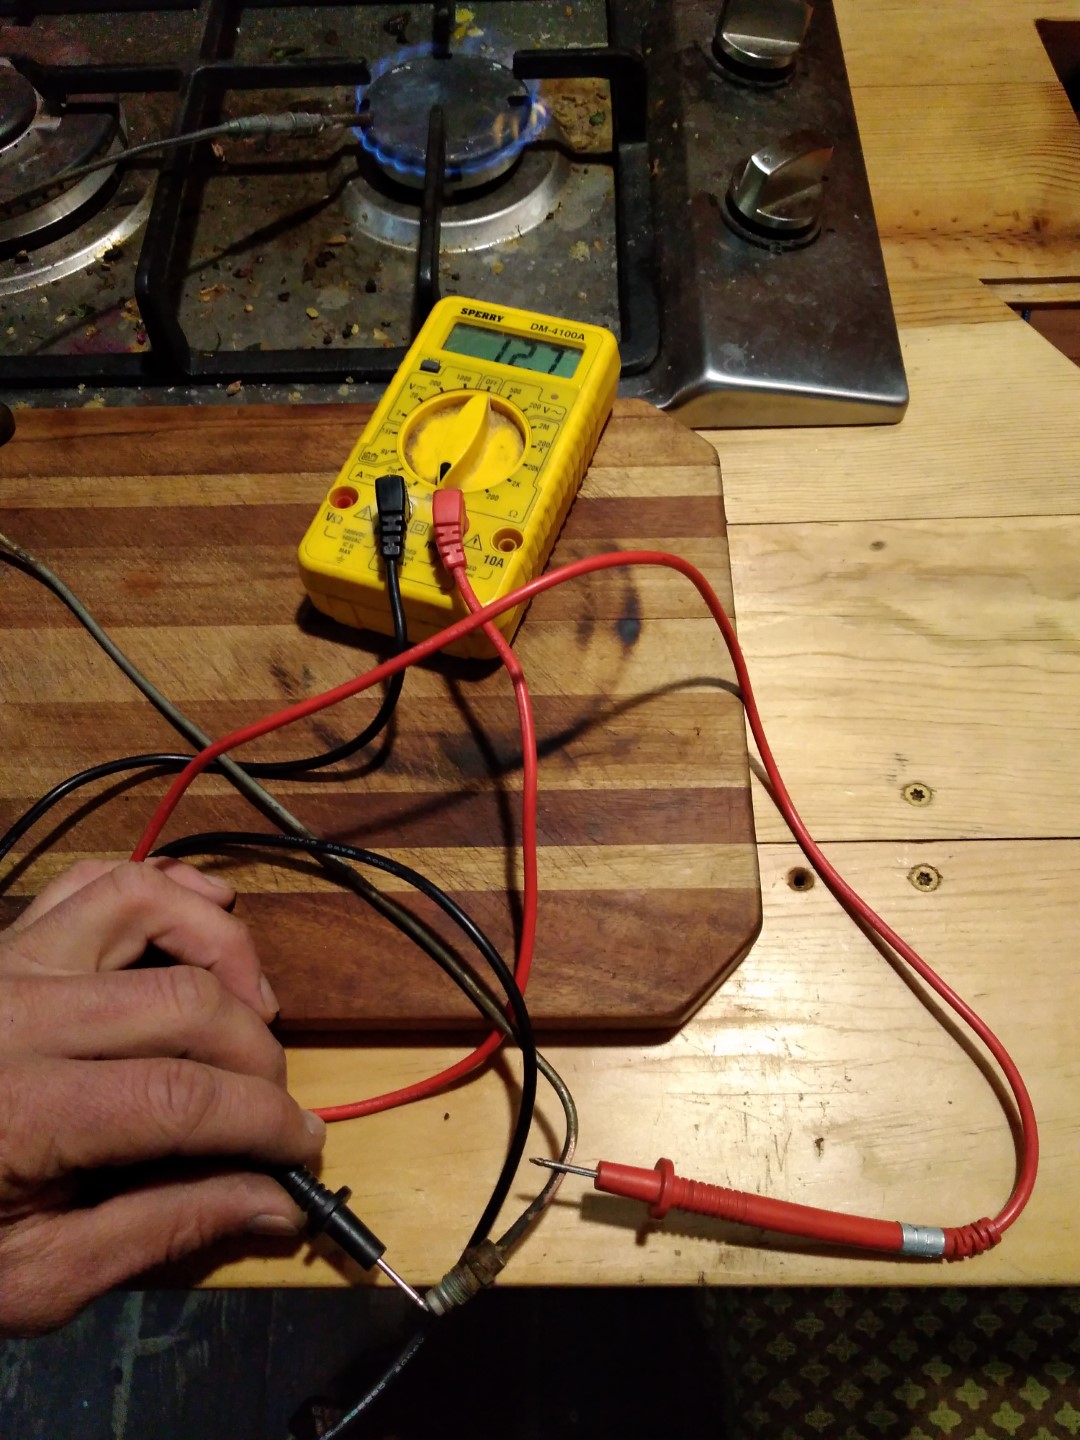
Credit: electronics.stackexchange.com
Thermocouple Basics
Thermocouples are simple devices that measure temperature. They are widely used in many industries. Understanding the basics helps you test them correctly with a multimeter.
Thermocouples come in different types and work on a basic principle. They find use in heating systems, engines, and even home appliances.
Types Of Thermocouples
There are several types of thermocouples. Each type uses different metals to create a voltage. The most common types are K, J, T, and E. Type K is popular for general use. Type J works well at lower temperatures. Type T is good for very low temperatures. Type E has a higher voltage output than others.
How Thermocouples Work
A thermocouple works by joining two different metals. When the junction heats up, it produces a small voltage. This voltage changes with temperature. A multimeter measures this voltage. The reading shows the temperature at the junction. This simple setup is very reliable and fast.
Common Applications
Thermocouples are used in many places. They measure temperature in furnaces and ovens. They help control heating in water heaters. Engines and gas appliances also use thermocouples. Even scientific labs use them for experiments. Their small size and durability make them ideal.
Tools Needed
Testing a thermocouple requires a few basic tools. These tools help check if the thermocouple works correctly. Having the right equipment makes the process faster and easier. Below, learn about the main tools needed.
Choosing The Right Multimeter
Select a multimeter that can measure millivolts accurately. Thermocouples produce very low voltage signals. A digital multimeter with a low voltage setting is best. Check if the multimeter has a temperature measurement mode. This feature helps test thermocouples directly. Make sure the multimeter is easy to read and use. Avoid models with complex settings for beginners.
Additional Equipment
You may need extra tools for better testing results. A pair of insulated test leads helps connect the thermocouple safely. Use a small screwdriver to access thermocouple terminals. A clean cloth can remove dirt from the thermocouple tips. Having a heat source, like a lighter or candle, helps test temperature response. Keep a notebook to record your readings for reference.
Preparing For The Test
Preparing for the test is the first important step to check a thermocouple with a multimeter. Proper preparation helps get accurate results and keeps you safe. It involves understanding safety rules and setting up your multimeter correctly. This section guides you through these necessary steps before testing.
Safety Precautions
Always wear safety gloves to protect your hands from heat or sharp parts. Make sure the thermocouple is cool before touching it. Work in a dry area to avoid electric shock. Keep the multimeter away from water and other liquids. Check that the multimeter’s wires and probes are not damaged. Never touch metal parts of the probes while testing. Follow these safety steps strictly to avoid accidents.
Setting Up The Multimeter
Turn on the multimeter and set it to the millivolt (mV) mode. This mode measures small voltage changes from the thermocouple. Connect the red probe to the positive terminal and the black probe to the negative terminal. Make sure the probes are firmly connected. Zero the multimeter if it has a calibration option. Prepare the thermocouple by cleaning its ends for good contact. Proper setup ensures you get correct readings during the test.

Credit: www.youtube.com
Testing Resistance
Testing resistance is a key step in checking a thermocouple. It helps find problems like breaks or bad connections. Using a multimeter to test resistance gives a clear idea about the thermocouple’s condition. The process is simple and fast.
Start by setting the multimeter to measure resistance, usually marked as Ω. This lets you see if the wires inside the thermocouple are continuous or damaged. A good thermocouple shows low resistance. High or no reading means there might be a fault.
Measuring Continuity
Continuity means the wire inside is complete and unbroken. To measure it, touch the multimeter probes to the thermocouple ends. The multimeter will beep or show a low resistance number if the wire is good. No beep or a very high number means no continuity. This shows the wire may be broken.
Identifying Faulty Wires
Faulty wires cause wrong temperature readings or no signal. Check each wire by measuring resistance. If one wire shows very high resistance, it is likely damaged. Replace or repair the wire to fix the thermocouple. Testing resistance helps find these faulty parts quickly and easily.
Measuring Voltage Output
Measuring the voltage output of a thermocouple is key to checking its function. This step helps you see if the thermocouple produces the right signals based on temperature changes. A multimeter is the tool used to measure this tiny voltage. Understanding this output ensures your thermocouple works properly.
Simulating Temperature Changes
To test the thermocouple, create small temperature changes. Hold the sensing tip in your hand for a warm reading. Or, dip it briefly in ice water for a cold reading. These changes cause the thermocouple to generate different voltages. The multimeter will show these changes as you test.
Interpreting Voltage Readings
The multimeter shows millivolts (mV) from the thermocouple. Higher temperatures give higher voltage readings. Lower temperatures give lower voltage readings. Check your thermocouple’s chart to compare values. If the voltage is zero or very low, the thermocouple might be broken. This simple test confirms if the device works or not.
Troubleshooting Common Issues
Troubleshooting common problems with a thermocouple is key to keeping it working well. Understanding typical issues helps fix them fast. This section explains how to spot and solve common errors using a multimeter. Clear steps make the process simple. Follow these tips to ensure accurate readings and smooth operation of your thermocouple.
Inconsistent Readings
Inconsistent readings often mean a loose connection. Check all wires for tight, clean contacts. Dirt or corrosion can cause errors. Clean any dirty parts with a soft cloth. Test the thermocouple at different temperatures. If readings jump or change without reason, the sensor may be damaged. Replace the thermocouple if cleaning does not help. Also, ensure the multimeter is set to the correct scale for millivolts.
No Voltage Detected
No voltage can mean a broken wire or sensor. First, check the wire for cuts or breaks. Use the multimeter to test continuity along the wire. A broken wire will show no continuity. Also, check the connection points for secure fitting. If the wire is good, the thermocouple tip might be faulty. Replace the thermocouple if no voltage shows at the sensor tip. Make sure the multimeter is working by testing a known voltage source.
When To Replace A Thermocouple
Knowing when to replace a thermocouple is important for safety and efficiency. A thermocouple that does not work properly can cause heating issues or prevent your appliance from working at all. Regular checks help find problems early. This saves time and money. Understanding signs of wear and damage is key to deciding when to replace it.
Signs Of Wear And Damage
Look for physical damage like cracks or breaks on the thermocouple. A bent or corroded tip reduces accuracy. If the flame keeps going out, the thermocouple may not sense heat correctly. Weak or no voltage reading on a multimeter also shows it is failing. Strange smells or soot near the pilot light can be a warning. These signs mean the thermocouple is worn and needs replacement.
Cost And Replacement Tips
Thermocouples are usually low-cost parts. Replacing one can be done without a professional in many cases. Always buy the correct type for your appliance. Turn off the gas and power before removal. Clean the area around the pilot before installing the new thermocouple. Proper installation ensures safety and better performance. Check your appliance manual for specific instructions.

Credit: www.wikihow.com
Frequently Asked Questions
How Do I Test A Thermocouple With A Multimeter?
Set your multimeter to the millivolt (mV) setting. Connect the thermocouple leads to the multimeter probes. Heat the thermocouple tip and observe the voltage reading. A rising voltage indicates a working thermocouple.
What Multimeter Setting Is Best For Thermocouples?
Use the millivolt (mV) or microvolt (µV) setting. This measures the small voltage generated by the thermocouple. Avoid using resistance or continuity settings for accurate temperature readings.
Why Is My Thermocouple Showing Zero Voltage?
Zero voltage may indicate a broken or disconnected thermocouple wire. Check connections and ensure the thermocouple tip is heated. Replace the thermocouple if the voltage remains at zero.
Can I Test A Thermocouple Without Heating It?
No, heating the thermocouple tip is essential. The voltage output depends on the temperature difference between the junctions. Without heat, the multimeter will show little or no voltage.
Conclusion
Testing a thermocouple with a multimeter is simple and useful. You just need to follow a few clear steps. This process helps find problems quickly and saves time. Regular checks keep devices safe and working well. Practice these steps to feel more confident.
Small efforts lead to better results. Now you can test thermocouples with ease and accuracy. Try it yourself and see the difference.