Are you wondering if your fuel injectors are working properly? Knowing how to test injectors with a multimeter can save you time and money on costly repairs.
You don’t need to be a mechanic to do it—just a few simple steps and the right tool can help you spot problems early. In this guide, you’ll learn exactly what to look for and how to get accurate results, so you can keep your engine running smoothly.
Keep reading, and you’ll gain the confidence to diagnose injector issues like a pro.
Tools Needed
Testing injectors with a multimeter needs a few simple tools. These tools help check if the injector works well. Having the right tools makes the test easy and accurate.
Choosing The Right Multimeter
Pick a multimeter that measures resistance. It should have a clear display for easy reading. A digital multimeter is best for accuracy. Check if it has probes with good tips. These help connect to small injector parts.
Additional Equipment
Besides the multimeter, use a set of test leads. These connect the multimeter to the injector terminals. A pair of needle-nose pliers can help hold small wires. Also, keep a clean cloth to wipe parts. This removes dirt for better contact.

Credit: www.fluke.com
Preparing The Vehicle
Start by turning off the vehicle and disconnecting the battery to avoid shocks. Locate the injectors and clean the area for clear access. Ensure the multimeter is set to the correct resistance range before testing.
Safety Precautions
Start by turning off the engine and removing the key. Let the engine cool down to avoid burns. Wear safety gloves and glasses to protect your hands and eyes. Disconnect the negative battery cable to prevent electrical shocks. Work in a well-ventilated area to avoid inhaling fumes. Keep a fire extinguisher nearby for emergencies. Follow these steps to ensure your safety throughout the process.
Accessing The Injectors
Open the vehicle’s hood and locate the fuel injectors. Refer to the vehicle manual for exact injector positions. Remove any engine covers blocking access to the injectors. Use the correct tools to avoid damaging parts. Carefully disconnect the electrical connectors from each injector. Keep track of all removed parts for easy reassembly. Clean the area around the injectors to prevent dirt from entering.
Testing Injector Resistance
Testing injector resistance is a key step in diagnosing fuel injector issues. It helps identify if the injector coil is damaged or has a bad connection. A multimeter is the right tool for this task. The process is simple and quick.
Setting The Multimeter
Start by turning on your multimeter. Set it to the ohms (Ω) mode. This mode measures electrical resistance. Choose a range that covers low resistance, usually around 20 ohms.
Make sure the multimeter leads are connected properly. The black lead goes to the common (COM) port. The red lead goes to the voltage or resistance (VΩ) port.
Measuring Resistance Values
Locate the fuel injector terminals. Place one multimeter probe on each terminal. Hold the probes steady to get an accurate reading. Note the resistance value displayed on the screen.
Repeat this for each injector you want to test. Write down the results for comparison later.
Interpreting Results
Compare the readings with the manufacturer’s specifications. Most injectors have a resistance between 12 and 16 ohms. Readings much higher or lower may indicate a faulty injector.
Very high resistance can mean a broken coil inside the injector. Very low resistance may suggest a short circuit. Both conditions require injector replacement or repair.
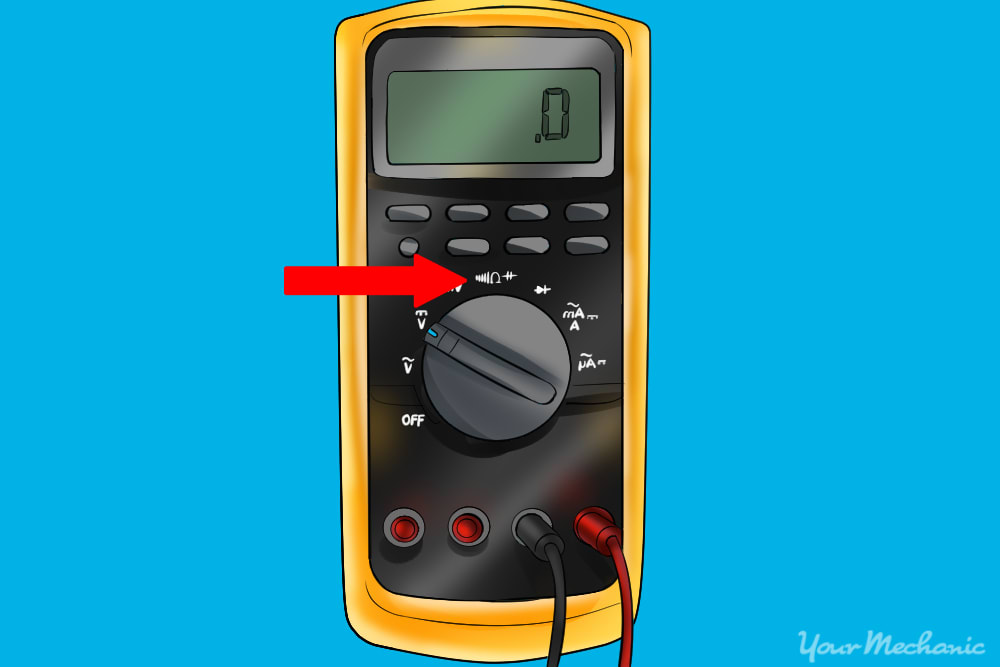
Credit: www.yourmechanic.com
Checking Injector Continuity
Checking injector continuity is a key step to test fuel injectors. It helps find if the injector coil is broken or working. A multimeter is a simple tool to measure this. It checks electrical flow inside the injector.
This test shows if the injector has a complete circuit. A broken circuit means the injector will not work properly. The test is quick and does not need removing the injector from the engine.
Multimeter Settings For Continuity
Set your multimeter to the continuity mode. This mode often has a symbol like a sound wave or diode. If no continuity mode exists, use the lowest ohm (Ω) setting. This measures resistance in the injector coil.
Check the multimeter leads are plugged into the correct ports. Usually, the black lead goes to the common port. The red lead goes to the voltage or resistance port.
Performing The Test
Turn off the engine and disconnect the injector connector. Touch the multimeter leads to the injector terminals. It does not matter which lead goes to which terminal.
The multimeter should beep or show a low resistance value. This means the circuit is complete and the injector coil is good. No beep or a very high reading shows a broken coil.
Test each injector one by one. Write down the readings for comparison. Similar readings mean injectors are in good condition. Different or no readings mean injector problems.
Testing Injector Voltage
Testing injector voltage is an important step in checking fuel injectors. It helps find electrical problems that stop injectors from working. A multimeter can measure voltage to see if the injector gets power. This test shows if the wiring and connections work well. You can do this test with the engine running. It gives real-time data on the injector’s electrical system.
Locating Injector Connectors
First, find the injector connectors in the engine bay. They are usually near the fuel rail. Each injector has a small plug with two wires. These connectors deliver voltage to the injector. Look for plastic clips or covers that protect the connectors. Gently remove the clips to access the wires. Check the vehicle manual if unsure about the location. Be careful not to damage the connectors or wires.
Measuring Voltage With Engine Running
Set the multimeter to measure voltage (DC volts). Connect the multimeter’s positive probe to one wire of the injector connector. Attach the negative probe to a good ground point on the engine or chassis. Start the engine and let it idle. Watch the multimeter display for voltage readings. Voltage should vary as the injector pulses. A steady voltage or no voltage indicates a problem. Turn off the engine before disconnecting the multimeter. This test confirms if the injector receives proper electrical signals.

Credit: www.youtube.com
Common Injector Issues
Fuel injectors play a key role in engine performance. They deliver fuel into the engine for combustion. Common injector problems can cause engine issues and poor fuel economy. Knowing these issues helps you spot injector faults early. It also guides you during testing with a multimeter.
Signs Of Faulty Injectors
Rough idling is a common sign of bad injectors. The engine may shake or stall at low speeds. Poor fuel economy also points to injector problems. You might notice black smoke from the exhaust. Engine misfires can happen if injectors deliver uneven fuel. Sometimes, the car hesitates or lacks power during acceleration.
Troubleshooting Tips
Start by checking the injector’s resistance with a multimeter. A reading outside the normal range shows a faulty injector coil. Listen for clicking sounds from the injector while the engine runs. No sound could mean the injector is stuck or dead. Clean dirty injectors to improve spray patterns. Use fuel additives or remove injectors for professional cleaning. Check injector wiring and connectors for damage or loose connections. Fix any electrical issues before testing again.
When To Replace Injectors
Knowing when to replace fuel injectors is important for engine health. Faulty injectors cause poor fuel delivery and reduce engine performance. Testing injectors with a multimeter helps find problems early. This guide explains how to evaluate test results and choose the right replacement options.
Evaluating Test Results
Check the resistance reading on your multimeter. Compare it to the manufacturer’s specifications. A reading too high or too low shows a problem. Look for signs like open circuits or short circuits. Also, listen for injector clicking sounds during operation. Lack of clicking may mean the injector is stuck or dead. Use these clues to decide if replacement is needed.
Choosing Replacement Options
Select injectors that match your vehicle’s make and model. Choose parts from trusted brands to ensure quality. Consider OEM (original equipment manufacturer) injectors for best fit. Aftermarket injectors can work but check reviews carefully. Make sure the new injector’s resistance matches the specs. Proper fit and function help keep your engine running smoothly.
Frequently Asked Questions
How Do I Test Fuel Injectors With A Multimeter?
To test fuel injectors, set the multimeter to ohms. Disconnect the injector’s electrical connector and measure resistance. Compare the reading to the manufacturer’s specified range to check injector health.
What Resistance Should A Good Injector Show?
A good fuel injector typically shows resistance between 12 and 16 ohms. Values outside this range indicate a faulty injector that may need cleaning or replacement.
Can A Multimeter Detect Clogged Injectors?
No, a multimeter only measures electrical resistance. It cannot detect clogged injectors, which require flow testing or cleaning for proper diagnosis.
How To Prepare The Injector For Multimeter Testing?
Turn off the vehicle and disconnect the battery. Remove the injector’s electrical connector carefully before measuring resistance with the multimeter.
Conclusion
Testing injectors with a multimeter is a simple, useful skill. It helps find problems before they get worse. Follow the steps carefully and take your time. Good results come from patience and clear attention. This tool gives quick, clear readings to check injector health.
Practice a few times to gain confidence and skill. Keep your vehicle running smoothly by checking injectors regularly. Small checks now can save big repair costs later. Stay safe and enjoy learning this handy technique.