Are you unsure if your speaker is working properly or if it’s time for a replacement? Testing your speaker with a multimeter is easier than you might think, and it can save you time and money.
In this guide, you’ll learn simple, step-by-step instructions to check your speaker’s health quickly. By the end, you’ll have the confidence to diagnose common speaker problems on your own. Keep reading to find out how to make your multimeter your new best friend when it comes to speaker testing.
Tools Needed
Testing a speaker with a multimeter requires a few simple tools. These tools help you check the speaker’s condition quickly and accurately. Knowing what to prepare saves time and avoids frustration. Below are the essential tools you need for this task.
Choosing The Right Multimeter
Select a multimeter that can measure resistance (ohms). A digital multimeter is easier to read. It shows clear numbers on the screen. Look for a model with a range that covers 0 to 100 ohms. This range suits most speakers. Make sure the probes are in good condition. Sharp, clean probes give better contact with speaker terminals.
Additional Equipment
Besides the multimeter, you need a few extra items. Small alligator clips help hold the probes in place. This frees your hands during testing. A screwdriver may be necessary to remove speaker covers. Clean cloth or brush removes dust from terminals. Dust can affect the accuracy of your readings. Having these tools ready makes testing easier and faster.
Credit: dumin.org
Preparing The Speaker
Preparing the speaker properly makes testing easier and safer. This step avoids wrong readings and possible damage to the multimeter or speaker. Take time to get the speaker ready before measuring resistance or continuity.
Disconnecting From Devices
Unplug the speaker from all devices and power sources. Remove any wires or cables attached to it. This stops electricity flow that can affect the multimeter or cause injury. Ensure no power is running through the speaker before testing.
Inspecting For Visible Damage
Look closely at the speaker for any signs of damage. Check for tears, holes, or dents in the cone or casing. Inspect the wires and terminals for breaks or corrosion. Identifying damage helps explain test results and guides repair decisions.
Setting Up The Multimeter
Setting up the multimeter correctly is the first step to test a speaker accurately. The multimeter needs to be ready to measure the right electrical values. This setup ensures you get clear and reliable results from your speaker test. Follow these steps carefully to prepare your multimeter for the task.
Selecting The Correct Measurement Mode
Turn on the multimeter and check the dial. Choose the resistance mode, often marked as “Ω” or “Ohms.” This mode measures the speaker’s coil resistance. Avoid other modes like voltage or current, as they won’t give the correct readings for a speaker test.
Set the range to a low value if your multimeter does not auto-range. This choice helps to see small resistance values clearly. Speakers usually have low resistance, so a low range setting works best.
Calibrating The Device
Before testing the speaker, calibrate your multimeter to ensure accuracy. Touch the two test probes together. The multimeter should read zero or very close to it. If it does not, adjust the calibration knob or reset the device.
Calibration removes errors caused by the test leads or device drift. It guarantees the resistance reading matches the actual value of the speaker coil. Proper calibration is key for precise speaker testing results.
Measuring Speaker Resistance
Measuring speaker resistance is a simple way to check if your speaker works properly. Resistance tells you if the speaker coil is intact or damaged. A good speaker usually shows a resistance close to its rated impedance. Measuring resistance helps find problems before using the speaker in your system.
Locating Speaker Terminals
First, find the speaker terminals. They are the points where speaker wires connect. Usually, these are small metal tabs or screws on the speaker’s back. Some speakers have red and black terminals to show positive and negative sides. Make sure you identify these clearly before testing.
Taking Resistance Readings
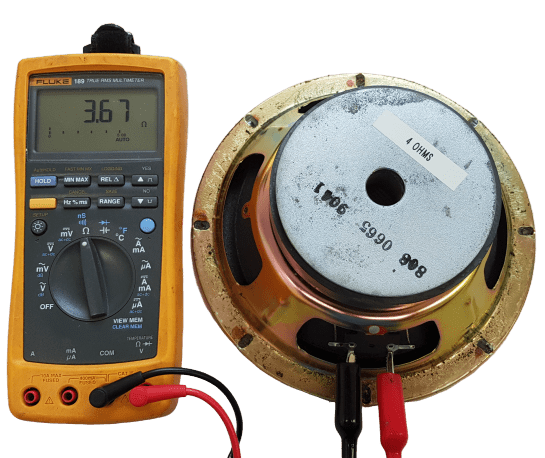
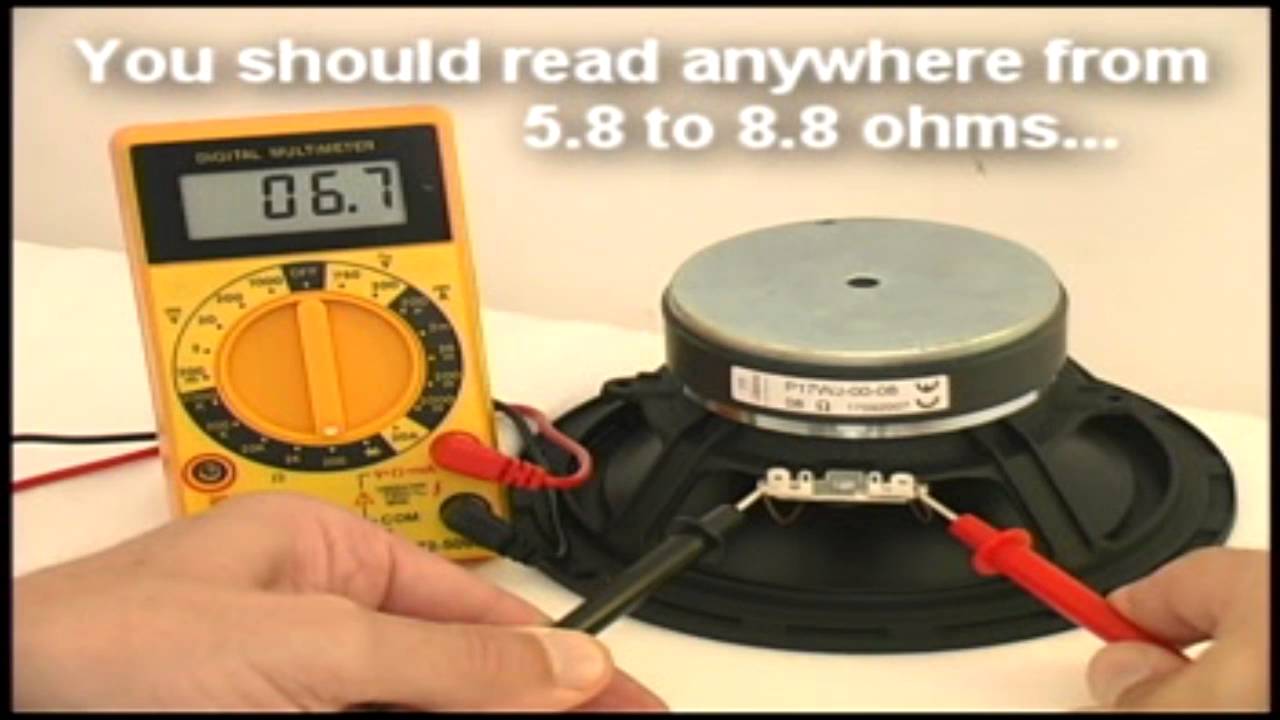
Set your multimeter to the resistance mode, often marked as “Ω”. Touch the multimeter probes to the speaker terminals. Polarity does not matter for resistance testing. Read the value shown on the screen. A typical speaker shows resistance between 3 and 8 ohms. A very high or infinite reading means a broken coil. A reading near zero means a short circuit.
Interpreting Results
After testing your speaker with a multimeter, understanding the results is key. This step tells you if the speaker works well or has issues. The readings you get help decide the next move.
Check the numbers carefully. They reveal the speaker’s health. Knowing the normal range and what signals a problem saves time and effort.
Normal Resistance Range
Most speakers show resistance between 4 and 8 ohms. This range means the speaker coil is okay. Slight changes are normal due to temperature or meter accuracy.
If your reading falls in this range, the speaker likely works fine. A stable, steady number is a good sign. It shows the coil is not broken or shorted.
Identifying Faulty Speakers
A very high or infinite resistance means the coil is broken. No continuity shows the speaker cannot pass electrical current. This is a clear sign of damage.
Low or zero resistance means a short circuit inside the speaker. This also causes problems with sound quality. The speaker needs repair or replacement.
Uneven or changing readings may indicate loose wires or bad connections. Double-check your test setup and speaker terminals in such cases.
Credit: www.tjbystre.cz
Additional Speaker Tests
After the basic speaker test, some extra checks help find hidden issues. These tests focus on the speaker’s wiring and internal parts. They use the multimeter to reveal problems not obvious at first.
Checking Continuity
Continuity shows if the wire inside the speaker is complete. It means the electrical path is unbroken. Set the multimeter to continuity mode. Touch the probes to the speaker terminals. A beep or low resistance means good continuity. No beep or infinite resistance means a break inside the speaker wire.
Testing For Short Circuits
A short circuit means wires touch where they should not. This causes sound problems or no sound at all. Set the multimeter to resistance mode. Check between the speaker terminals and the speaker frame or metal parts. A low resistance reading here shows a short circuit. This needs repair or replacement of the speaker.
Troubleshooting Tips
Testing a speaker with a multimeter can be simple if you follow the right steps. Sometimes, you might face problems while taking measurements. Troubleshooting tips help fix these issues quickly. They also prevent wrong readings that can confuse you. Use these tips to get accurate results and save time.
Common Measurement Errors
One common error is not setting the multimeter to the correct mode. Always use the ohm setting for speaker tests. Another mistake is touching the metal probes together while measuring. This causes false readings. Also, poor contact between probes and speaker terminals can give wrong results. Check the multimeter battery. A low battery can affect accuracy. Avoid measuring speakers while they are connected to an amplifier. This can damage your multimeter or speaker.
When To Seek Professional Help
Some speaker problems need expert attention. If you find inconsistent readings after multiple tests, call a technician. Complex speaker systems with built-in crossovers might confuse basic tests. Physical damage like torn cones or broken wires needs repair by a pro. Also, if the speaker still does not work after testing, professional help is best. Experts have tools and skills for deeper diagnosis.

Credit: www.ifixit.com
Frequently Asked Questions
How Do I Test A Speaker With A Multimeter?
To test a speaker, set your multimeter to the ohms setting. Connect the probes to the speaker terminals. A good speaker usually shows resistance between 4 to 8 ohms.
What Resistance Should A Speaker Show On A Multimeter?
A working speaker typically shows a resistance of 4 to 8 ohms. Readings outside this range may indicate speaker damage or disconnection.
Can A Multimeter Detect Speaker Coil Damage?
Yes, a multimeter can detect coil damage by measuring resistance. An infinite or zero reading suggests a broken or shorted coil.
Is It Necessary To Remove The Speaker Before Testing?
It’s best to remove the speaker for accurate testing. This prevents interference from other components affecting the resistance measurement.
Conclusion
Testing a speaker with a multimeter helps find common problems fast. You only need a few simple steps to check if the speaker works. This method saves time and money on repairs. Keep your multimeter ready for quick checks anytime.
Knowing how to test speakers makes fixing sound systems easier. Try these tips to keep your audio gear in good shape. Practice a few times, and you will gain confidence. Simple tools can make a big difference in sound quality.