Testing a 2 pin ignition coil with a multimeter is a smart way to check if your car or motorcycle’s ignition system is working well. The ignition coil is a key part of any gasoline engine. It takes the low voltage from your battery and turns it into a high voltage spark for your spark plugs. When this part fails, your engine might not start, run rough, or misfire. Knowing how to test a 2 pin ignition coil can help you fix problems faster, save money, and avoid unnecessary replacement. You don’t need to be a professional mechanic—just a bit of patience, basic tools, and the right steps.
In this article, you will learn everything you need to know about testing a 2 pin ignition coil with a multimeter. You’ll see clear, step-by-step instructions, what results to expect, and how to read them. You will also find practical tips, common mistakes, real examples, and answers to questions that confuse many beginners.
By the end, you’ll feel confident to test your ignition coil, understand your results, and know what to do next.
Understanding The 2 Pin Ignition Coil
Before you start testing, it’s important to know what a 2 pin ignition coil is and how it works. This basic knowledge will make your testing more accurate and help you understand your results.
A 2 pin ignition coil is a type of coil with two electrical connections (pins). These are usually found in older cars, motorcycles, and small engines. The two pins are:
- Positive (+): Connects to the battery or ignition switch, supplying power.
- Negative (–): Connects to the ignition control module or ground.
Inside, the coil has two main windings:
- Primary winding: Receives battery voltage (12V).
- Secondary winding: Creates high voltage (thousands of volts) for the spark plug.
When the ignition switch turns on, current flows through the primary winding. When the ignition module or breaker interrupts this flow, a high voltage is created in the secondary winding. This high voltage is sent to the spark plug, making the spark that ignites the fuel.
Common Signs Of A Bad Ignition Coil
Knowing the symptoms of a bad coil helps you decide when to test it. Here are some clear signs:
- Engine misfires or runs rough
- No spark at the spark plug
- Hard starting or no start at all
- Poor fuel economy
- Check engine light is on
- Backfiring or unusual noises
If you notice these, it’s time to test your coil with a multimeter.
Tools And Equipment You Need
Testing a 2 pin ignition coil is not complicated, but you need the right tools. Here’s what you should have:
- Digital Multimeter: Measures resistance (ohms) and voltage.
- Wrench or Screwdriver: To remove the coil from the vehicle.
- Service Manual or Spec Sheet: To find the correct resistance values for your coil.
- Gloves and Safety Glasses: For safety when working around electrical parts.
- Clean Cloth: To wipe connectors and avoid false readings.
A digital multimeter is the best tool for this job because it’s accurate and easy to use. If you only have an analog multimeter, that’s okay, but digital is preferred.
Credit: www.marineengine.com
Safety Precautions Before Testing
Working with ignition coils means you’re dealing with electricity. Even when the engine is off, some components can store high voltage. Follow these safety tips:
- Turn off the ignition and remove the key before testing.
- Disconnect the battery if you need to remove the coil.
- Never test for spark by holding the plug wire with your hand.
- Work in a well-ventilated area to avoid fumes.
- Wear insulated gloves if possible.
- Keep metal tools away from coil terminals to avoid short circuits.
Many beginners forget that ignition coils can store charge like a capacitor. Always wait a few minutes after turning off the ignition before touching the coil.
Step-by-step Guide: How To Test A 2 Pin Ignition Coil With A Multimeter
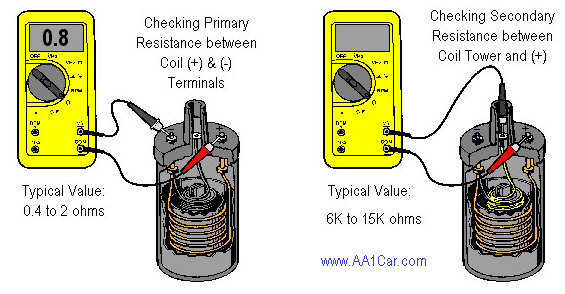
Testing your 2 pin ignition coil involves two main checks: primary resistance and secondary resistance. Here’s how to do it:
1. Remove The Ignition Coil
- Locate the ignition coil. It’s usually near the engine, connected by two wires and a high voltage wire to the distributor or spark plug.
- Label the wires if needed, so you remember where they go.
- Use a wrench or screwdriver to remove the coil.
2. Set Up Your Multimeter
- Turn the multimeter dial to the ohms (Ω) setting.
- If your multimeter has multiple ranges, choose the lowest setting (e.g., 200Ω).
3. Measure Primary Resistance
- Find the two small terminals (pins) on the coil. These are usually labeled + and –.
- Touch one probe to the + terminal and the other to the – terminal.
- Read the value on the multimeter.
Normal primary resistance for most 2 pin coils is between 0.3Ω and 2Ω. (Check your service manual for exact values.)
If your reading is:
- Within range: The primary winding is good.
- Much lower (0 or near 0Ω): The coil is shorted.
- Much higher (infinite or open circuit): The coil is open.
4. Measure Secondary Resistance
- Find the high voltage terminal (where the spark plug wire connects).
- Touch one probe to the – terminal and the other to the high voltage terminal.
- Read the resistance.
Normal secondary resistance is usually 6,000Ω to 15,000Ω (6kΩ to 15kΩ).
If your reading is:
- Within range: The secondary winding is good.
- Zero or near zero: The coil is shorted.
- Infinite or no reading: The coil is open.
5. Compare Your Results
Now, check your readings against the manufacturer’s specifications. If both primary and secondary resistance are within range, your coil is likely good. If either is out of range, the coil is faulty and should be replaced.
6. Reinstall The Coil
- Reconnect all wires.
- Tighten bolts or screws securely.
- Reconnect the battery and start the engine to test.
Example Readings
Here’s a quick summary of what your readings might look like:
| Test Point | Expected Reading | Action Needed |
|---|---|---|
| Primary (+ to -) | 0.3Ω – 2Ω | Good |
| Primary (+ to -) | 0Ω or infinite | Replace coil |
| Secondary (- to HV) | 6kΩ – 15kΩ | Good |
| Secondary (- to HV) | 0Ω or infinite | Replace coil |
Always compare with your vehicle’s manual, as values may vary.
Interpreting Multimeter Readings
Reading a multimeter can be confusing for beginners. Let’s break down what each result means and what to do next.
Low Primary Resistance (near 0ω)
This means the coil is shorted. The insulation between wires is broken, and the coil cannot build up a magnetic field. The only fix is replacement.
High Primary Resistance (infinite Or Ol)
This indicates an open circuit. The wire is broken inside the coil, so no current can flow. Again, replace the coil.
Correct Primary Resistance
If your reading is within the specified range, the primary winding is fine. Move to the secondary test.
Secondary Resistance Out Of Range
If you see 0Ω or infinite resistance, your coil’s secondary winding is faulty. If the reading is slightly higher or lower than spec, the coil may work for a while, but it will likely fail soon.
Real-world Example
Let’s say you have a motorcycle with starting issues. You test the coil:
- Primary resistance: 0.8Ω (spec is 0.5–2.0Ω) – Good.
- Secondary resistance: 11,000Ω (spec is 6,000–15,000Ω) – Good.
The coil is fine. Check other parts, like the spark plug or CDI unit.
But if your secondary resistance was 25,000Ω, the coil is failing and should be replaced.
Common Mistakes To Avoid
Many beginners make errors when testing ignition coils. Here are some common mistakes and how to avoid them:
- Not zeroing the multimeter: Some meters have resistance in the leads. Touch the leads together and subtract this value from your reading.
- Testing on a hot coil: Heat can affect readings. Let the coil cool before testing.
- Confusing terminals: Always check which pin is positive and negative before testing.
- Ignoring the service manual: Always check the correct resistance values for your coil.
- Skipping the secondary test: Some people only test the primary winding, missing secondary faults.
- Not cleaning terminals: Dirty or corroded terminals can give false readings.
- Testing with the coil connected: Other parts in the circuit can affect your readings. Test the coil removed from the engine.

Credit: www.youtube.com
Why Resistance Matters In Ignition Coils
You might wonder why you measure resistance at all. Resistance tells you if the wire inside the coil is continuous or broken. A coil has thousands of turns of very fine wire. If the wire is broken (open) or melted together (short), the coil cannot work.
Higher resistance means the wire is too thin or broken; zero resistance means a short circuit. Both will stop your engine from running properly.
How 2 Pin Coils Compare To Other Types
Not all ignition coils are the same. Some have 3 or 4 pins, with built-in electronics. Here’s a quick comparison:
| Coil Type | Pins | Main Use | Testing Steps |
|---|---|---|---|
| 2 Pin | 2 | Older cars, motorcycles | Simple, resistance test |
| 3 Pin | 3 | Modern cars with ECU | Resistance + signal test |
| 4 Pin | 4 | Direct ignition, coil-on-plug | Advanced, needs oscilloscope |
2 pin coils are the easiest to test with a basic multimeter.

Credit: forum.miata.net
When To Replace Your Ignition Coil
Even if your coil passes the resistance test, it might still fail under real-world conditions. Here are signs that you should replace it:
- Intermittent misfire: Works sometimes, fails when hot.
- Cracks or burn marks: Visible damage on the coil.
- Old age: More than 5–10 years old.
- Failed voltage test: Coil does not produce spark even if resistance is good.
If you are not sure, replace the coil with a high-quality part. Cheap or low-quality coils can cause more problems later.
Advanced Testing: Voltage Drop And Output Test
For a deeper test, you can check the coil’s actual voltage output, but this needs special tools (spark tester, oscilloscope). For most DIY users, a resistance test is enough. If you want to go further:
- Use a spark tester to see if the coil fires a spark.
- Use an oscilloscope to check coil waveforms.
But remember, never test for spark by holding wires close to the engine. It’s dangerous and can damage electronic parts.
Practical Tips For Reliable Testing
- Test when the engine is cold and hot: Some coils only fail when hot.
- Check wiring and connectors: Sometimes the problem is a loose wire, not the coil.
- Label everything: When removing parts, label wires to avoid confusion.
- Keep records: Write down your readings for future reference.
A common insight many miss: Even a coil that tests “good” might not work under load. Always trust your engine’s symptoms and test results together.
Case Study: Diagnosing A Hard Start Problem
Imagine you have a small engine that’s hard to start. You suspect the ignition coil. Here’s how the process goes:
- Remove the coil and test primary resistance: 1.1Ω (within spec).
- Test secondary resistance: Infinite (no reading).
- Check the coil visually: No cracks or burns.
The primary is good, but secondary is open. The coil will not send voltage to the spark plug, so the engine won’t start. Replace the coil.
But suppose both readings are in spec. The next step is to check the spark plug, wiring, and ignition switch. This shows why step-by-step testing is important.
Cost Of Replacing A 2 Pin Ignition Coil
The price of a 2 pin ignition coil can range from $10 to $60 for most motorcycles and small engines. For some cars, it can be higher. Labor costs are usually low because replacement is simple.
Here’s a comparison of estimated costs:
| Vehicle Type | Coil Price | Labor (DIY) | Labor (Shop) |
|---|---|---|---|
| Motorcycle | $10 – $30 | Free | $20 – $50 |
| Small car | $20 – $60 | Free | $50 – $120 |
Testing before replacing can save you money by avoiding unnecessary parts.
Real-world Insights: What Many Beginners Miss
- Coil failure can be temperature-related. Some coils only fail when hot. Always test both cold and after running the engine.
- Wiring problems look like coil failure. Loose, corroded, or broken wires can cause the same symptoms as a bad coil. Always check connectors and grounds.
- Resistance tests are not 100% foolproof. A coil may show good resistance but still fail under high voltage. Combine resistance testing with spark testing for best results.
- Use the right specs. Each coil model can have different resistance values. Using the wrong specs can cause you to replace good coils by mistake.
- Document your steps. Keep track of what you tested and the results. This helps you or a mechanic later if more problems appear.
Frequently Asked Questions
How Do I Know If My 2 Pin Ignition Coil Is Bad Without A Multimeter?
You may notice symptoms like engine misfire, no spark, or hard starting. However, the only sure way is to test with a multimeter or use a known-good coil for comparison.
Can I Test A 2 Pin Ignition Coil Without Removing It?
Yes, you can test the coil while it’s still in place, but remove at least one wire from each terminal to avoid interference from other circuit parts. For the most accurate test, remove the coil.
What Should I Do If My Readings Are Close But Not Exactly Within Spec?
If your readings are slightly above or below the specified range, the coil may still work but could fail soon. If you have starting or misfiring issues, replace the coil.
Is It Safe To Test For Spark By Holding The Plug Wire Close To The Engine?
No, it’s not safe. This can shock you or damage sensitive electronics. Always use a proper spark tester or multimeter for testing.
Where Can I Find The Correct Resistance Values For My Ignition Coil?
The best source is your vehicle’s service manual or the coil manufacturer’s datasheet. You can also check reliable online resources like Wikipedia for general values, but always use the exact specs for your model.
Testing a 2 pin ignition coil with a multimeter is a simple but powerful way to diagnose ignition problems. By following the steps above, using the right tools, and avoiding common mistakes, you can keep your engine running smoothly and save time and money on repairs.
If you’re unsure at any step, consult a professional mechanic or your vehicle’s manual for guidance. With practice, you’ll become confident in diagnosing and fixing ignition coil issues yourself.