Checking a 5V reference with a multimeter may sound like a simple step, but it’s a vital skill for anyone working with electronics. A stable 5V reference is the backbone of many circuits, from sensors in cars to the heart of microcontroller projects.
If this reference is off, even by a little, your whole system can behave in strange ways. Whether you’re a hobbyist, a technician, or a student, knowing how to test a 5V reference correctly can save you hours of troubleshooting later.
But there’s more to the process than just “connect and read. ” Understanding what a reference voltage is, why it matters, how to avoid common errors, and what to do with your results will make your measurements accurate and meaningful.
This article will guide you through the step-by-step process, explain the reasons behind each action, and help you interpret what you see. By the end, you’ll feel confident checking any 5V reference—no guesswork, just results.
What Is A 5v Reference And Why Does It Matter?
A 5V reference is a stable voltage source used as a standard in electronic circuits. Its main job is to set a known voltage for components like analog-to-digital converters (ADCs), sensors, and voltage regulators. Without a reliable reference, your sensors may give wrong data, or your microcontroller could misread signals.
For example, in an automotive ECU, a 5V reference ensures that the engine sensors report accurate values. In a microcontroller project, 5V is often the “high” logic level. If your 5V reference drifts to 4.5V, an ADC could misinterpret sensor values, causing faults.
A good 5V reference should be:
- Stable: Does not change with time or temperature.
- Accurate: As close as possible to 5.00V.
- Low noise: No sudden jumps or spikes.
Small errors can cause big problems. Imagine a temperature sensor reading 80°C instead of 70°C because of a weak reference. This is why checking the 5V reference is not just routine—it’s essential.
Understanding Your Multimeter
Before measuring, you need to know your tool. The digital multimeter (DMM) is the most common device for checking voltages. But not all multimeters are the same.
Key Features That Matter
- DC Voltage Range: Make sure your meter can measure at least 0-20V DC.
- Resolution: How many decimal places does it show? More is better for small errors.
- Accuracy: Check the manual—accuracy is usually given as a percentage (e.g., ±0.5%).
- Input impedance: Higher (e.g., 10MΩ) means less effect on the circuit you’re testing.
Some cheap multimeters may show the right number but are not accurate. If you need precise results (like in medical or automotive work), use a meter with a good reputation.
Analog Vs. Digital Multimeters
Digital meters are most common because they are easier to read and usually more accurate. Analog meters use a needle and are less precise for small voltage measurements. Always use a digital meter for checking a 5V reference.
How To Check Your Multimeter’s Health
A broken meter gives wrong readings. Test your multimeter on a known battery (like a new AA battery, which should be about 1. 5V) before you measure anything important. If it’s off by more than 0. 05V, consider replacing the battery or calibrating the meter.

Credit: www.reddit.com
Preparing To Measure The 5v Reference
Taking the right steps before testing will help you avoid mistakes and stay safe.
Safety Checks
- Power Off: Before connecting probes, make sure the circuit is safe to touch.
- Inspect Leads: Check for cracks, broken wires, or loose tips on your meter leads.
- Hands Dry: Wet hands can cause a shock or damage components.
- No Metal Jewelry: Remove rings or bracelets that might touch live circuits.
Identify The 5v Reference Point
Look at your circuit’s schematic or manual. The 5V reference is usually labeled as “Vref,” “5V REF,” or just “5V. ” In cars, it might be a specific pin on the ECU connector. On microcontroller boards, it’s often marked on the PCB.
Circuit Must Be Powered
To measure the reference voltage, the circuit must be powered on. Make sure you connect your power supply or battery, and that the system is in its normal operating state.
Ground Reference
You need a good ground point. This is often marked “GND” on the board or is the negative side of the power supply. Poor grounding will give you false readings.
Step-by-step: How To Check 5v Reference With Multimeter
Follow these steps to get an accurate voltage reading.
- Set Your Multimeter
- Turn the dial to “DC Voltage” (often marked V⎓).
- Select the range just above 5V (for example, 20V). Many meters are auto-ranging.
- Connect the Black Probe
- Attach the black (negative) probe to the circuit ground. Use an alligator clip if possible for stability.
- Touch the Red Probe
- Touch the red (positive) probe to the 5V reference point. Be gentle—don’t slip and short anything.
- Read the Display
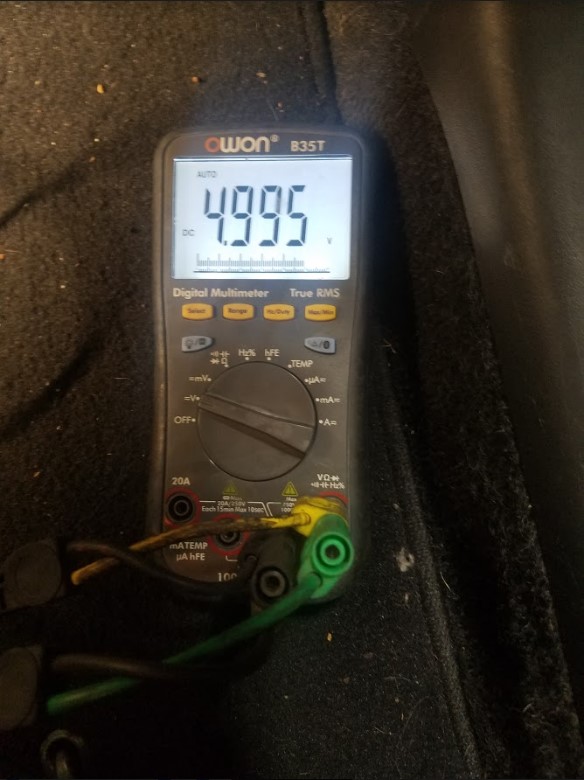
- Look at the number. A good reference should read close to 5.00V (often between 4.95V and 5.05V).
- Record the Value
- Write down the voltage. This helps if you need to compare later or spot trends.
Example: Checking 5v Reference On An Arduino
- Power on the Arduino.
- Connect the black probe to the GND pin.
- Touch the red probe to the “5V” pin.
- The meter should read about 5.00V. If it shows 4.8V or 5.2V, something may be wrong.
Common Mistakes (and How To Avoid Them)
- Measuring AC by Mistake: If the dial is on “AC” instead of “DC,” you’ll get a wrong or zero reading.
- Bad Ground: If your ground connection is loose, the voltage will be unstable.
- Touching the Wrong Pin: Double-check your reference point—never guess.
- Not Waiting: Some circuits take a few seconds to stabilize after power-up.
Interpreting Your Results
The reading you see is just the start. What does it mean, and when should you worry?
What Is An Acceptable Range?
Most circuits work fine if the reference is within ±0.05V of 5.00V (so, 4.95V to 5.05V). High-precision systems may need even tighter tolerance.
- 4.95V to 5.05V: Normal range for most uses.
- 4.90V to 5.10V: Still works for many devices, but check the design specs.
- Below 4.90V or above 5.10V: May cause errors or damage sensitive components.
When To Investigate Further
If your reading is outside the normal range:
- Check your multimeter on a known voltage.
- Make sure your probes are touching the right points.
- Try measuring on another part of the circuit.
If it’s still off, the reference circuit may be failing or overloaded.
Example: Sensor Error Due To Low Reference
Suppose you have a temperature sensor that needs a 5V reference. If your reference drops to 4. 8V, the sensor output will be lower than expected. The microcontroller might report a low temperature, even if it’s not true.
Causes Of Incorrect 5v Reference Readings
If the reference is wrong, you need to know why.
1. Faulty Voltage Regulator
The voltage regulator is the chip or circuit that creates the 5V reference. If it’s failing, the output can drift or become noisy.
2. Overloaded Reference
Too many devices drawing power from the reference line can pull the voltage down. For example, connecting extra sensors to a 5V line not designed to handle the load.
3. Bad Connections
A loose or corroded connector can cause voltage drops, especially in cars or outdoor equipment.
4. Power Supply Issues
If your main supply (like a 12V battery or wall adapter) is weak, the 5V reference may also sag.
5. Damaged Components
Short circuits or failed parts (like a leaky capacitor) can pull the reference voltage up or down.
Diagnosing The Problem
- Try disconnecting loads to see if the voltage returns to normal.
- Inspect connectors for dirt or corrosion.
- Check the main power input to the voltage regulator.
Advanced Tips For Accurate Measurement
Getting a good reading is about more than just connecting probes. Small details matter.
Use Fresh Batteries In Your Multimeter
Weak meter batteries can cause incorrect readings. If you see flickering or odd numbers, replace the battery.
Avoid Measuring Near Strong Electromagnetic Fields
High-frequency signals (like those near motors or transformers) can add noise. If possible, measure with the circuit powered but idle.
Calibrate Your Meter Annually
Professional meters should be calibrated yearly. For home use, compare with a known voltage source like a fresh 9V battery.
Compare With A Second Meter
If you doubt your reading, check with another multimeter. If both show the same value, you can trust the result.
Use Fine Probes
For small or crowded boards, use fine-tip probes. This prevents accidental shorts and lets you touch small test points.
Comparing Types Of 5v References
Not all 5V sources are made equal. Here’s a quick comparison of common 5V reference types:
| Type | Stability | Precision | Common Use |
|---|---|---|---|
| Linear Regulator (e.g., 7805) | Good | Medium | General electronics |
| Switching Regulator | Very Good | Medium | Power supplies, battery projects |
| Precision Reference IC | Excellent | High | Sensors, ADCs, lab equipment |
| Microcontroller Internal Reference | OK | Low | Cheap or simple projects |
Non-obvious insight: Using a precision reference IC can improve measurement accuracy in sensor circuits, but only if your multimeter is also precise.
Credit: www.scannerdanner.com
How To Test 5v Reference Under Load
Sometimes, a 5V reference looks fine with no load, but drops when you connect devices. This test helps you see if the reference can handle real work.
- Power the Circuit
- Connect a Small Load (like a 1kΩ resistor between 5V and ground).
- Measure Voltage Again
If the voltage drops more than 0. 05V with the load, your reference is too weak. Try a stronger voltage regulator or reduce the load.
Why Test Under Load?
Some circuits pass the “no-load” test but fail in real use. Always check the reference with the system running as normal.
Using A Multimeter Vs. Oscilloscope
A multimeter shows average voltage. An oscilloscope shows voltage changes over time.
| Tool | Shows Average Voltage | Shows Noise/Spikes | Best For |
|---|---|---|---|
| Multimeter | Yes | No | Simple voltage checks |
| Oscilloscope | Yes | Yes | Detecting noise, ripple |
Non-obvious insight: If your circuit is failing randomly, but your multimeter shows 5.00V, check with an oscilloscope. Noise or ripple could be the hidden problem.
Real-world Example: Diagnosing A Faulty Ecu Reference
An automotive technician found that a car’s sensors were acting “strange” at random times. Using a multimeter, the 5V reference read 4. 6V—too low. After checking loads, they found a sensor shorting internally. Replacing the sensor restored the reference to 5.
00V, and the car ran smoothly.
This shows the importance of checking the 5V reference whenever you see odd sensor readings.
Practical Troubleshooting Steps
If your 5V reference is wrong, follow these steps:
- Check the Multimeter
- Test on a known battery.
- Inspect Connections
- Look for loose wires, corroded pins, or cold solder joints.
- Test With and Without Load
- Remove devices and see if the voltage rises.
- Check Main Supply Voltage
- Low input can affect the reference.
- Feel for Hot Components
- A hot voltage regulator may be overloaded.
- Replace Suspect Parts
- Swap the regulator, capacitor, or sensor if you suspect failure.
How To Maintain A Healthy 5v Reference
- Use quality voltage regulators and parts.
- Don’t overload the reference line.
- Keep contacts clean and dry.
- Check the reference regularly, especially before critical work.
- Use surge protection in noisy environments.
When To Seek Professional Help
If you’ve checked everything and the reference is still wrong, or if you see burnt parts, strong smells, or smoke—stop. Damaged circuits can be dangerous. Contact a qualified technician.
Summary
Measuring a 5V reference with a multimeter is a simple but powerful way to check the health of your circuit. Take your time, follow the right steps, and interpret your results carefully. Remember, small voltage errors can cause big system problems.
With the right skills, you can spot and fix issues before they cause trouble.
If you want more technical details about voltage references, visit the Wikipedia Voltage Reference page.
Frequently Asked Questions
How Accurate Does My Multimeter Need To Be For Checking A 5v Reference?
For most electronics work, a meter with ±0.5% accuracy is enough. For high-precision jobs (like lab equipment or medical devices), use a meter with ±0.1% or better accuracy.
What Should I Do If My 5v Reference Reads Low?
First, check your multimeter on a known source. If the meter is fine, inspect the circuit for overloaded lines, bad connectors, or failing regulators. Try disconnecting loads to see if the voltage returns to normal.
Can I Use Any Ground Point In The Circuit For Measurement?
It’s best to use the designated ground near the voltage reference for the most accurate reading. Avoid using far-away grounds, as voltage drops can cause errors.
Why Does The Voltage Change When I Connect A Load?
If the reference voltage drops under load, your regulator may be too weak or the line overloaded. Check the load rating of your regulator and reduce the number of devices sharing the 5V line.
Is A Small Fluctuation In The 5v Reference Normal?
Tiny changes (less than 0.01V) are normal, especially as the circuit warms up. Big swings or constant noise are not normal and mean you should check for faulty components or power supply issues.
With these steps and tips, you’re now ready to check any 5V reference with confidence and accuracy.

Credit: www.youtube.com