Can You Test Capacitor With Multimeter
A capacitor is a small but important electronic part. It stores and releases electric energy, helping circuits work smoothly. But what if a capacitor stops working? Knowing how to test a capacitor can save time and money. Many people wonder: Can you test a capacitor with a multimeter? The answer is yes, but there are a few things you must know first.
This guide will show you how to test different types of capacitors using a multimeter. You will learn the tools you need, the right steps to follow, and how to understand the results. You will also discover common mistakes, safety tips, and real-life examples.
By the end, you will feel confident testing most capacitors you find at home or in the workshop.
What Is A Capacitor And Why Test It?
A capacitor is an electronic component that stores electricity for a short time. It is often used to smooth out power, filter signals, or start motors. You can find capacitors in TVs, fans, air conditioners, computers, and almost every electronic device.
Over time, capacitors can wear out or get damaged. Faulty capacitors cause many electronic problems, such as:
- Devices not turning on
- Motors not starting
- Flickering screens
- Unusual noises
Testing a capacitor helps you find out if it is still good or needs replacing. If you skip this step, you might change the wrong part or waste money on repairs.
Types Of Capacitors You Might Test
There are many types of capacitors, but the most common are:
- Electrolytic capacitors: Usually larger, often found in power supplies and audio equipment.
- Ceramic capacitors: Small, disk-shaped, found on circuit boards.
- Film capacitors: Used in power and signal applications, often rectangular or box-shaped.
- Tantalum capacitors: Compact, used in small devices.
- Motor start/run capacitors: Found in fans, air conditioners, and pumps.
Each type may require a slightly different test method, but the main ideas are similar.

Credit: www.fluke.com
Understanding Multimeters: Your Main Tool
A multimeter is a device that can measure voltage, current, and resistance. Some multimeters also measure capacitance directly. There are two main types:
- Analog multimeter: Has a needle that moves across a scale.
- Digital multimeter (DMM): Shows readings on a digital display.
Not all multimeters can measure capacitance. Most basic ones can measure resistance and voltage, which is enough for simple tests. If your multimeter has a “capacitance” setting, testing becomes more precise.
Main Features To Look For
- Resistance (ohms, Ω) mode: Needed for the basic test.
- Capacitance (F, µF, nF) mode: If available, this gives more direct results.
- Voltage mode: Used for checking if the capacitor is charged.
- Auto-ranging: Makes it easier to get a correct reading.
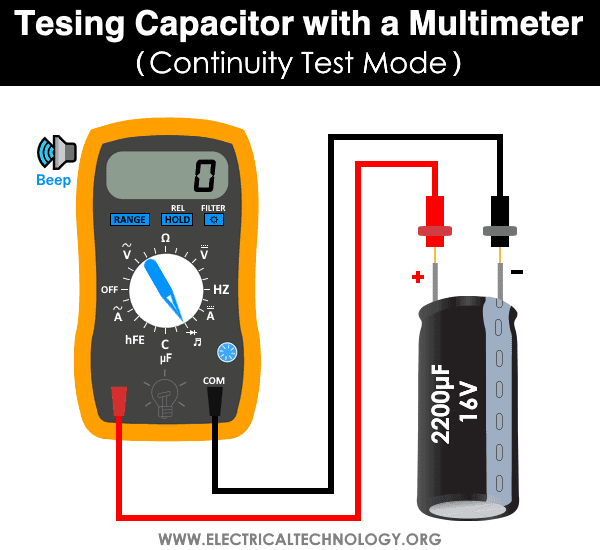
Some advanced models also beep for continuity, which helps find short circuits.
Why Test A Capacitor With A Multimeter?
You may ask, why not just replace the capacitor? There are good reasons to test first:
- Saves money: No need to buy new parts if old ones are fine.
- Saves time: Quickly find faulty parts without guessing.
- Avoids extra repairs: Replacing the wrong part can cause more problems.
- Checks in-circuit parts: Sometimes, you cannot remove the capacitor easily.
Testing with a multimeter is a fast way to check most capacitors, especially if you do not have special tools.
Credit: www.electricaltechnology.org
Safety Precautions Before Testing
Testing capacitors is safe if you follow the right steps. But capacitors can store dangerous voltage, even when the device is off. A shock from a large capacitor can be harmful.
Before you start:
- Always unplug or turn off the device.
- Discharge the capacitor before touching it.
- Wear safety glasses and use insulated tools.
- Do not touch both terminals with your hands.
How to discharge a capacitor:
- Use a resistor (10kΩ, 2W) or a screwdriver with an insulated handle.
- Touch the resistor or screwdriver across the two capacitor leads for a few seconds.
- For large capacitors, repeat the process or use a voltage meter to check.
Never skip this step. For high-voltage capacitors (in microwaves, TVs), extra care is needed. If you are not sure, ask a professional.
Tools And Materials Needed
To test a capacitor with a multimeter, you need:
- A digital or analog multimeter
- Insulated screwdriver or discharge tool
- Safety glasses
- Soldering iron (if you need to remove the capacitor)
- Alligator clips (optional, for easy connection)
- Notepad (for writing down values)
Having all tools ready makes the process smooth and safe.
Credit: www.electricaltechnology.org
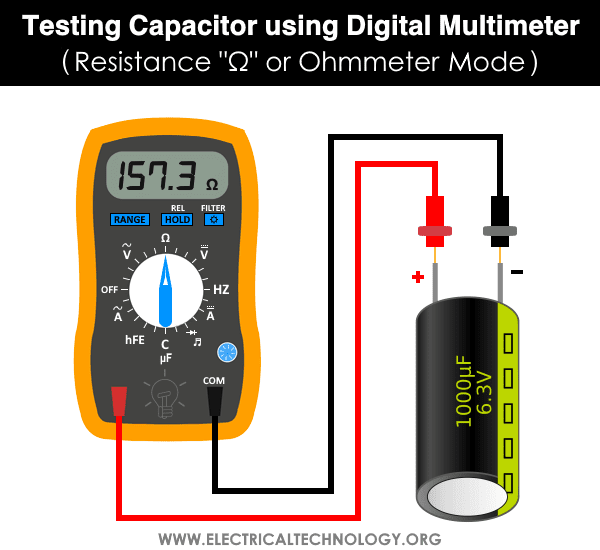
How To Test A Capacitor With A Multimeter (resistance/ohm Test)
Even if your multimeter does not measure capacitance, you can still test most capacitors using the resistance (ohm) setting. This method works best for electrolytic capacitors.
Follow these steps:
- Discharge the capacitor: Always do this first. Use a resistor or insulated tool.
- Remove from circuit (if possible): If you leave the capacitor connected, other parts may affect the reading.
- Set the multimeter to resistance (Ω): Choose a mid-range or high resistance range (e.g., 10kΩ or higher).
- Connect probes: Touch the black (COM) probe to one lead and the red (VΩ) probe to the other.
- Observe the reading:
- At first, the display shows low resistance (the capacitor charges).
- The number should quickly rise and finally show “OL” (open line) or a very high value.
- Reverse the probes and repeat. The same thing should happen.
What Results Mean
- Normal capacitor: Shows low resistance at first, then quickly increases to infinity or “OL.”
- Shorted capacitor: Shows very low resistance that does not change.
- Open capacitor: Shows no movement or always “OL.”
- Leaky capacitor: Shows a resistance that stays low or does not reach infinity.
This test does not show exact capacitance, but it helps you spot bad capacitors quickly.
Real-world Example
Suppose you test a 470µF, 25V capacitor from a power supply. After discharging and removing it, you connect your multimeter. The display jumps from 1kΩ to 10kΩ, then slowly climbs to “OL. ” This is a good sign. But if it stays at 50Ω, the capacitor is shorted and must be replaced.
How To Test A Capacitor With A Multimeter (capacitance Test)
If your multimeter has a capacitance setting (often shown as “F” for farads, “µF,” or “nF”), you can measure the actual value.
Steps:
- Discharge the capacitor: Never skip this step.
- Remove the capacitor: For accurate readings, take it out of the circuit.
- Set the multimeter to capacitance mode.
- Connect the probes: Place the leads in the correct slots or touch the probes to the capacitor’s leads.
- Read the value: Wait for the number to stabilize.
How To Compare Results
Check the value shown on your multimeter against the value printed on the capacitor. Most capacitors have a tolerance of ±10% to ±20%.
If the value is:
- Within tolerance: The capacitor is good.
- Much lower: The capacitor is losing capacity (degraded).
- Zero or very high: The capacitor is open or faulty.
Practical Example
You test a 10µF, 50V capacitor. The multimeter shows 9. 6µF. Since this is within 10% of the label, the capacitor is fine. If the reading is 1. 5µF, the part is no longer good.
Testing Non-polarized And Small Value Capacitors
Testing ceramic or film capacitors is a bit trickier. The resistance test may not work well because these capacitors charge and discharge very fast, making the meter needle or display barely move.
For these, use the capacitance mode if possible. If your multimeter does not have this feature, you can:
- Use a specialized ESR meter.
- Test for short circuits (infinite or very low resistance).
- Replace with a known good capacitor and check if the circuit works.
Small value capacitors are hard to test without special tools, but you can still check for shorts or opens.
In-circuit Vs Out-of-circuit Testing
You get more accurate results when the capacitor is out of the circuit. Other components can change the reading or hide faults.
However, sometimes you cannot remove the capacitor, especially on big circuit boards. In these cases:
- Use the resistance test as a quick check.
- For more exact results, desolder one lead of the capacitor.
Pro Tip: If you get a strange reading, always test again after removing the capacitor from the board.
Common Testing Problems And How To Solve Them
Even experienced technicians make mistakes. Here are issues you may face:
- Meter always shows “OL”: Check if the capacitor is open or the probes are not connected well.
- Reading does not change: Try switching probe positions or use a different range.
- Value jumps: The capacitor may not be fully discharged, or there is a bad connection.
- Cannot get a reading: Some capacitors are too small for basic meters. Use a dedicated tester.
Tip: Always double-check your connections and discharge the capacitor before each test.
How To Read Capacitor Values
Capacitor values are printed in different ways:
- Direct value: “1000µF, 16V” (microfarads, voltage)
- Code: “104” means 100,000pF or 0.1µF
- Tolerance: “±10%” or letter code (K = ±10%, M = ±20%)
Some parts show values in nanofarads (nF) or picofarads (pF). Knowing how to read these helps you compare test results.
Capacitor Value Conversion Table
Here’s a quick reference for converting values:
| Unit | Symbol | Equivalent in Farads | Example |
|---|---|---|---|
| Microfarad | µF | 0.000001 F | 10µF = 0.00001 F |
| Nanofarad | nF | 0.000000001 F | 220nF = 0.00000022 F |
| Picofarad | pF | 0.000000000001 F | 470pF = 0.00000000047 F |
Note: Always match the symbol to your multimeter’s display.
Comparing Analog And Digital Multimeters For Capacitor Testing
Both analog and digital multimeters can help, but each has pros and cons.
| Feature | Analog Multimeter | Digital Multimeter |
|---|---|---|
| Ease of use | Needs practice (reading needle) | Easy (digital display) |
| Accuracy | Good for trend (not exact value) | High (shows numbers directly) |
| Capacitance mode | No | Some models have it |
| Battery life | Long | Shorter (uses LCD) |
| Price | Usually cheaper | Varies (basic to advanced) |
If you test capacitors often, a digital multimeter with capacitance mode is the best choice.
Real-life Applications: When And Where To Test Capacitors
You may need to test capacitors in these situations:
- Repairing a fan or air conditioner: If the motor does not start, the start/run capacitor may be faulty.
- Fixing a TV or computer: If the device does not power on or shows lines on the screen, check the large electrolytic capacitors.
- Audio equipment: Bad capacitors cause noise or no sound.
- LED bulbs or drivers: Flickering often means a damaged capacitor.
Case Study: A ceiling fan does not start. You test the run capacitor and find it measures only half the value printed. Replacing the capacitor makes the fan work again. This simple test saved the cost of a new fan.
Common Beginner Mistakes
Testing capacitors is simple, but beginners often make these errors:
- Not discharging the capacitor: This is dangerous and can damage your meter.
- Testing in-circuit without checking first: Other parts can give false readings.
- Confusing units: ΜF, nF, and pF are not the same.
- Ignoring tolerance: Every capacitor has a range; a small difference is normal.
- Mixing up probe polarity: For polarized capacitors, keep track of positive and negative.
Learning from these mistakes will help you test safely and get accurate results.
Tips For More Accurate Testing
- Use the right range: Set your multimeter to a suitable range for the capacitor value.
- Test at room temperature: Extreme heat or cold can affect readings.
- Clean the leads: Dirt or corrosion can cause bad connections.
- Repeat the test: If unsure, test more than once.
- Compare with a new capacitor: If possible, test a known good part to see what a normal reading looks like.
These small steps can make a big difference in your test results.
When To Replace A Capacitor
Replace the capacitor if:
- It shows “short” or “open” on your meter.
- The measured value is much lower than the label.
- There is visible damage (bulge, leak, or burn marks).
- The device does not work, and testing points to the capacitor.
Pro Insight: Even if a capacitor “sort of” works, it may cause future problems. If in doubt, change it.
How Capacitor Failure Affects Circuits
A bad capacitor can cause:
- No power: Power supply fails.
- Motor problems: Fan or compressor does not start.
- Noise or distortion: Audio equipment sounds bad.
- Random resets: Computers or TVs turn off by themselves.
Fact: More than 60% of power supply failures are caused by bad capacitors.
Other Tools For Advanced Testing
A multimeter does a good job, but sometimes you need more:
- ESR meter: Checks the equivalent series resistance; great for electrolytic capacitors.
- LCR meter: Measures inductance, capacitance, and resistance with high accuracy.
- Capacitor tester: Dedicated tool for quick checks.
These tools are more expensive but very useful for professionals.
Quick Reference: Capacitor Testing Methods
| Method | Best For | Result Type | Tools Needed |
|---|---|---|---|
| Ohm/Resistance Test | Large, polarized capacitors | Good/Short/Open | Basic multimeter |
| Capacitance Test | All types | Exact value | DMM with capacitance |
| ESR Test | Electrolytics (in-circuit) | ESR value | ESR meter |
| Substitution | Any type | Functional check | Spare capacitor |
Final Thoughts
Testing a capacitor with a multimeter is a key skill for anyone who works with electronics. It saves time, money, and prevents bigger problems. With just a few steps, you can tell if a capacitor is good, shorted, or open.
Remember to always discharge the capacitor, check the readings carefully, and use the right settings on your meter.
If you want to learn more about the science behind capacitors, or need more advanced information, visit the Wikipedia page on capacitors for in-depth resources.
With practice, you will become faster and more confident. Soon, testing capacitors will feel as easy as changing a light bulb.
Frequently Asked Questions
How Do I Know If My Capacitor Is Bad Without Removing It?
You can do a simple resistance test in-circuit, but results are not always accurate because other parts may affect the reading. If you suspect a problem, it is best to desolder one lead and test again.
Can I Test A Capacitor With A Multimeter Without A Capacitance Setting?
Yes. Use the resistance (ohms) test for large capacitors. Watch how the reading changes—if it starts low and goes high, the capacitor is likely good. For exact values, you need a capacitance meter.
What Happens If I Install A Capacitor Backwards?
If you reverse the polarity on a polarized capacitor, it can get very hot, leak, or even explode. Always check the “+” and “-” signs before installing.
Why Does My Multimeter Show “ol” When Testing A Capacitor?
“OL” means “overload” or “open line. ” It can mean the capacitor is open (broken inside), or your meter is not set to the right range. Try a different range or test a known good capacitor to make sure the meter works.
Is It Safe To Test A Capacitor Right After Unplugging The Device?
No. Capacitors can hold a charge even after power is off. Always discharge the capacitor first, using a resistor or insulated tool, before testing or touching the leads.