Are you ready to take control of your electrical projects with confidence? Learning how to use a Craftsman multimeter can save you time, money, and frustration.
Whether you’re fixing a broken wire or checking a battery’s charge, this tool puts essential information right at your fingertips. In this guide, you’ll discover simple steps to master your Craftsman multimeter quickly and accurately. Keep reading, and you’ll soon feel empowered to troubleshoot like a pro.
Getting To Know Your Craftsman Multimeter
Getting to know your Craftsman multimeter is the first step to using it safely and effectively. This tool helps check electrical circuits and devices. It measures different electrical values, giving you important information.
Understanding its parts and functions makes your work easier. It also helps avoid mistakes and damage to the tool or circuits.
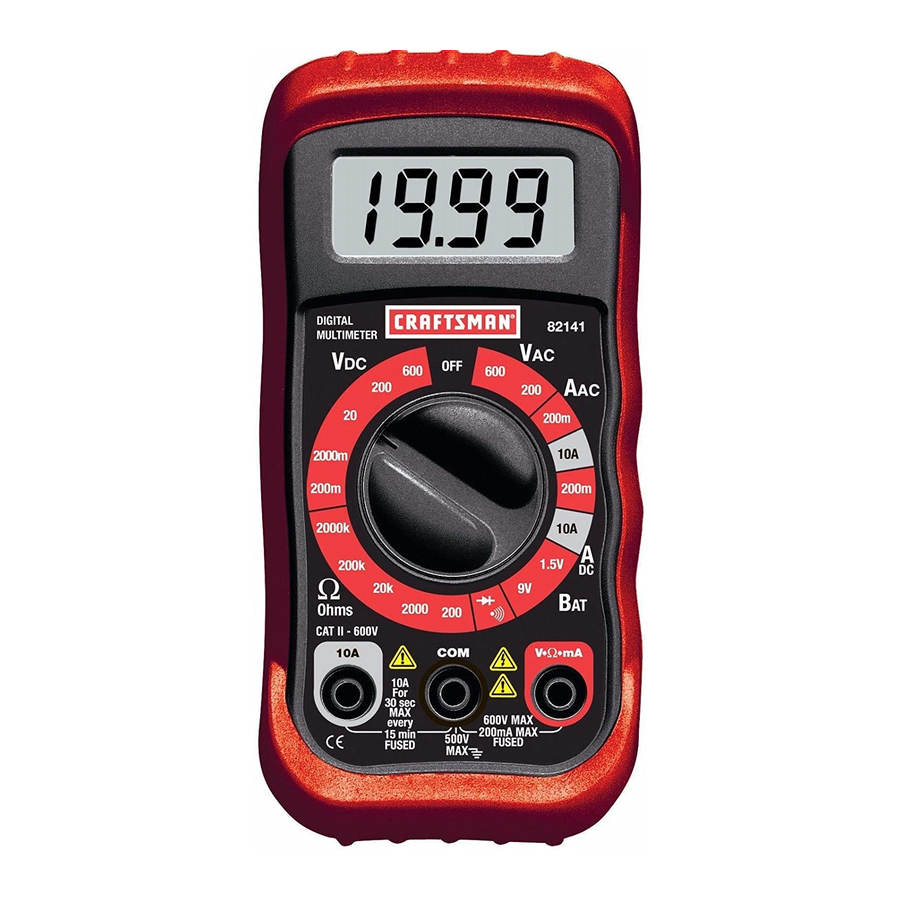
Key Features And Components
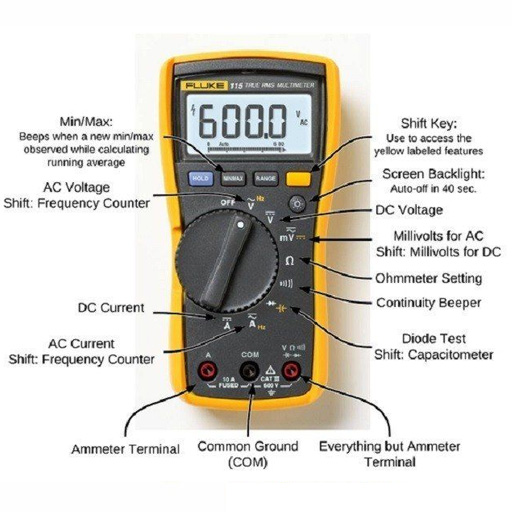
The Craftsman multimeter has several key parts. The digital display shows the readings clearly. A rotary dial lets you choose the type of measurement. Test leads connect the multimeter to the circuit. They have red and black probes for positive and negative points.
Some models include extra features like a backlight or a hold button. The hold button freezes the reading on the display. The multimeter casing is strong and made to protect the device.
Types Of Measurements Available
Your Craftsman multimeter can measure voltage, current, and resistance. Voltage shows how much electrical force flows through a circuit. Current tells how much electricity passes through a wire. Resistance measures how much a component stops the flow of electricity.
Many models also test continuity. Continuity checks if a circuit is complete and can carry electricity. Some multimeters can measure frequency and temperature too. Knowing these measurements helps you understand electrical problems quickly.
Preparing For Measurement
Preparing for measurement is an important step before using a Craftsman multimeter. It helps ensure accurate readings and protects you from electric shocks. Taking time to set up and check your device makes your work safer and easier.
Clear understanding of safety rules and proper setup avoids damage to the multimeter or the circuit. Follow simple steps to get ready for measuring voltage, current, or resistance with confidence.
Safety Precautions
Always wear safety glasses to protect your eyes from sparks. Avoid touching metal parts of the probes during measurement. Make sure your hands are dry and you stand on a dry surface. Never use a damaged multimeter or leads. Check for cracks or exposed wires before starting. Keep the multimeter away from water and flammable materials.
Setting Up The Multimeter
Turn the dial to the correct measurement type: voltage, current, or resistance. Choose the right range for the measurement to avoid overload. Plug the red probe into the VΩmA port for most measurements. Use the 10A port only for high current tests. Insert the black probe into the common (COM) port. Check the battery level of the multimeter before use. Test the leads by touching their tips together; the multimeter should show zero or near zero.
Measuring Voltage
Measuring voltage is a common task for anyone using a Craftsman multimeter. Voltage tells how much electric power flows in a circuit. It helps check batteries, outlets, and electronic devices. Knowing how to measure voltage safely ensures accurate results. It also protects you from electric shocks.
Selecting The Correct Mode
First, turn on your Craftsman multimeter. Find the dial or button for voltage. Choose “V” for volts. Select AC or DC voltage based on your test. AC is for home outlets and power cords. DC is for batteries and electronics. Setting the right mode prevents wrong readings.
Step-by-step Voltage Testing
Hold the black probe in your hand and touch the black lead to the circuit’s ground or negative side. Use the red probe to touch the positive side of the circuit or device. Read the number on the multimeter screen. This number shows the voltage level.
For safety, keep your hands steady. Avoid touching metal parts of the probes. Turn off power before connecting if possible. Double-check your mode and connections before measuring again.
Measuring Current
Measuring current with a Craftsman multimeter is simple and useful for many electrical tasks. Current shows how much electric charge flows through a circuit. You can measure two types of current: AC (alternating current) or DC (direct current). Each type needs a different setting on your multimeter to get accurate readings.
Choosing Ac Or Dc Current
First, decide if the current is AC or DC. AC flows back and forth, like in home wiring. DC flows in one direction, like from batteries. Turn the dial on your multimeter to the correct current type. Choosing the wrong setting can give false readings or damage the tool. Check the device or circuit you test to pick the right current type.
Connecting The Probes Properly
Connect the multimeter probes carefully to measure current. Insert the red probe into the correct current input jack, often labeled “A” or “mA.” The black probe goes into the common (COM) jack. To measure current, the multimeter must be part of the circuit, so connect the probes in series. This means breaking the circuit and placing the probes between the open ends. This setup lets current flow through the multimeter for accurate measurement.
Testing Resistance
Testing resistance is a common use for a Craftsman multimeter. It helps check if wires or components are broken or working well. Resistance measures how hard it is for electricity to flow. A high resistance means less flow, a low resistance means more flow. This test is useful for fixing electronics or checking circuits.
Setting Resistance Mode
First, turn the multimeter dial to the resistance setting. It usually shows the Greek letter omega (Ω). This symbol stands for ohms, the unit of resistance. Make sure the multimeter is off before changing settings. Connect the black test lead to the COM port. Plug the red lead into the port marked for resistance or voltage.
Hold the test leads by the insulated handles. Touch the two leads together to check the meter. The reading should be close to zero ohms. This means the meter works and the leads are good.
Interpreting Results
Touch the test leads to the object or wire you want to test. Watch the multimeter screen for the number. A reading near zero means good connection or low resistance. A very high number or “OL” means the circuit is open or broken. Use these results to decide if parts need replacing.
Resistance values help find shorts or broken wires. Always test components with power off. This keeps you safe and protects the multimeter. Testing resistance is simple with the right steps and tools.

Credit: www.youtube.com
Using Continuity Test
The continuity test on a Craftsman multimeter checks if a circuit is complete. It tells you if electricity can flow through wires or components. This test is useful for finding breaks or faults in circuits quickly. The multimeter makes a sound when there is continuity, helping you identify working connections without guessing.
Activating Continuity Mode
Turn the dial on your Craftsman multimeter to the continuity symbol. This symbol often looks like a sound wave or diode. Connect the black probe to the COM port and the red probe to the VΩ port. Touch the two probes together to check the meter’s sound. If it beeps, the continuity mode is active and ready to use.
Practical Applications
Use continuity tests to check wires in electronics or home repairs. Test fuses to see if they are good or blown. Check switches and buttons to ensure they close the circuit properly. This test helps find broken connections in cables or circuit boards fast. It saves time and avoids unnecessary replacements.
Advanced Multimeter Functions
Advanced functions on a Craftsman multimeter help you test more than just voltage and current. These features allow deeper checks on electronic parts. Learning to use these can save time and improve accuracy in your work.
Testing Diodes
Diodes only let current flow one way. Testing them with a multimeter checks if they work right. Set the multimeter to the diode test mode. Connect the red lead to the diode’s anode and the black lead to the cathode. A good diode shows a small voltage drop, usually around 0.6 to 0.7 volts. If the meter shows no reading or zero, the diode may be damaged or reversed.
Measuring Capacitance And Frequency
Capacitance measures a capacitor’s ability to store charge. Frequency shows how often a signal repeats each second. Switch the multimeter to the capacitance mode to test capacitors. Connect the probes to the capacitor terminals. The display shows the capacitance value in microfarads.
To measure frequency, set the meter to frequency mode. Attach the leads to the circuit points where you want to check. The reading appears in hertz. These measurements help check components in radios, clocks, and other electronics.
Credit: www.manualslib.com
Troubleshooting Common Issues
Troubleshooting common issues with your Craftsman multimeter helps keep it working well. Problems like inaccurate readings or no power can stop your work. Fixing these issues is simple with the right steps. This guide shows how to solve basic problems quickly and safely.
Calibration Tips
Check calibration to get accurate readings. Use a known voltage source or a calibration tool. Turn on the multimeter and set it to the correct function. Compare the reading with the known value. Adjust the calibration screw or dial if the reading is off. Repeat the test to confirm accuracy. Calibrate your multimeter every few months for best results.
Battery Replacement
Low battery power causes false readings or no display. Open the back cover carefully using a screwdriver. Remove the old battery and dispose of it properly. Insert a new battery matching the multimeter’s specifications. Close the cover tightly to avoid damage. Test the multimeter to ensure it powers on correctly. Replace batteries once a year or when the display dims.
Maintenance And Storage
Taking care of your Craftsman multimeter helps it last longer and work better. Proper maintenance and storage keep the device safe from damage and dirt. Simple steps can protect your multimeter from common issues.
Cleaning Your Multimeter
Turn off the multimeter before cleaning. Use a soft, dry cloth to wipe the surface. Avoid using water or cleaning liquids. Dirt and dust can block the screen or buttons. Clean the probe tips gently with a small brush. This keeps measurements accurate and reliable.
Proper Storage Practices
Store the multimeter in a cool, dry place. Avoid areas with high humidity or direct sunlight. Keep it in its protective case if available. Make sure the test leads are not tangled or bent. Remove the batteries if you do not plan to use it soon. This prevents battery leaks and damage.
Credit: www.coolcircuit.com
Frequently Asked Questions
What Is A Craftsman Multimeter Used For?
A Craftsman multimeter measures voltage, current, and resistance in electrical circuits. It helps troubleshoot and diagnose electrical problems accurately and efficiently.
How Do I Set Up A Craftsman Multimeter?
Turn the dial to the desired measurement type. Connect the probes to the correct ports. Ensure proper settings for AC or DC.
Can I Measure Both Ac And Dc Voltage?
Yes, a Craftsman multimeter can measure both AC and DC voltage. Select the appropriate setting on the dial before testing.
How Do I Test A Battery With A Craftsman Multimeter?
Set the dial to DC voltage. Place the red probe on the battery’s positive terminal and the black probe on the negative terminal. Read the voltage.
Conclusion
Using a Craftsman multimeter is simple and useful for many tasks. You can check batteries, wires, and circuits with it. Always follow safety steps and read the manual. Practice helps you get comfortable using the tool. Soon, measuring voltage and resistance will feel easy.
This tool saves time and helps find problems fast. Keep your multimeter clean and store it safely. With regular use, your skills will grow day by day. This small device is handy for home and work projects. Give it a try and see how it helps you.