Are you ready to unlock the full potential of your analog multimeter? Whether you’re fixing a simple circuit or troubleshooting complex electronics, knowing how to use this tool correctly can save you time and frustration.
This guide will walk you through every step, making it easy to understand and apply right away. By the end, you’ll feel confident measuring voltage, current, and resistance like a pro. Keep reading, and discover how to turn your analog multimeter into your most trusted companion for any electrical task.

Credit: www.wikihow.com
Analog Multimeter Basics
An analog multimeter is a tool used to measure electrical values. It shows results with a needle on a dial. This old-style meter helps check voltage, current, and resistance. Understanding its basics is key to using it well. This section explains the main parts, what it measures, and safety tips.
Parts Of An Analog Multimeter
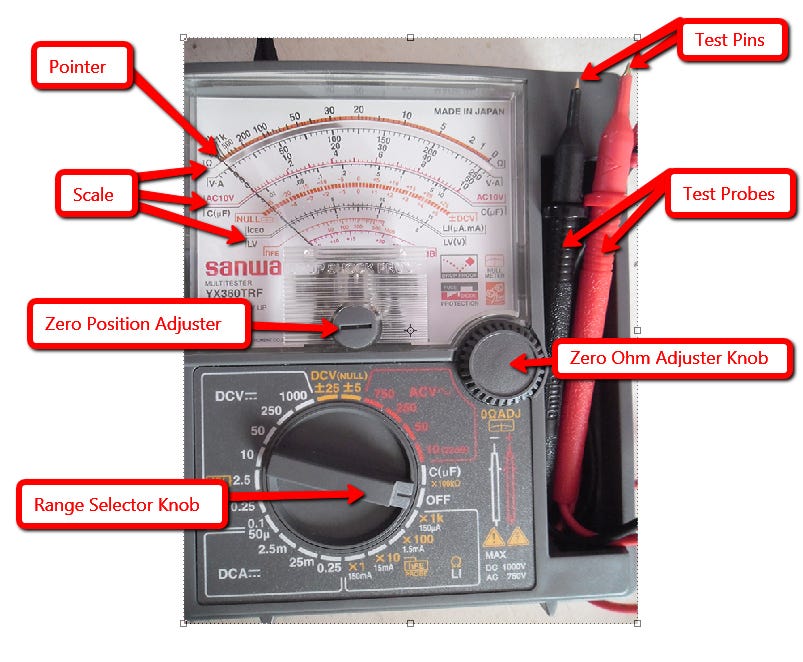
The main parts include the needle, dial, and scale. The needle moves to show measurement values. The dial has numbers and symbols for different tests. There are two probes: one red and one black. The red probe connects to positive points. The black probe connects to negative or ground points. A selector switch lets you choose the measurement type and range.
Types Of Measurements
Analog multimeters measure voltage, current, and resistance. Voltage is the electrical force in a circuit. Current is the flow of electricity. Resistance shows how much a material resists electricity. Each measurement uses a different scale on the dial. Set the meter to the correct type before testing. Use the right range to get accurate readings.
Safety Tips
Always check the meter before use. Make sure probes and wires are not damaged. Never touch metal parts during measurement. Use the correct range to avoid damage. Avoid measuring high voltage without proper training. Turn off power before connecting the meter in some cases. Keep fingers behind the probe guards for safety.
Credit: medium.com
Preparing The Multimeter
Preparing your analog multimeter correctly is key for accurate readings. Before using it, check a few important settings. This ensures safety and precision. Follow these simple steps to get your multimeter ready.
Selecting The Correct Range
Start by choosing the right range for your measurement. Analog multimeters often have multiple ranges for voltage, current, and resistance. Pick a range slightly higher than the expected value. This prevents damage to the meter and gives a clear reading. If unsure, start with the highest range and move down as needed.
Setting The Function Switch
Set the function switch to the correct type of measurement. Common settings include voltage (AC or DC), current, and resistance. Turning the switch to the wrong function can cause wrong readings or harm the meter. Confirm the switch is firmly in place before testing.
Checking The Battery
Check the multimeter’s battery before use. A low battery can cause inaccurate readings. Most analog meters have a battery test or a small indicator. Replace the battery if the reading is weak or the meter doesn’t power on. Good battery power keeps your measurements reliable.
Measuring Voltage
Measuring voltage with an analog multimeter is a basic but important skill. Voltage tells you how much electrical power flows through a circuit. An analog multimeter uses a needle to show this value. This section explains how to measure both DC and AC voltage safely and accurately.
Testing Dc Voltage
Set the multimeter to the DC voltage range that matches your expected voltage. Connect the black probe to the circuit’s ground or negative side. Place the red probe on the positive side where you want to measure. Watch the needle move. It points to the voltage value on the scale. Do not touch the probes during testing to avoid shocks.
Testing Ac Voltage
Switch the multimeter to the AC voltage setting. Place the probes on the two points where you want to measure voltage. The needle will move back and forth because AC voltage changes direction. Read the voltage value on the AC scale. Keep your hands steady to get a clear reading.
Interpreting The Needle Movement
The needle moves left or right to show voltage. A steady needle means a stable voltage. If the needle swings a lot, the voltage is unstable. Note the scale number where the needle points. Use the correct scale for DC or AC voltage. This helps you avoid wrong readings.
Measuring Current
Measuring current with an analog multimeter helps find how much electricity flows in a circuit. This is important for testing batteries, wires, and electronic parts. The needle on the meter moves to show the current level. Correct use keeps you safe and gives right readings.
Connecting In Series
Always connect the multimeter in series with the circuit. This means the current must flow through the meter. Turn off power before connecting. Break the circuit wire and attach the meter leads at the break. This setup lets the meter measure current directly. Do not connect the meter across the power source. It can damage the meter and cause sparks.
Selecting Proper Range
Choose the highest current range on the meter first. This protects the meter from overload. If the needle moves a little, switch to a lower range. This gives a more accurate reading. Too high a range makes the reading hard to see. Too low a range can blow the meter fuse. Always start high and go lower carefully.
Avoiding Common Mistakes
Never connect the meter in parallel for current measurement. This can cause a short circuit. Check the meter fuse before use. Replace it if blown. Do not touch the metal parts while measuring. Use correct test leads and holders. Keep your hands dry and stand on an insulated surface. These steps prevent electric shock and errors.
Measuring Resistance
Measuring resistance with an analog multimeter helps check how much a component resists electric current. This process is useful for testing resistors and finding broken circuits. The meter shows resistance in ohms (Ω), which tells if parts work correctly or need replacement.
Before testing, the meter needs calibration. This ensures the readings are accurate. Proper calibration avoids errors and saves time during troubleshooting.
Calibrating The Meter
Turn the multimeter on and set it to the resistance mode. Touch the two test leads together. The needle should move to zero on the ohm scale. If it does not, use the calibration knob to adjust it. This step is vital for accurate resistance readings.
Testing Resistors
Place the test leads on each end of the resistor. Make sure the resistor is disconnected from any circuit. Read the value where the needle points on the scale. Compare this value to the resistor’s color code or label. A close match means the resistor is good.
Troubleshooting Open Circuits
Use the multimeter to check wires and connections. Place the leads at two points in the circuit. If the needle stays at infinity or does not move, the circuit is open. This means there is a break or loose connection. Fixing open circuits restores proper flow of electricity.

Credit: www.youtube.com
Additional Functions
Analog multimeters offer more than just voltage and current readings. They have extra functions that help with different electrical tasks. These functions make the multimeter a useful tool for many simple tests around the house or in a workshop.
Testing Continuity
Continuity testing checks if an electrical path is complete. Set the multimeter to the continuity setting. Touch the two probes together to see if the meter needle moves. Next, touch the probes to each end of the wire or circuit. If the needle moves, the path is good. No movement means the wire or connection is broken. This test helps find breaks in wires or faulty switches quickly.
Using The Diode Test
The diode test function checks diodes and other semiconductor parts. Turn the dial to the diode test mode. Connect the red probe to the diode’s positive side and the black to the negative. The needle will show the forward voltage drop if the diode works. If the needle does not move or moves in both directions, the diode may be bad. This test avoids taking parts out for separate checks.
Measuring Battery Health
Battery testing is simple with an analog multimeter. Switch to the DC voltage mode that matches the battery size. Place the red probe on the battery’s positive terminal and the black on the negative. The needle shows the voltage level. A full or good battery will show close to its rated voltage. A low reading means the battery is weak or dead and needs replacement.
Maintaining Your Analog Multimeter
Maintaining your analog multimeter is key to keeping it accurate and reliable. Regular care helps the tool last longer and perform well. Simple steps in cleaning, fuse replacement, and battery care make a big difference.
Cleaning And Storage
Clean the multimeter carefully after use. Use a soft, dry cloth to remove dust and dirt. Avoid using water or harsh chemicals. Store the meter in a dry, cool place. Keep it away from direct sunlight and moisture. Proper storage prevents damage to the internal parts and screen.
Replacing The Fuse
The fuse protects your multimeter from damage during high current tests. Check the fuse if the meter stops working or shows no reading. Turn off and open the back cover carefully. Remove the old fuse and replace it with the correct type. Make sure the new fuse matches the original in size and rating. Close the cover tightly before use.
Battery Replacement
Replace the battery when the meter shows weak or no power. Open the battery compartment with a screwdriver. Remove the old battery and insert a new one of the same type. Check the battery contacts for corrosion and clean if needed. Close the compartment securely to avoid loose connections.
Common Errors And Fixes
Using an analog multimeter can be tricky at times. Errors may happen, but most have easy fixes. Knowing common problems helps you avoid mistakes and get correct readings. This section covers typical issues and how to solve them quickly.
Reading Fluctuations
The needle may move up and down fast. This happens when the signal is unstable or weak. Keep the test leads steady and avoid touching them. Check the connection points for dirt or rust. Use a lower range to get a more stable reading.
Incorrect Range Selection
Choosing the wrong range can cause wrong readings or needle damage. Start with the highest range to protect the meter. Then move to lower ranges for better accuracy. If the needle moves to the end quickly, switch to a higher range. This keeps the meter safe and gives clear results.
Needle Sticking Issues
The needle might stick or not move smoothly. Dust or dirt inside the meter can cause this. Gently tap the meter to free the needle. Avoid shaking it hard. Clean the glass and case regularly. If the problem continues, a professional checkup is needed.
Frequently Asked Questions
How Do I Set Up An Analog Multimeter Correctly?
To set up an analog multimeter, start by turning the dial to the desired measurement type. Connect the black lead to the common terminal and the red lead to the voltage, resistance, or current terminal. Ensure the range is set higher than the expected measurement.
What Are The Main Functions Of An Analog Multimeter?
An analog multimeter measures voltage, current, and resistance. It displays readings with a moving needle on a scale. This tool helps troubleshoot electrical circuits and test batteries, fuses, and components accurately.
How To Read The Needle On An Analog Multimeter?
Read the needle position carefully against the scale marked for your measurement. Note the scale units and range selected to interpret the correct value. Always observe the zero adjustment before taking any reading for accuracy.
Can I Measure Dc And Ac Voltage With An Analog Multimeter?
Yes, analog multimeters can measure both DC and AC voltage. Select the appropriate mode (DCV or ACV) on the dial. Use the correct range to avoid damaging the meter or getting inaccurate readings.
Conclusion
Using an analog multimeter is simple with practice and care. Start by choosing the right setting for your test. Always connect the probes correctly to avoid mistakes. Read the needle carefully to understand the measurement. Take your time and double-check your results.
This tool helps you measure voltage, current, and resistance easily. Keep your multimeter clean and store it safely. With these tips, you can use an analog multimeter confidently. Try it yourself and see how useful it is.