If you own an ebike, you know how important the battery is for your ride. But how can you tell if your battery is still healthy or needs a replacement?
Testing your ebike battery with a multimeter is a simple skill that saves you time and money. In this guide, you’ll learn exactly how to check your battery’s health step-by-step, even if you’ve never used a multimeter before. By the end, you’ll feel confident making sure your battery delivers the power you need every time you hit the road.
Keep reading to unlock the secrets of testing your ebike battery easily and accurately.

Credit: www.youtube.com
Tools Needed
Testing your ebike battery needs the right tools. Having the correct equipment makes the process safe and accurate. You will need a multimeter and a few extra supplies. These tools help you check the battery’s voltage and health easily.
Choosing The Right Multimeter
Pick a multimeter that measures DC voltage. It should show readings in volts. A digital multimeter is easier to read than an analog one. Choose one with a range up to 20 volts or more. This covers most ebike batteries. Look for clear display and simple controls. A reliable brand lasts longer and gives better results.
Additional Supplies
You will need a few extras besides the multimeter. Use insulated test leads to connect the multimeter to the battery. This keeps you safe from electric shocks. Have a screwdriver ready to open the battery casing if needed. Keep a cloth nearby to clean battery terminals. Clean terminals improve contact and give accurate readings.
Safety Precautions
Testing an ebike battery with a multimeter needs careful attention to safety. Batteries hold electrical energy that can cause harm if not handled right. Taking safety steps protects you and your battery from damage. Read these precautions before starting any tests.
Handling Batteries Safely
Always turn off the ebike and disconnect the battery before testing. Avoid touching battery terminals together or with metal objects. Work on a dry, clean surface to prevent short circuits. Keep the battery away from heat, flames, or water. Do not open or damage the battery casing. Handle the battery gently to avoid drops or impacts.
Protective Gear
Wear safety glasses to protect your eyes from sparks or acid leaks. Use insulated gloves to avoid electric shocks. Avoid loose clothing or jewelry that can catch on battery parts. Keep a fire extinguisher nearby, just in case. Good lighting helps you see clearly and avoid mistakes.
Preparing The Battery
Preparing the ebike battery is the first step before testing it with a multimeter. This helps ensure accurate readings and safe handling. Taking time to prepare the battery properly reduces errors during testing.
Preparation involves removing the battery from the bike and cleaning its terminals. Both steps help get clear access to the battery’s electrical points. Clean terminals make better contact with the multimeter probes.
Removing The Battery
Start by turning off your ebike. This prevents any accidental power flow during removal. Locate the battery pack, usually under the seat or frame. Use the key or latch to unlock and release the battery. Gently pull the battery out from its holder. Place it on a flat, clean surface for testing.
Cleaning Terminals
Check the battery terminals for dirt, dust, or corrosion. Dirty terminals can block electrical signals and give false readings. Use a dry cloth or soft brush to wipe away grime. For stubborn corrosion, a small amount of rubbing alcohol on a cloth helps. Make sure the terminals are dry before testing. Clean terminals improve the connection with the multimeter probes.

Credit: www.sunmono.com.au
Setting Up The Multimeter
Setting up the multimeter correctly is the first step to test your ebike battery. This step ensures accurate readings and protects both the device and the battery. Take your time to prepare the multimeter before starting any measurement.
Selecting Voltage Mode
Turn on the multimeter and select the voltage mode. Look for the symbol “V” with a straight line, which means DC voltage. Ebike batteries produce direct current, so this mode is essential.
Set the range higher than your battery’s voltage. For example, if your battery is 36 volts, choose a range of 50 volts or more. This prevents damage to the multimeter and ensures safety during testing.
Calibrating The Device
Check the multimeter’s calibration to get accurate results. Connect the probes together and watch the reading. It should show zero or very close to zero.
If the reading is off, adjust the zero setting if your multimeter allows it. This step removes any small errors before testing the battery. Proper calibration improves the reliability of your voltage measurements.
Measuring Battery Voltage
Testing an ebike battery with a multimeter shows its voltage level quickly. Connect the multimeter probes to the battery terminals and read the voltage on the screen. This simple check helps find battery health and power issues fast.
Connecting Probes Correctly
Start by setting your multimeter to the voltage setting, usually marked as “V” with a straight line. This setting measures direct current (DC) voltage.
Next, connect the black probe to the multimeter’s common (COM) port. Connect the red probe to the port marked for voltage (V).
Touch the black probe to the battery’s negative terminal. Then, touch the red probe to the positive terminal. Hold the probes steady for an accurate reading.
Reading The Voltage
Look at the multimeter screen to see the voltage value. It shows how much charge the battery currently holds.
A fully charged e-bike battery usually shows a voltage near its rated voltage. For example, a 36V battery should read close to 42V when fully charged.
If the voltage is much lower, the battery might need charging or could be damaged. Always compare your reading to the battery’s specifications.
Interpreting Results
After testing your ebike battery with a multimeter, understanding the numbers is key. The voltage reading tells you how healthy the battery is. This section explains what the numbers mean and how to spot battery problems. Clear steps help you decide if your battery needs repair or replacement.
Normal Voltage Range
Check your ebike battery’s voltage against its rated voltage. A fully charged 36V battery usually shows around 42V. A 48V battery should read about 54V when fully charged. Slight drops are normal after use. Voltage between 80% and 100% of the rated voltage is good. If the reading matches this range, the battery is healthy and ready to use.
Signs Of Battery Issues
Voltage much lower than the normal range signals trouble. Batteries below 70% of their rated voltage may have damage. Rapid drops or inconsistent readings suggest cell problems. If the battery voltage quickly falls under load, it could be weak. Also, if the voltage never reaches full charge, the battery might be aging or faulty. These signs mean you should consider professional help or battery replacement.
Testing Battery Under Load
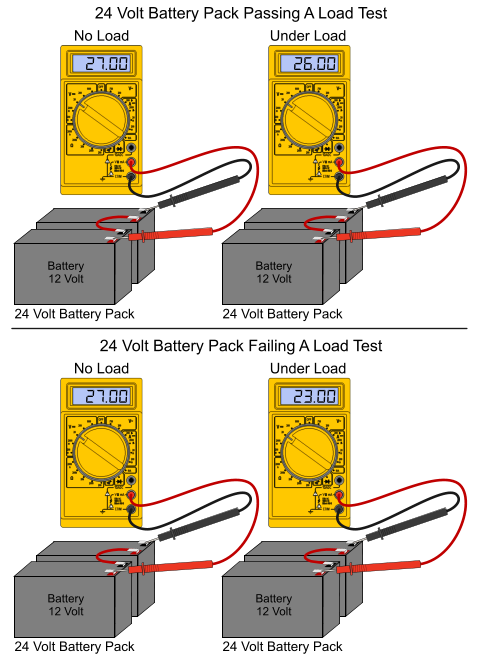
Testing an ebike battery under load shows how it performs in real use. It reveals the battery’s true health better than just checking voltage at rest. A multimeter helps measure how the voltage changes when the battery powers a device. This method simulates actual riding conditions, giving a clearer picture of battery strength.
Simulating Real-world Usage
To simulate real-world usage, connect the battery to a load. Use a resistor or the ebike’s motor as the load. This forces the battery to supply current like during a ride. Keep the multimeter probes on the battery terminals to monitor voltage. Watch the voltage level while the load is active. This shows how well the battery holds up under pressure.
Recording Voltage Drop
Record the voltage drop during the load test. A small drop means the battery is healthy. A large drop signals the battery may be weak or damaged. Note how quickly the voltage falls after applying the load. Sudden or large drops can mean poor battery capacity. Use these readings to decide if the battery needs charging or replacement.
Checking Battery Cells
Checking the battery cells is an important step in testing an ebike battery. Each battery has multiple small cells inside it. These cells work together to provide power. Sometimes, one or more cells may be weak or damaged. This can lower the battery’s performance. Testing individual cells helps find these problems early. It ensures the battery works well and lasts longer.
Accessing Individual Cells
First, you need to open the battery pack carefully. Find the wires or connectors that link the cells. Use a multimeter to test each cell separately. Set the multimeter to measure volts. Touch the probes to the positive and negative ends of each cell. Be gentle to avoid short circuits or damage. Note the voltage of each cell for comparison.
Identifying Faulty Cells
Compare the voltage readings of all cells. Most healthy cells show similar voltage levels. A cell with much lower voltage is likely faulty. This cell may cause the battery to drain fast. Replace or repair the faulty cell to improve battery health. Testing cells regularly helps keep your ebike running smoothly.
Maintaining Battery Health
Maintaining the health of your ebike battery helps it last longer and work better. Checking the battery often and storing it right keeps it safe. It also prevents damage and saves money on replacements.
Regular Testing Schedule
Test your ebike battery with a multimeter every month. This checks if the battery holds the right voltage. Low voltage means the battery needs charging or repair. Keep a record of each test to spot problems early. Regular tests avoid sudden battery failures during rides.
Storage Tips
Store the battery in a cool, dry place. Avoid extreme heat or cold to protect the battery cells. Charge the battery to about 50% before storing it for a long time. Check the voltage every few weeks if not using the battery. Proper storage keeps the battery healthy and ready to use.
Credit: electricscooterparts.com
Frequently Asked Questions
How Do I Check Ebike Battery Voltage With A Multimeter?
Set your multimeter to DC voltage. Connect the probes to battery terminals. Read the voltage and compare it to the battery’s rated voltage. A healthy battery shows voltage close to its rating when fully charged.
What Voltage Range Indicates A Healthy Ebike Battery?
A fully charged ebike battery usually reads between 36V to 42V for a 36V battery. Voltage below 30V indicates a weak or discharged battery. Always check the manufacturer’s specifications for exact voltage ranges.
Can A Multimeter Detect Ebike Battery Cell Problems?
Yes, by measuring voltage across individual cells, a multimeter can identify weak or damaged cells. Significant voltage drops in cells indicate battery health issues needing repair or replacement.
How Often Should I Test My Ebike Battery With A Multimeter?
Test your battery monthly during regular use. Frequent checks help detect early signs of battery wear or damage. This prevents sudden failures and extends battery life.
Conclusion
Testing your ebike battery with a multimeter saves time and money. You can find out if the battery works well or needs a replacement. Follow the steps carefully and check the voltage correctly. A healthy battery shows the right voltage range.
Always handle the multimeter and battery safely. Regular testing helps keep your ebike running smoothly. Simple tools and knowledge make a big difference. Now, you can check your battery with confidence.