Checking your car’s alternator amps with a multimeter might sound technical, but it’s a valuable skill for anyone who wants to keep their vehicle running smoothly. The alternator is like the heart of your car’s electrical system. It charges the battery and powers everything from the headlights to the radio while the engine is running.
If the alternator isn’t producing enough current (measured in amps), your car may show signs like dim lights, a dead battery, or strange electrical problems. Learning to measure alternator amps correctly can save you time, money, and unexpected breakdowns.
Many drivers only check their battery voltage and ignore the alternator’s output. This is a common mistake. Sometimes, an alternator can show the right voltage but still not provide enough amps to run your car’s electronics. By understanding how to use a multimeter for this test, you get a clearer picture of your car’s health.
Whether you’re a DIY enthusiast or just want to verify a mechanic’s diagnosis, knowing these steps gives you confidence and control over your vehicle’s maintenance.
Why Alternator Amps Matter
The alternator’s amp output is crucial for your vehicle’s operation. Amps are the measurement of electric current. While voltage tells you the pressure of electricity, amps show how much electricity is actually flowing. If your alternator delivers too few amps, your battery drains even when driving, and your car’s electronics might fail.
Most car alternators produce between 50 and 120 amps. Modern cars with more electronics may need up to 200 amps. If your alternator can’t meet these demands, you’ll face problems like:
- Slow or non-working power windows
- Flickering dashboard lights
- Battery warning light on the dashboard
- Trouble starting your car
Understanding your car’s amp needs helps you spot issues before they become serious. Many people assume a new battery will fix electrical problems, but if the alternator isn’t charging properly, the issues will return.
Tools You Need For The Test
Before you begin, gather these essential tools:
- Digital Multimeter: Choose a model that can measure both DC voltage and DC current (amps). Not all multimeters can handle high current, so check its maximum amp rating.
- Protective Gloves and Eyewear: Safety is important. Working around the battery and alternator exposes you to high currents and moving parts.
- Alligator Clip Test Leads: These make connections easier and safer, especially when measuring high currents.
- Service Manual for Your Car: This contains the correct amp output specifications for your specific vehicle.
- Wrench or Socket Set: For disconnecting the battery cable if needed.
A common mistake is using a multimeter not rated for high amps. Most basic multimeters can only measure up to 10 or 20 amps directly. Testing beyond this can damage the device or cause injury. For alternators with higher output, use a clamp meter designed for automotive currents.
Safety Precautions
Testing your alternator’s amp output is safe if you follow these steps:
- Always wear safety gloves and eye protection.
- Never let metal tools touch both battery terminals at once—this can cause a dangerous short circuit.
- Keep loose clothing, jewelry, and hair away from moving engine parts.
- Work in a well-ventilated area, as batteries can emit flammable gases.
- Double-check your multimeter’s settings before connecting it to the car.
Many people forget to set the multimeter to the correct current range, which can blow the fuse inside the meter. If you’re new to this, practice using your multimeter on lower currents before testing the alternator.
Understanding Multimeter Settings
A multimeter is a versatile tool. It can measure voltage, current, resistance, and sometimes more. For alternator testing, you’ll use the DC amp setting. Here’s what you should know:
- DC Amps (A): Measures the flow of direct current. This is what your alternator produces.
- Clamp Meter Function: Some multimeters have a clamp feature that lets you measure current without breaking the circuit.
- 10A/20A Jack: Higher current measurements require a separate port on the meter. Plug the red test lead into this port.
Selecting the wrong range or port is a common beginner error. Always check the manual for your multimeter to avoid damaging it.
Credit: electrical-engineering-portal.com
Preparing Your Car For The Test
To get an accurate reading, your car needs to be in the right state:
- Turn off all accessories (lights, radio, AC, etc. ).
- Start the engine and let it idle for a few minutes.
- Check the battery voltage first to confirm it’s above 12.4 volts. If it’s lower, charge or replace the battery before testing the alternator.
Never test the alternator with a weak or dead battery. The results will not be reliable, and you might damage your electrical system.
Step-by-step: How To Check Alternator Amps With A Multimeter
Now, let’s go through the process in detail. There are two main methods: direct amp measurement and using a clamp meter. We’ll cover both.
1. Direct Amp Measurement (series Method)
This method involves connecting the multimeter directly in the circuit. Here’s how:
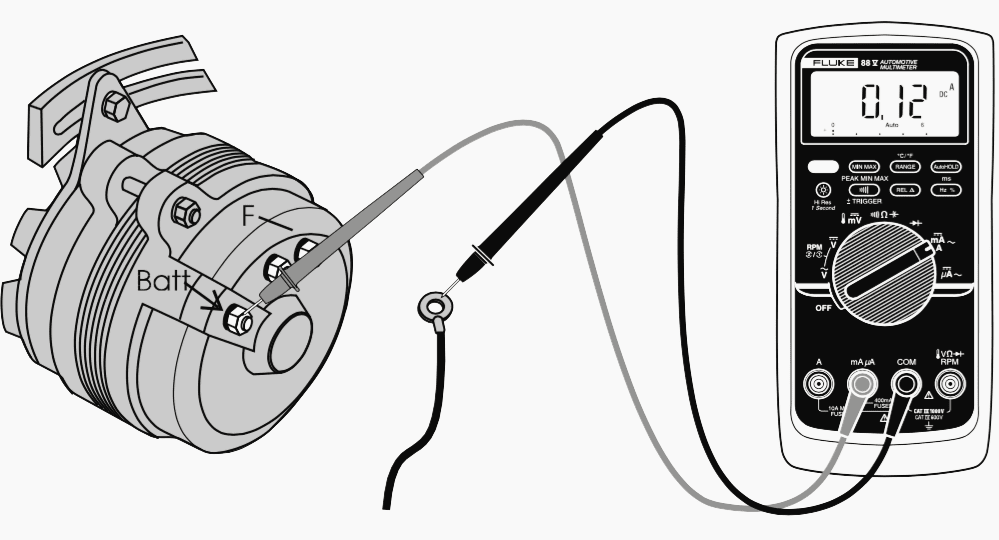
Step 1: Set Up Your Multimeter
- Turn the multimeter to the DC amp setting (choose 10A or 20A range).
- Plug the red lead into the correct amp port.
- The black lead goes in the common (COM) port.
Step 2: Disconnect The Battery Cable
- With the engine OFF, use a wrench to loosen and remove the negative battery cable.
- This breaks the connection between the alternator and the battery.
Step 3: Connect The Multimeter In Series
- Attach the red lead to the battery’s negative terminal.
- Attach the black lead to the removed battery cable.
- This routes all current from the alternator through the multimeter.
Step 4: Start The Engine
- With the multimeter in place, start the engine.
- The multimeter will now display the total amp output from the alternator.
Step 5: Test Under Load
- Turn on headlights, AC, and other accessories.
- Note the amp reading as the alternator works harder.
Step 6: Compare With Specifications
- Check your car’s manual for the correct amp range.
- Most cars should show 50–120 amps with accessories on.
- If the reading is much lower, your alternator may be weak or failing.
Important: Many modern cars have sensitive electronics. Disconnecting the battery can reset settings or cause errors. Always check your manual first. For most people, the clamp meter method is safer.
2. Clamp Meter Method (inductive)
A clamp meter measures current by clamping around a wire—no disconnection needed. This is safer and easier.
Step 1: Set Up The Clamp Meter
- Select the DC amp mode on your clamp meter.
- Zero the meter if needed (follow the meter’s instructions).
Step 2: Locate The Alternator Output Wire
- Find the thick wire running from the alternator to the battery.
- Usually, it’s a red or black cable.
Step 3: Clamp Around The Wire
- Place the clamp around the alternator output wire only.
- Do not clamp around multiple wires, or the reading will be incorrect.
Step 4: Start The Engine And Test
- Start your car and let it idle.
- Read the amp output on the meter.
Step 5: Increase Load
- Turn on accessories and watch the amp reading rise.
- The reading should match or come close to your alternator’s rated output.
Tip: Clamp meters are best for cars with sensitive electronics, as they don’t interrupt the circuit.
Example Results And What They Mean
Let’s compare some sample readings:
| Condition | Expected Amps | What It Means |
|---|---|---|
| Engine Idle, No Accessories | 15–40 | Normal low load |
| Engine Idle, Headlights On | 40–70 | Moderate load |
| Engine 2000 RPM, All Accessories On | 80–120 | Full alternator output |
| Any Condition, Amps < 10 | Low | Possible alternator failure |
If your readings are much lower than expected, your alternator may be faulty, or there could be a wiring problem.
Interpreting Your Results
After testing, compare your results to the manufacturer’s specifications. Here’s how to understand what you see:
- Normal Output: Amp readings match or are close to the spec. Your alternator is healthy.
- Low Output: Amp readings are much lower than spec. This usually means a failing alternator, bad diodes, or worn brushes.
- Zero Output: The alternator may not be charging at all. Check the belt, wiring, and alternator fuse.
It’s rare, but sometimes a faulty voltage regulator can cause inconsistent amp readings. If numbers bounce around a lot, have the alternator and regulator checked by a professional.
Common Mistakes To Avoid
Many beginners make errors that lead to wrong readings or even damage. Here’s what to watch out for:
- Using the Wrong Meter Range: Setting the multimeter to measure milliamps (mA) instead of amps (A) can blow the fuse in your meter.
- Clamping Around Multiple Wires: This causes inaccurate readings because currents can cancel each other out.
- Testing With a Weak Battery: A low battery can pull extra amps, making the alternator work harder or skewing results.
- Ignoring Car Manual Warnings: Some cars have complex electronics that don’t like having the battery disconnected.
- Not Increasing Load: Only testing at idle doesn’t show the alternator’s true capacity. Always repeat the test with lights and AC on.
Troubleshooting Low Alternator Amps
If your test shows low amp output, don’t panic. There are several possible causes. Check these before replacing the alternator:
- Loose or Dirty Battery Terminals: Corrosion can reduce current flow.
- Worn Drive Belt: If the belt slips, the alternator can’t spin fast enough to produce full output.
- Blown Alternator Fuse: Some cars have a main fuse for the alternator circuit.
- Damaged Wiring: Frayed or broken wires between alternator and battery cut current.
- Weak Battery: A failing battery can also cause low readings.
If you’ve checked all these and still get low output, it’s time to replace or repair the alternator.
When To Seek Professional Help
Some alternator problems need expert diagnosis. If you notice these signs, visit a mechanic:
- Alternator output is inconsistent or spikes up and down.
- Strange noises from the alternator area (squealing, grinding).
- The battery warning light stays on after testing.
- You’re not confident working with high currents.
Modern cars often have computer-controlled charging systems. Testing these with a basic multimeter may not give accurate results. A professional shop can run more advanced diagnostics.
Real-world Example
Let’s look at a real scenario. A 2015 Honda Accord owner notices dimming headlights and slow power windows. He tests the alternator amps using a clamp meter and gets these results:
- Idle, no accessories: 22 amps
- Idle, headlights and AC on: 38 amps
- 2000 RPM, all accessories: 45 amps
The car manual says the alternator should provide up to 100 amps. The low readings suggest the alternator is failing, even though voltage tests look normal. By catching the issue early, the owner avoids a breakdown and replaces the alternator before the battery dies.
How Alternator Output Changes Over Time
Alternators don’t always fail suddenly. Output drops as brushes wear and internal parts age. Regular testing helps you spot slow declines. A good rule is to check alternator amps every year or whenever you notice electrical issues.
Here’s an example of how output can change as an alternator ages:
| Age of Alternator | Typical Amps (Full Load) | Condition |
|---|---|---|
| New | 100–120 | Excellent |
| 3–5 Years | 80–100 | Good |
| 5–8 Years | 60–80 | Worn |
| 8+ Years | Below 60 | Replace soon |
Testing amps is more accurate than just checking voltage because voltage can stay normal while amps drop.
Upgrading Your Alternator
If you add high-powered accessories (like a sound system or extra lights), your stock alternator may not keep up. In these cases, test your amp draw with everything turned on. If it exceeds your alternator’s rating, consider an upgrade.
For example, adding a 1000-watt amplifier can raise your amp needs by 60–80 amps. Always match your alternator’s capacity to your car’s total electrical load.
Multimeter Vs. Professional Testers
You might wonder if a home multimeter is as good as professional shop equipment. Here’s a quick comparison:
| Tool | Accuracy | Safety | Cost | Best For |
|---|---|---|---|---|
| Basic Multimeter | Good (up to 10–20A) | Medium | Low | DIYers, basic cars |
| Clamp Meter | Very Good | High | Medium | Most car owners |
| Shop Load Tester | Excellent | High | High | Mechanics, advanced systems |
For most home mechanics, a clamp meter offers the best balance of safety and accuracy.
Practical Tips For Accurate Testing
- Warm Up the Engine: Let the engine run for a few minutes before testing. Cold alternators may not give full output.
- Test at Different RPMs: Alternators produce more amps at higher RPMs. Check at idle and at 2000 RPM.
- Repeat the Test: Try multiple times to confirm the results.
- Keep Multimeter Leads Secure: Loose connections can cause fluctuating readings.
- Don’t Rush: Take your time to avoid mistakes or accidents.

Credit: tameson.com
Additional Resources
For those who want to go deeper, you can find more on alternator testing and automotive electrical systems at the Wikipedia Alternator page.
Frequently Asked Questions
How Do I Know If My Alternator Is Producing Enough Amps?
You’ll know by comparing your measured amp output to the specification in your car’s manual. If your alternator produces amps within 10% of the rated value (for example, a 100A alternator showing 90–110A under load), it’s healthy. If it’s much lower, the alternator may need repair.
Can I Use A Regular Multimeter To Measure Alternator Amps?
A regular multimeter can measure low currents (up to 10–20 amps) directly, but most alternators produce much more. For higher currents, use a clamp meter designed for DC amps. Never try to measure high current directly with a standard multimeter.
What’s The Difference Between Measuring Voltage And Amps On The Alternator?
Voltage measures electrical pressure, while amps measure the amount of current flowing. An alternator can show normal voltage (13. 5–14. 5V) but still not produce enough amps to run the car. That’s why checking amps is important for a complete diagnosis.
What Should I Do If My Alternator Output Is Low?
First, check for loose or corroded connections, a worn belt, or a weak battery. If all those are fine and the alternator still produces low amps, it likely needs to be repaired or replaced.
Is It Safe To Test Alternator Amps By Myself?
Yes, if you follow safety precautions: use the right tools, wear protective gear, and avoid disconnecting the battery unless your car’s manual allows it. If you’re unsure or uncomfortable, it’s best to let a professional handle the test.
Knowing how to check your alternator amps with a multimeter is a practical skill that can save you money and prevent breakdowns. With the right tools and careful steps, you can confidently diagnose charging problems and keep your car’s electrical system in top shape.

Credit: www.youtube.com