Are you having trouble with your PTO clutch and unsure if it’s working properly? Knowing how to test your PTO clutch with a multimeter can save you time, money, and frustration.
In this guide, you’ll learn simple steps to check your clutch’s electrical components quickly and accurately. Whether you’re a beginner or just want to be sure your equipment is in top shape, this easy-to-follow method will help you avoid costly repairs down the road.
Keep reading to take control of your PTO clutch testing and keep your machinery running smoothly.
Credit: www.lawnsite.com
Pto Clutch Basics
The PTO clutch is an important part of many machines. It helps transfer power from the engine to other tools or parts. Understanding the basics of the PTO clutch is key to testing it properly. This section covers what a PTO clutch is and common problems it may have. Knowing these basics makes the testing process easier and more accurate.
What Is A Pto Clutch
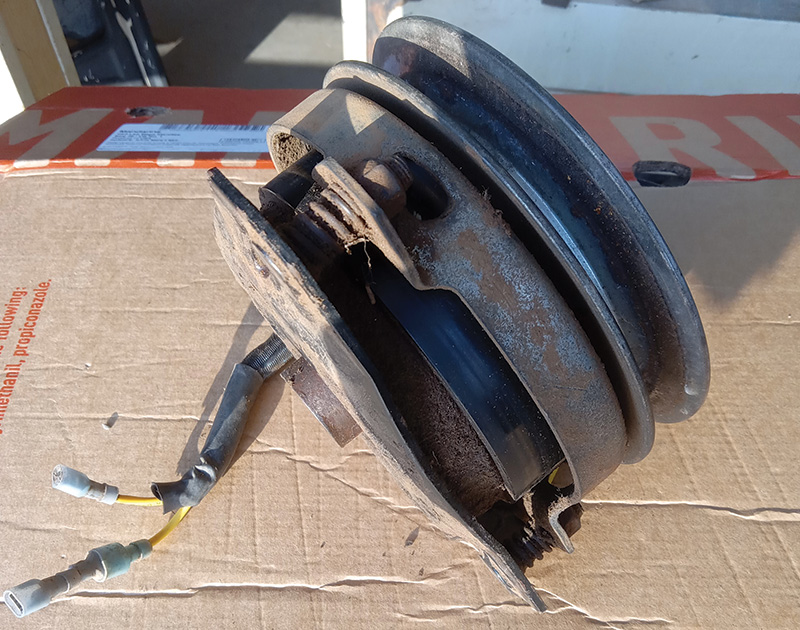
A PTO clutch connects the engine to the power take-off shaft. It allows the machine to start and stop power delivery smoothly. This clutch often uses an electric coil to engage and disengage. When the coil gets power, the clutch engages and transfers power. When power stops, the clutch disengages. This system helps control tools like mowers and snow blowers.
Common Issues With Pto Clutches
PTO clutches can fail due to several common problems. One issue is coil burnout, where the electric coil stops working. Another problem is worn friction material, which causes slipping. Dirt and debris can also block the clutch from engaging fully. Loose or damaged wiring may stop the coil from getting power. Testing these parts with a multimeter helps find such faults quickly.
Credit: gcmonline.com
Tools Needed
Testing a PTO clutch requires the right tools for accurate results. Using proper equipment ensures safety and efficiency. This section covers the essential tools you need to test your PTO clutch with a multimeter.
Choosing The Right Multimeter
Select a multimeter that can measure resistance and continuity. Digital multimeters are easy to read and reliable. Look for one with a clear display and a range suitable for low resistance. A handheld device with simple controls works best for beginners. Ensure the multimeter has fresh batteries to avoid false readings.
Additional Equipment
Besides the multimeter, gather a few extra items. Insulated test leads help prevent electric shocks. A screwdriver may be needed to access clutch terminals. Wear safety gloves to protect your hands. Also, keep a clean cloth to wipe any dirt or grease from the clutch parts. These small tools make the testing process smoother and safer.
Safety Measures
Always disconnect power before testing the PTO clutch to avoid electric shock. Use insulated tools and wear gloves for extra protection. Double-check connections to prevent short circuits during multimeter use.
Preparing Your Workspace
Start by clearing the area around the PTO clutch. Remove any tools or debris that could cause accidents. Ensure good lighting to see all parts clearly. Keep the multimeter and other tools within easy reach. Check that the engine is off and the key is removed. This prevents accidental starting. Avoid working near water or wet surfaces to reduce shock risks.
Personal Protective Equipment
Wear safety gloves to protect your hands from sharp edges. Use safety glasses to guard your eyes from sparks or debris. Wear sturdy shoes to protect your feet from heavy objects. Avoid loose clothing or jewelry that may get caught. Use ear protection if the environment is noisy. Dressing right reduces the chance of injury during testing.
Credit: www.youtube.com
Testing Resistance
Testing the resistance of a PTO clutch helps find electrical problems. Resistance tells if the clutch coil is good or broken. Using a multimeter is easy and quick. Follow simple steps to get accurate readings and protect your equipment.
Locating The Pto Clutch Terminals
First, find the PTO clutch terminals on the clutch coil. They look like small metal posts or screws. Check the clutch body near the wires. Terminals connect the coil to the power source. Clean any dirt or rust before testing. This helps get a clear reading.
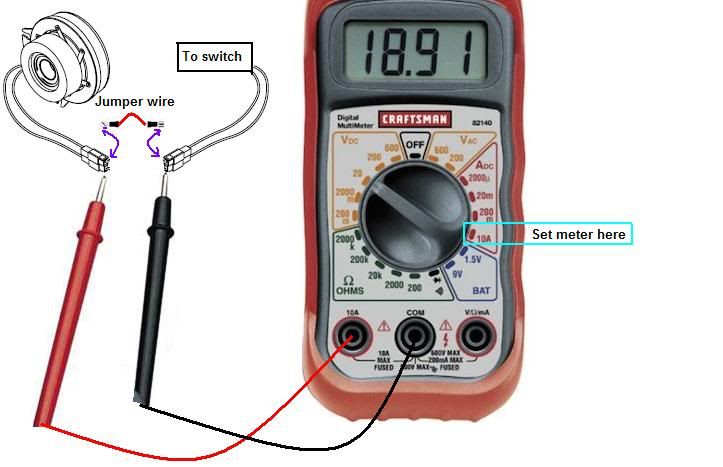
Setting Multimeter To Ohms
Turn the multimeter dial to the ohms setting. This measures electrical resistance. Choose a low range, usually 200 ohms, for accuracy. Make sure the meter’s probes are working. Touch the two probes together; the meter should show zero or close.
Interpreting Resistance Readings
Place the probes on each terminal carefully. Note the reading on the meter screen. A good PTO clutch usually shows a resistance between 3 and 8 ohms. A very high or infinite reading means a broken coil. A zero or near zero reading means a short circuit. Both problems need clutch replacement or repair.
Testing Voltage
Testing voltage is a key step in checking a PTO clutch. It shows if the clutch gets power correctly. Use a multimeter to measure the voltage. This tells you if the clutch can work well or not.
Connecting Multimeter For Voltage Test
First, turn off the machine to stay safe. Set the multimeter to measure DC voltage. Find the clutch’s power wires. Connect the multimeter probes to these wires. Red probe goes to the positive wire. Black probe connects to the negative or ground wire. Keep the probes steady for a clear reading.
Checking Power Supply To Clutch
Turn on the machine or key switch. Look at the multimeter display. It should show the correct voltage for the clutch. If the voltage is too low or zero, there might be a power supply issue. Check fuses, wires, or switches next. Correct voltage means the clutch gets power properly.
Troubleshooting Results
Troubleshooting results help you understand the condition of your PTO clutch. Testing with a multimeter shows if the clutch has electrical issues. These results guide you to fix or replace the clutch. Clear results save time and avoid guesswork.
Common Fault Indicators
Low resistance reading means a short circuit inside the clutch coil. High or infinite resistance shows a broken wire or open circuit. No reading indicates no power reaching the clutch. Fluctuating readings can suggest loose connections or damaged wiring. These signs point to specific problems in the clutch or its wiring.
When To Replace The Pto Clutch
Replace the clutch if resistance is too low or too high. A damaged clutch coil cannot work correctly. Replace if the clutch does not engage even with correct voltage. Physical damage like cracks or burnt spots means replacement. Frequent electrical faults and poor performance also suggest replacement.
Maintenance Tips
Proper maintenance keeps your PTO clutch working well and safe. It helps avoid sudden failures and costly repairs. Regular care ensures smooth operation and longer life for your equipment.
Regular Inspection Routine
Check the PTO clutch often for wear and damage. Look for cracks, rust, or loose parts. Test electrical connections with a multimeter to find faults early. Clean dirt and debris from the clutch area regularly. Tighten any loose bolts or screws to prevent problems.
Extending Pto Clutch Lifespan
Use the right type of oil and grease for your clutch parts. Avoid overloading the PTO system beyond its limits. Store equipment in a dry place to prevent rust. Replace worn parts promptly to stop further damage. Follow the manufacturer’s guidelines for maintenance and repairs.
Frequently Asked Questions
How Do You Test A Pto Clutch With A Multimeter?
To test a PTO clutch, set your multimeter to ohms. Measure resistance across the clutch terminals. A normal reading indicates a good coil. Infinite or zero resistance means a faulty clutch coil.
What Resistance Should A Pto Clutch Show On Multimeter?
A PTO clutch typically shows 3 to 5 ohms resistance. This value varies by model. Always check the manufacturer’s specs for exact readings. Deviations suggest coil damage or wiring issues.
Can A Multimeter Detect A Faulty Pto Clutch Coil?
Yes, a multimeter can detect coil faults. Open circuit or short circuit readings indicate a bad coil. Proper resistance confirms the coil is functional.
Why Is Testing Pto Clutch Important For Lawn Mowers?
Testing ensures the PTO clutch engages properly. Faulty clutches cause mower blades to stop working. Regular tests prevent unexpected breakdowns and costly repairs.
Conclusion
Testing a PTO clutch with a multimeter is simple and clear. Follow the steps carefully to check for electrical issues. A good multimeter reading means the clutch works fine. If readings are off, the clutch may need repair or replacement.
Regular testing helps keep your equipment running well. Take your time and stay safe during the process. This way, you avoid bigger problems later. Keep your tools ready for the next check. Simple checks save time and money in the long run.