Is your motorcycle having trouble starting, or are you worried your battery might be failing? Knowing how to test your motorcycle battery with a multimeter can save you time, money, and frustration.
You don’t need to be a mechanic or have expensive tools to check your battery’s health. With just a simple multimeter and a few easy steps, you can find out if your battery is still strong or if it’s time for a replacement.
Keep reading, and you’ll learn exactly how to do it yourself—quickly and confidently.

Credit: www.youtube.com
Tools Needed
Testing a motorcycle battery with a multimeter needs the right tools. Having these tools ready makes the process smooth and safe. You do not need many items, but each one is important. This section covers the must-have tools for checking your battery properly.
Choosing The Right Multimeter
Select a multimeter that can measure DC voltage. Look for one with a range of at least 20 volts. This range covers most motorcycle batteries. Digital multimeters are easier to read than analog ones. A clear display helps avoid mistakes. Make sure the multimeter has good probes with firm tips. This ensures a steady connection to the battery terminals.
Safety Gear Essentials
Wear safety glasses to protect your eyes from sparks or battery acid. Use gloves to keep your hands safe and clean. Insulated gloves prevent electric shocks. Avoid loose clothing or jewelry that might catch or touch the battery. A well-ventilated area reduces harmful fumes. Safety gear keeps you safe during the testing process.
Preparing The Motorcycle
Preparing the motorcycle is the first step before testing its battery. It ensures safety and accurate results. Taking time to prepare helps avoid damage or incorrect readings.
Proper preparation makes the testing process smooth and easy. Follow the steps carefully to get ready.
Turning Off The Engine
Make sure the motorcycle engine is completely off. Remove the key from the ignition to cut all power. This prevents electrical shock or damage to the multimeter.
Wait a few minutes after turning off the engine. This lets the battery settle and gives a stable reading.
Accessing The Battery
Locate the battery on your motorcycle. It is usually under the seat or side panel. Use the owner’s manual if you cannot find it.
Remove any covers or panels carefully. Keep screws or clips safe for reassembly. Avoid touching battery terminals with bare hands to prevent corrosion.
Setting Up The Multimeter
Setting up the multimeter correctly is the first step in testing your motorcycle battery. A wrong setup can give false readings or even damage the device. Take your time to prepare the multimeter for accurate and safe testing.
Selecting The Correct Voltage Range
Start by turning on the multimeter. Set the dial to measure DC voltage, often marked as V with a straight line. Motorcycle batteries usually have 12 volts. Choose a voltage range slightly higher than 12 volts, such as 20V. This setting prevents overloading the multimeter while giving precise results.
Understanding Multimeter Probes
Multimeters have two probes: red and black. The red probe connects to the positive terminal of the battery. The black probe connects to the negative terminal. Hold the probes steadily to avoid slipping. Proper probe placement ensures correct voltage readings.
Measuring Battery Voltage
Measuring the battery voltage is a key step to check your motorcycle’s battery health. This process helps you know if the battery is charged or needs replacement. A multimeter is a simple tool that shows the battery’s voltage easily. Follow each step carefully to get the correct reading.
Connecting Probes To Battery Terminals
First, turn off your motorcycle and remove the key. Locate the battery under the seat or side panel. Identify the positive terminal marked with a plus (+) sign and the negative terminal with a minus (−) sign. Take your multimeter and set it to DC voltage mode. Connect the red probe to the positive terminal. Then, connect the black probe to the negative terminal. Make sure both probes touch the metal parts of the terminals firmly. Avoid touching the probes together during this step.
Reading The Voltage Display
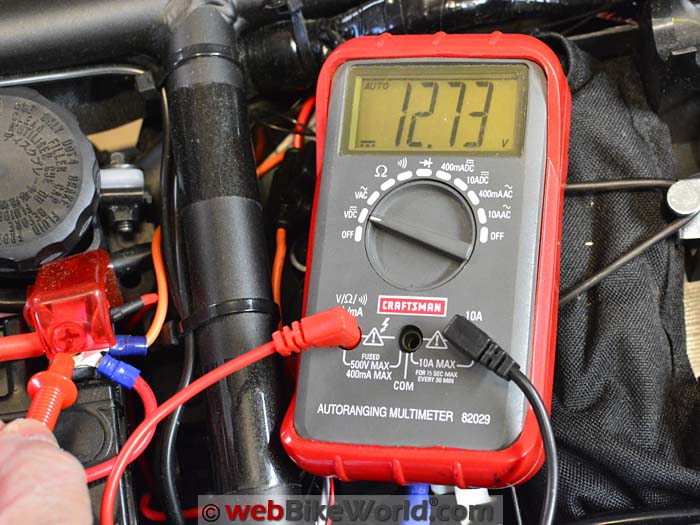
Look at the multimeter screen to see the voltage number. A fully charged motorcycle battery usually shows about 12.6 volts or more. If the reading is below 12.4 volts, the battery may be weak or discharged. If it reads below 12 volts, the battery likely needs charging or replacement. Take note of the voltage and compare it with your battery’s specifications. Always handle the battery carefully during this process to avoid sparks or damage.
Interpreting Voltage Results
After testing your motorcycle battery with a multimeter, understanding the voltage results is crucial. These numbers tell you about the battery’s health and if it can power your bike effectively. Knowing what the readings mean helps you decide if the battery needs charging or replacement.
Normal Voltage Range
A fully charged motorcycle battery shows about 12.6 to 12.8 volts. This range means the battery holds a good charge and is ready for use. If the voltage reads slightly above 12.8 volts, it might be due to recent charging. Avoid testing immediately after charging to get accurate results.
When the voltage falls between 12.4 and 12.6 volts, the battery is partly charged. It still works but may need charging soon. Readings below 12.4 volts indicate the battery is low and needs attention to avoid starting problems.
Signs Of A Weak Battery
A battery showing less than 12.4 volts often struggles to start the motorcycle. If the voltage drops below 12 volts, the battery is weak or nearly dead. This low voltage can cause slow engine cranks or failure to start.
Voltage readings under 11.8 volts usually mean the battery cannot hold a charge. Such batteries need replacement to prevent breakdowns. Consistent low voltage readings suggest sulfation or internal damage inside the battery.
Performing A Load Test
Performing a load test on a motorcycle battery helps check its true condition. This test shows how the battery works under pressure. It reveals if the battery can hold power while running the bike’s electrical system. A simple voltage test might not give the full picture. The load test gives a better idea of battery health.
Why Load Testing Matters
Batteries can show good voltage but still fail under load. Load testing checks the battery’s ability to deliver power. It helps find weak or failing batteries early. This prevents sudden battery failure on the road. Load tests also help decide if you need a new battery or just a recharge. It saves time and money by avoiding unexpected breakdowns.
Steps For A Load Test With A Multimeter
First, fully charge the battery. Turn off the motorcycle and all lights. Set your multimeter to measure DC voltage. Connect the multimeter’s red lead to the battery’s positive terminal. Connect the black lead to the negative terminal. Note the voltage reading before starting the load test.
Next, turn on the motorcycle’s headlight or use a battery load tester. This adds a load to the battery. Watch the voltage on the multimeter. Keep the load on for about 10-15 seconds. The voltage should stay above 9.6 volts. If it drops below, the battery is weak or failing.
Turn off the load and check the voltage again. It should return close to the original reading. If not, the battery may have internal damage. Record your results and decide if the battery needs replacement or charging.
Common Battery Issues
Motorcycle batteries face many common issues that reduce their performance. Knowing these problems helps you test and maintain your battery better. Simple checks can save you time and money by avoiding bigger repairs.
Corrosion And Loose Connections
Corrosion appears as white or green powder on battery terminals. It stops electricity from flowing properly. Loose connections cause the battery to lose power. Both problems make starting the motorcycle hard or impossible. Clean the terminals with a brush and baking soda mix. Tighten any loose cables for a strong connection. Regular checks prevent these issues from damaging the battery.
Battery Replacement Indicators
Some signs show your motorcycle battery needs replacement. The engine turns over slowly or not at all. The battery voltage reads below 12.4 volts on a multimeter. Bulging or leaking battery cases also mean replacement is needed. Old batteries lose their charge fast and fail often. Testing voltage regularly helps spot when to buy a new battery. Do not wait for complete failure to avoid being stranded.
Credit: aeroclubcomo.com
Tips For Battery Maintenance
Maintaining your motorcycle battery is key to keeping it healthy and reliable. Simple care steps can extend the battery life. These tips help avoid sudden battery failures and keep your bike ready to ride.
Regular Testing Schedule
Check your battery voltage with a multimeter every month. Regular tests show early signs of battery problems. Note the voltage readings and compare them over time. A healthy battery usually reads about 12.6 volts when fully charged. If the voltage drops below 12.4 volts, recharge the battery. Regular testing prevents unexpected battery failure during rides.
Proper Storage Practices
Store your motorcycle battery in a cool, dry place. Avoid areas with extreme heat or cold. High temperatures can cause battery fluids to evaporate. Cold weather can reduce battery power. Disconnect the battery if you store the bike for a long time. Use a battery maintainer or trickle charger to keep it charged. Proper storage keeps the battery in good condition and ready for use.

Credit: www.revzilla.com
Frequently Asked Questions
How Do I Test A Motorcycle Battery With A Multimeter?
Set your multimeter to DC voltage. Connect red to positive and black to negative terminals. A healthy battery reads about 12. 6 volts or higher.
What Voltage Indicates A Bad Motorcycle Battery?
If the voltage reads below 12. 4 volts, your battery may be weak. Below 12 volts usually means the battery is discharged or faulty.
Can I Test The Motorcycle Battery Without Removing It?
Yes, testing can be done while the battery is in the bike. Just access the terminals safely and follow the multimeter steps.
How Often Should I Test My Motorcycle Battery?
Test your battery every 3-6 months or if the bike shows starting issues. Regular checks help maintain battery health and avoid surprises.
Conclusion
Testing a motorcycle battery with a multimeter is simple and quick. You only need basic tools and a little patience. Checking the voltage helps you know if the battery works well or needs replacing. Regular tests keep your bike running smoothly and avoid surprises on the road.
Practice a few times to feel confident with the steps. Good care of your battery saves money and time later. Keep your bike ready for every ride by testing the battery often.