Testing a battery charger with a multimeter is a skill that can save you time, money, and frustration. Many people trust their chargers blindly, not realizing that a faulty charger can lead to battery failure, wasted power, and even safety hazards.
Knowing how to check your charger’s performance will help you avoid these problems and get the most from your batteries—whether you’re dealing with car, motorcycle, or household rechargeable batteries.
This guide will walk you step-by-step through the process, using clear explanations and practical tips. You’ll learn not only how to use a multimeter, but also how to interpret the results, spot common mistakes, and understand what really matters for different types of chargers and batteries.
Even if you’ve never used a multimeter before, you’ll gain the confidence to test your charger safely and accurately.
Why Testing A Battery Charger Matters
A battery charger’s job is to deliver the right voltage and current to your battery. If it fails, several things can go wrong:
- Overcharging can damage the battery, shorten its lifespan, or even cause leaks or explosions.
- Undercharging leaves your battery weak, making it unreliable or useless when you need it most.
- No charging means you might think your battery is the problem, when in fact, it’s the charger.
Some chargers have lights or indicators, but these can fail or give false readings. A multimeter measures the real voltage and current, so you know exactly what your charger is doing.
What You Need To Get Started
Before you begin, gather the following items:
- Digital Multimeter – Choose one with DC voltage and, if possible, DC current (amps) settings.
- Battery Charger – The charger you want to test.
- Compatible Battery – The battery type your charger is designed for (e.g., car, motorcycle, AA, etc. ).
- Insulated Gloves – For extra safety, especially with car batteries.
- Notebook and Pen – To record your readings.
Do not test a charger without a battery connected unless your charger is designed to output voltage without a battery. Some smart chargers do not show voltage unless they detect a battery.
Understanding Battery Charger Basics
Chargers come in different types and sizes. Here’s a quick overview to make sure you’re testing yours correctly:
- Linear Chargers: Simple, older chargers that provide a fixed voltage and current. Common for lead-acid and some NiMH batteries.
- Smart Chargers: Adjust charging based on battery condition. They may only show voltage when a battery is connected.
- Trickle Chargers: Deliver a low, steady current to keep batteries topped up over time.
- Fast Chargers: Provide high current for quick charging, usually with temperature or voltage monitoring.
Batteries also differ:
- Lead-Acid (Car, Motorcycle): Usually 6V or 12V.
- NiMH/NiCd (AA, AAA): Each cell is 1.2V.
- Li-ion/LiPo: Each cell is 3.6–3.7V, but chargers may handle several cells in series.
Always match the charger to the battery type.
How A Multimeter Works
A multimeter is a tool that measures voltage (V), current (A), and sometimes resistance (Ω). For battery chargers, you’ll mostly use the DC voltage and DC current settings.
- Voltage (V): Shows the pressure of electricity.
- Current (A): Shows the flow of electricity.
- Probes: Red for positive (+), black for negative (–).
Understanding how to set your multimeter is key. Always start with the highest range above your expected reading to avoid damaging the meter.

Credit: www.wikihow.com
Safety Precautions You Must Follow
Working with electricity is not without risk. Follow these rules:
- Check the charger and battery for damage before testing.
- Use gloves for car or motorcycle batteries.
- Work in a dry area away from flammable materials.
- Never touch both probes together when connected to a charger or battery.
- Do not short-circuit the charger or battery terminals.
If you are testing high-power chargers (car battery chargers, for example), be extra cautious. Even low-voltage chargers can cause sparks or burns if mishandled.
Step-by-step: How To Test A Battery Charger With A Multimeter
1. Identify Charger Output Specifications
Before testing, look at the label on your charger. Find:
- Output voltage (e.g., 12V DC, 5V DC)
- Output current (e.g., 2A, 500mA)
- Battery type (lead-acid, NiMH, etc.)
Write these down. You’ll compare them to your multimeter readings.
2. Set Up The Multimeter
- Turn your multimeter’s dial to DC voltage (V with a straight line and dots).
- If possible, set the range slightly above your charger’s rated output. For a 12V charger, set it to 20V.
- Plug the black probe into the COM port.
- Plug the red probe into the VΩmA port.
3. Test Charger Output Without A Battery (if Applicable)
Some chargers show voltage even with no battery connected. To check:
- Plug the charger into the wall.
- Touch the black probe to the charger’s negative terminal.
- Touch the red probe to the positive terminal.
- Read the voltage on the display.
If you see a voltage close to the charger’s rated output (e.g., 12.5V for a 12V charger), it’s working. If you see zero or a low reading, your charger may need a battery connected to activate (common with smart chargers).
4. Test Charger Output With A Battery Connected
This is the best way to test real-world performance.
- Connect the charger to the battery as normal.
- Set your multimeter to DC voltage.
- With the charger on, touch the black probe to the battery’s negative terminal.
- Touch the red probe to the positive terminal.
You should see a voltage higher than the battery’s resting voltage but not above the charger’s rated output. For example, charging a 12V car battery, you might see 13.5–14.5V.
5. Measuring Charging Current (optional)
If your multimeter can measure current (amps), you can check if the charger is delivering the right flow.
Warning: This involves breaking the circuit, so only do this if you are comfortable.
- Turn off the charger.
- Set your multimeter to DC current (A or mA).
- Move the red probe to the 10A or higher current port.
- Disconnect the positive wire from the charger to the battery.
- Connect the red probe to the charger’s positive output.
- Connect the black probe to the battery’s positive terminal.
- Turn on the charger.
The multimeter now completes the circuit and shows the charging current.
Typical values: For a 12V, 2A charger, you might see 1.8–2.1A at the start.
Do not leave the multimeter in current mode longer than needed, as it can heat up.
6. Interpret The Results
- Voltage matches specs: Charger works.
- Voltage much too high: Charger may be faulty, risking battery damage.
- Voltage too low: Charger may be weak, or the battery may be faulty.
- Zero voltage: Charger is dead, not powered, or needs a battery to activate.
If you measure current, compare it to the charger’s rating. Low current may mean the battery is nearly full, or there is a problem.
7. Test Under Load
Chargers sometimes show good voltage with no load, but fail when charging a real battery. Always test with a battery connected for a more accurate picture.
Non-obvious insight: Some smart chargers cycle on and off as the battery nears full. A fluctuating voltage is not always a fault—it may be normal for maintenance charging.
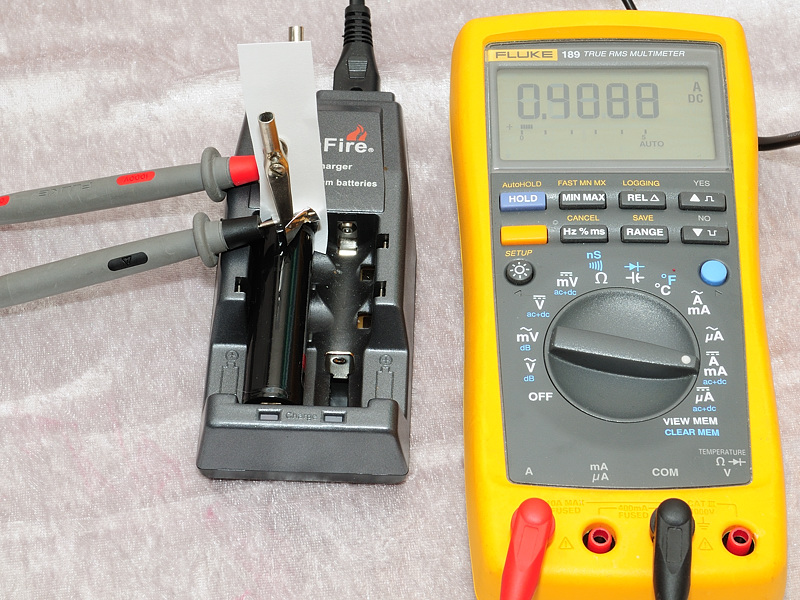
Credit: lygte-info.dk
Real-world Example: Testing A Car Battery Charger
Let’s say you have a 12V, 4A car battery charger and a standard lead-acid car battery.
- Plug in the charger, but do not connect the battery yet.
- Set the multimeter to 20V DC.
- Test the charger’s output: You see 0V. This is normal for a smart charger.
- Connect the charger to the battery. The battery’s resting voltage is 12.2V.
- Turn on the charger. Measure at the battery: You see 13.9V.
- The charger is working as expected.
- If you measure current, you see 3.8A, which is close to the rated 4A. Everything is normal.
If you saw 16V or higher, the charger may overcharge and damage the battery. If you saw 12. 2V (battery only, no charging), the charger is not working.
Data Table: Typical Charger Output Voltages
Here is a useful reference for standard charger outputs:
| Charger Type | Rated Output Voltage | Expected Charging Voltage |
|---|---|---|
| Car Battery (Lead-Acid) | 12V | 13.5–14.8V |
| Motorcycle Battery | 6V | 6.8–7.2V |
| AA/AAA NiMH | 1.2V per cell | 1.4–1.5V per cell |
| Lithium-ion | 3.7V per cell | 4.2V per cell |
| USB Charger | 5V | 4.8–5.2V |
Always compare your readings to these values.

Credit: www.youtube.com
Comparing Smart Vs. Basic Chargers
Not all chargers behave the same way. Here’s a comparison to help you understand what to expect:
| Feature | Smart Charger | Basic Charger |
|---|---|---|
| Shows Voltage Without Battery | No | Yes |
| Adjusts Charge Based on Battery | Yes | No |
| Stops Charging Automatically | Yes | No |
| Safe for All Battery Types | Most | Some |
| May Require Battery to Start | Yes | No |
Practical tip: If your charger is “smart,” always test it with the battery connected.
Common Mistakes When Testing A Battery Charger
- Using the wrong multimeter setting: Always use DC (not AC) for batteries and chargers.
- Testing without a battery on smart chargers: Can give zero reading, even if the charger works.
- Not matching voltage range: Setting the multimeter too low can damage it.
- Reversing probes: Results in negative readings, which can be confusing.
- Touching probes together: Risks short circuit and sparks.
- Trusting charger lights alone: LED indicators can fail or mislead.
Non-obvious insight: A charger that reads a little high (e.g., 0.2–0.3V above rated voltage) is often fine, but a much higher reading (over 10% above) can be dangerous for batteries.
Advanced Testing: Checking Charger Current Over Time
Some problems only appear after several minutes. For example, a charger might start strong, then drop to zero. For this, monitor charging current every 10 minutes over an hour.
- Record the current reading at intervals.
- If the current falls quickly to zero while the battery is still low, your charger may have a thermal cutoff or be faulty.
- If the current stays high for a long time after the battery is full, the charger is not regulating correctly.
Troubleshooting: What To Do If Charger Fails The Test
If your charger’s output is wrong, try these steps:
- Check the power source (outlet or extension cord).
- Test the multimeter on another device to confirm accuracy.
- Inspect charger cables and connectors for corrosion or damage.
- Try a different, known-good battery.
- For smart chargers, make sure the battery is not deeply discharged; some will not start if the battery is below a certain voltage.
If all else fails, the charger may need repair or replacement.
When To Replace Your Charger
A charger should be replaced if:
- Output voltage is far outside the rated value.
- No voltage is detected even with a good battery.
- Charger overheats, smells, or shows physical damage.
- It charges very slowly, or not at all, with known-good batteries.
Using a faulty charger can damage batteries and is not worth the risk.
Frequently Asked Questions
How Do I Know If My Battery Charger Is Working?
Use a multimeter to measure the charger’s output voltage while connected to a battery. The voltage should be higher than the battery’s resting voltage but not higher than the charger’s rated output. If you see the correct voltage, your charger is working.
Why Does My Multimeter Show Zero Voltage From The Charger?
Some smart chargers only output voltage when a battery is connected. Try connecting the charger to a battery and test again. If there’s still no voltage, check the power supply and cables.
Can I Test Charger Current With Any Multimeter?
Not all multimeters can safely measure high current. Check your multimeter’s maximum current rating before testing. For most car battery chargers, you need a multimeter rated for at least 10A. Never exceed your meter’s limits.
What Happens If My Charger Outputs Too Much Voltage?
A charger with output voltage much higher than the battery’s rating can damage the battery, causing overheating, leaks, or even explosions. Always stop using a charger that shows unsafe voltage.
Why Is My Charger’s Current Lower Than Rated?
If the battery is nearly full, the charger’s current naturally drops. If the battery is empty and the current is still low, the charger may be weak or faulty. Dirty contacts or old batteries can also cause low current.
Testing your battery charger with a multimeter is a simple process that gives you real answers about your charger’s health and performance. By following these steps, you’ll avoid the common trap of blaming your battery when the real problem is the charger. With clear measurements, you’re in control—ensuring your batteries stay strong, safe, and ready for action. For more in-depth information about multimeters and electrical testing, visit Wikipedia.