Testing a car amplifier with a multimeter might sound complex, but with the right guidance, anyone can do it. If your car’s audio system isn’t sounding right, or there’s no sound at all, the amplifier could be the problem. Knowing how to check your car amp with a multimeter can save you from expensive repairs or unnecessary replacements.
This guide will show you, step by step, how to use a multimeter to diagnose your car amplifier. Along the way, you’ll learn what readings to expect, what each test means, and how to spot subtle problems beginners often miss.
Why Test A Car Amp With A Multimeter?
A car amplifier is the heart of your sound system. It takes a small audio signal and makes it powerful enough to drive your speakers. When amps fail, they can cause silence, distortion, or even damage to other parts of your setup. A multimeter helps you measure electrical values like voltage, resistance, and continuity. This tool is essential for diagnosing whether your amp is working, receiving power, or has a deeper issue like a blown fuse or faulty wiring.
Many issues in car amps are not visible to the eye. Wires may look fine but carry no current. A fuse might blow without any external signs. With a multimeter, you can test every part quickly and accurately. Testing also helps you avoid “guesswork repairs” that waste time and money.
Essential Tools And Safety Precautions
Before starting, gather these tools:
- Digital multimeter (auto-ranging is best, but manual is fine)
- Screwdrivers (to access amp and connections)
- Insulated gloves (for safety)
- Car amp wiring diagram (from your amp’s manual or manufacturer website)
- Pen and paper (to note readings)
- Flashlight (for dark car interiors)
Safety first: Always disconnect the car’s negative battery terminal before working on any electrical parts. This prevents short circuits and accidental shocks. Wear insulated gloves and avoid touching bare wires. If your amp was recently in use, let it cool down to avoid burns.
Understanding Car Amplifier Terminals
Before you start testing, it’s important to know what each terminal on your amplifier does. Most car amps have these main connections:
- Power (B+): Connects to the car’s battery (+12V)
- Ground (GND): Connects to the car’s metal chassis
- Remote (REM): Gets a signal from the head unit to turn on
- Speaker outputs: Connects to speakers/subwoofers
- RCA inputs: Receives audio signal from head unit
Understanding these helps you test the correct points and avoid confusion. A common mistake for beginners is testing the wrong terminal, leading to false readings.
How A Multimeter Helps Diagnose Car Amp Problems
A multimeter can measure three main things:
- Voltage: Checks if power is reaching the amp
- Resistance (Ohms): Checks for blown fuses, bad wires, or speaker problems
- Continuity: Tests if a wire or circuit is complete
You’ll use all three functions when diagnosing a car amp. For example, if your amp is not turning on, you’ll check voltage at the power and remote terminals. If your speakers sound distorted, you might test resistance at the output terminals.

Credit: www.youtube.com
Step-by-step: How To Test A Car Amp With A Multimeter
Let’s break down the process into clear steps. Each step covers what to check, how to do it, and what the results mean.
1. Visual Inspection
Before using your multimeter, look for obvious problems:
- Loose wires or connectors
- Burn marks or melted insulation
- Blown fuses (glass fuse may look black or broken inside)
- Signs of water damage or corrosion
Fix any visible issues first. Sometimes, a simple loose wire causes the problem.
2. Test Power Supply To The Amplifier
Reconnect the car battery’s negative terminal for this step.
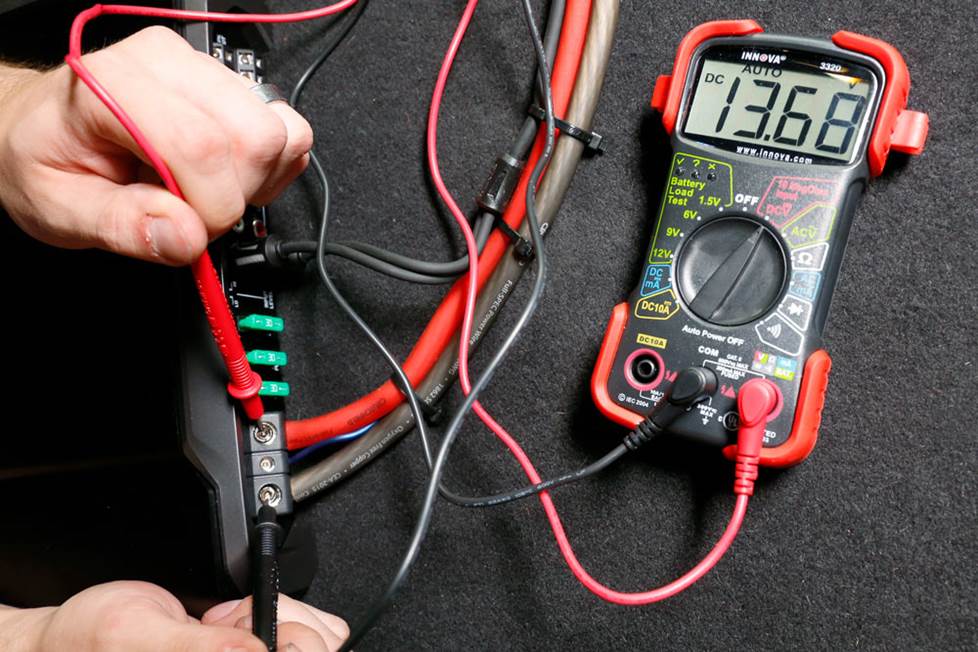
- Set the multimeter to DC voltage (20V range).
- Place the black probe on the amp’s ground (GND) terminal.
- Place the red probe on the power (B+) terminal.
A healthy amp should read around 12–14.4 volts (car engine off/on). If the voltage is much lower, your amp isn’t getting enough power.
Non-obvious tip: Test voltage both with the engine off and running. If voltage drops under load (engine running, music playing), your wiring or battery may be too weak.
3. Check The Remote Turn-on Wire
The remote wire tells your amp to power up when the stereo turns on.
- With the black probe on GND, touch the red probe to the REM terminal.
- Turn on your car stereo.
You should see 12V. If you see 0V, the head unit may not be sending the signal, or the wire is broken.
Beginner insight: The remote wire often comes from the blue/white wire of your head unit. Many mistakes happen by confusing it with other blue wires (like power antenna).
4. Inspect The Amplifier Fuse
Most amps have a fuse near the power terminal or in the main power cable.
- Remove the fuse from its holder.
- Set your multimeter to continuity or lowest resistance (Ohms).
- Touch probes to each end of the fuse.
A good fuse shows 0 Ohms or a beep. A blown fuse shows OL (over limit) or no beep.
Extra tip: Replace with the same amp rating only. Using a higher-rated fuse can damage your amp.
5. Test The Ground Connection
A bad ground is a common cause of amp problems.
- Set multimeter to continuity or low resistance.
- Place one probe on the amp’s GND terminal, the other on the metal chassis (bare metal, not painted).
You should see less than 1 Ohm. If it’s higher, clean the contact point and retest.
Hidden issue: Sometimes, the wire is connected but the metal is painted, blocking the connection. Scrape off paint to get a good ground.
6. Measure Speaker Output Terminals
Distorted sound or no sound can mean a problem at the speaker outputs.
- Set the multimeter to AC voltage (since music is AC).
- Play music with the amp on.
- Touch the probes to the + and – speaker terminals.
You should see voltage changing with the music. No voltage means the amp isn’t sending signal.
Advanced insight: If you see high voltage with no speakers connected, but low voltage when connected, your speakers may be shorted or blown.
7. Check For Output Shorts
To check if your amp’s output is shorted:
- Turn off the amp, disconnect all speakers.
- Set multimeter to continuity or lowest Ohms.
- Touch probes to the + and – speaker outputs.
If you get a beep or 0 Ohms, there’s a short inside the amp.
Beginner mistake: Do not test continuity with power on. This can damage your meter.
8. Test Rca Input Signal
If your amp has power but no sound, check the RCA inputs.
- Set multimeter to AC voltage.
- With music playing, touch probes to the RCA center pin (red) and outer ring (black).
- You should see a small voltage (0.2–2V AC).
If there’s no voltage, the head unit or RCA cable may be bad.
9. Testing The Amplifier’s Internal Components
This step is more advanced and often skipped by beginners. But sometimes the amp’s internal transistors, capacitors, or resistors may fail.
- Transistors: Test for shorts (0 Ohms) or opens (OL) between legs with the amp off.
- Capacitors: Use the meter’s capacitance mode, if available, to check for correct value.
- Resistors: Compare measured resistance to the color code or schematic.
If values are way off, the component may need replacing. For most users, this step is best left to professionals.
10. Comparing Your Results
Here’s a quick reference for what your readings should look like.
| Test Point | Expected Reading | Possible Problem if Incorrect |
|---|---|---|
| Power (B+) | 12–14.4 V DC | Wiring, fuse, battery |
| Remote (REM) | ~12 V DC when stereo on | Head unit, remote wire |
| Ground (GND) | <1 Ohm to chassis | Poor ground, paint, corrosion |
| Speaker Output (music playing) | Fluctuating AC voltage | Amp or speaker problem |
| RCA Input (music playing) | 0.2–2 V AC | Head unit, RCA cable |
| Fuse | 0 Ohm (continuity) | Blown fuse |
Common Issues And What Your Multimeter Tells You
Interpreting your readings is key. Here’s how to use your results to diagnose the most common amp problems.
No Power To Amp
- Zero volts at power terminal: Broken wire, blown fuse, or battery problem.
- Good power but zero at REM: Remote wire not connected or bad head unit.
- Power and REM good, but amp still off: Amp is faulty internally.
Amp Goes Into Protection Mode
Many amps have a protection light or shut off if something’s wrong.
- High resistance on ground: Clean or tighten ground connection.
- Short at speaker outputs: Disconnect speakers and retest. If the short stays, the amp may have an internal fault.
- Voltage drops when music plays: Upgrade power/ground wires or battery.
Distorted Or No Sound
- No voltage at speaker outputs: Amp output stage may be dead.
- Low or zero voltage at RCA input: Check head unit and RCA cable.
- Correct voltage everywhere but still no sound: Try a known good speaker.
Blowing Fuses
- Fuse shows 0 Ohm (good) but blows after turning on: Short inside amp, often in power transistors.
- Fuse blows instantly: Severe internal problem, amp may need repair.

Credit: www.wikihow.com
Two Real-world Examples
To make this practical, here are two scenarios based on real troubleshooting cases.
Example 1: Amp Not Turning On
A car owner finds their amp won’t turn on. Using the multimeter:
- Power terminal: 12.4V (good)
- Remote: 0V (bad)
- Ground: 0.5 Ohm (good)
Diagnosis: The remote wire was not sending the turn-on signal. The solution was to reconnect the blue/white wire at the head unit.
Example 2: Distorted Sound From Speakers
Another user hears distortion even at low volume.
- Power: 14.1V (good)
- Remote: 12.2V (good)
- Speaker output: Fluctuates but low voltage
- RCA input: 0.1V AC (too low)
Diagnosis: The head unit’s RCA output was weak. Replacing the RCA cable and cleaning the connectors fixed the issue.
Tips For Accurate Testing
Here are some practical tips you won’t find in most guides:
- Test under real conditions: Always check voltage with the system playing music and the car running. Idle readings can hide problems.
- Wiggle test: Gently move wires while watching the meter. If readings jump, you may have a bad connection.
- Record your values: Write down results for each test. This helps track changes or compare with manufacturer specs.
- Check both ends: Test voltage at the battery and at the amp power terminal. A big drop means your wire is too thin or too long.
- Don’t ignore small resistance: Even 2–3 Ohms at the ground can cause problems in high-power systems.
Credit: www.crutchfield.ca
Comparing Multimeter Types For Car Audio Work
There are different types of multimeters. Which is best for car audio?
| Type | Features | Best For | Drawbacks |
|---|---|---|---|
| Manual Range Digital | Manual selection, simple display | Budget users | Slower, needs knowledge |
| Auto Range Digital | Automatic selection, more functions | Beginners, quick tests | More expensive |
| Analog Meter | Needle display, no batteries for Ohms | Visual trends, old-school users | Less precise, hard to read |
For most car amp testing, a basic auto-ranging digital multimeter is easiest and fastest.
When To Seek Professional Help
Not every amp problem can be solved at home. Call a professional if:
- You find a short inside the amplifier.
- Fuses keep blowing even after replacing with the correct size.
- Internal components (transistors, capacitors) test bad.
- You see smoke, smell burning, or notice melted parts.
Attempting complex repairs without the right skills can cause more damage. Good repair shops have advanced tools like oscilloscopes for deeper diagnostics.
Preventing Future Amplifier Problems
Testing your amp is just one part of good car audio care. To prevent issues:
- Use quality wires and connectors. Cheap wires often cause voltage drops.
- Keep fuses close to the battery, not just the amp.
- Avoid running power and RCA cables side by side (can cause noise).
- Make sure all grounds touch bare metal, not paint.
- Check connections every few months, especially if you drive on rough roads.
Following these steps keeps your amp healthy and your music clear.
Frequently Asked Questions
How Can I Tell If My Car Amp Is Blown With A Multimeter?
Set your multimeter to continuity or lowest Ohms and test between the speaker output terminals. If you get a beep or 0 Ohms with speakers disconnected, the amp may have an internal short and is likely blown. Also, check the fuse and power terminals—no voltage or a blown fuse can also signal a blown amp.
Can I Test A Car Amplifier Without Removing It From The Car?
Yes, you can do most tests (power, ground, remote, output) with the amp installed. Only for internal component testing or if you find a short should you remove the amp. Always disconnect the battery before removing the amp.
What Voltage Should My Car Amp Get?
At the power (B+) terminal, you should see 12–14.4 volts DC, depending on whether the engine is off or running. The remote terminal should also show about 12V when the stereo is on.
Why Does My Amp Turn On But No Sound Comes Out?
Possible reasons include a bad RCA cable, no input signal, blown speakers, or the amp’s output stage failing. Use your multimeter to check for voltage at the RCA input and speaker outputs to narrow down the cause.
Is It Dangerous To Test A Car Amp With A Multimeter?
It’s generally safe if you follow basic precautions: disconnect the battery when removing the amp, avoid touching bare wires, use insulated tools, and never test continuity with the power on. If unsure, seek professional help.
Testing your car amp with a multimeter is a skill that saves money, time, and frustration. With the steps above, even beginners can find and fix most common amp problems. For more information on car electronics, visit Wikipedia’s Car Audio page. Take your time, follow safety steps, and your music will sound its best.