Testing a condenser, often called a capacitor, is an essential skill for anyone working with electronics, appliances, or automotive systems. Many electrical problems come from faulty capacitors. Learning how to check them with a multimeter can save time, money, and frustration.
Whether you’re a beginner or have some experience, this guide will give you all the details you need. We’ll go step by step, explain common mistakes, and share tips to make your testing accurate and safe.
What Is A Condenser?
A condenser, also known as a capacitor, is a basic electronic component. Its main job is to store and release electrical energy. In circuits, condensers help smooth voltage, start motors, and filter signals. You find them in air conditioners, refrigerators, cars, radios, and many other devices.
There are different types of condensers, including electrolytic, ceramic, and film capacitors. Each has its own shape and use. For example, large cylindrical capacitors are common in air conditioners, while small disc-shaped ones are found in radios.
Why Do Condensers Fail?
Condensers can fail for many reasons:
- Age and wear: Over time, materials inside break down.
- Heat: High temperatures damage the internal structure.
- Voltage spikes: Sudden high voltage can burn or burst the capacitor.
- Physical damage: Drops or impacts can crack the casing.
When a condenser fails, devices may not work, motors may not start, or you might hear humming or see flickering lights.
Types Of Multimeters For Testing
To test a condenser, you need a multimeter. This tool measures voltage, current, resistance, and sometimes capacitance. There are two main kinds:
| Type | Features | Best For |
|---|---|---|
| Analog Multimeter | Uses a needle; measures voltage, current, resistance | Quick checks, basic testing |
| Digital Multimeter (DMM) | Digital display, more precise, often has capacitance setting | Accurate measurement, advanced features |
Most people today use digital multimeters because they are simple, safe, and give accurate numbers. However, some older analog models are still good for basic checks.
Features To Look For
When choosing a multimeter for condenser testing, check for:
- Capacitance mode: Some meters can measure the actual capacitor value.
- Continuity mode: Useful for checking if there’s a short.
- Auto-ranging: Finds the right range automatically.
- Safety rating: CAT II or higher for household work.
If you don’t have a capacitance mode, you can still check basic health using resistance measurements.
Tools And Safety Precautions
Before you start, gather these tools:
- Digital or analog multimeter
- Insulated screwdriver
- Protective gloves
- Safety glasses
Safety is critical. Condensers can hold a charge even after power is off. A large capacitor can give a dangerous shock. Always discharge the condenser before touching it.
How To Discharge A Condenser
- Turn off all power to the device and unplug it.
- Wait 5-10 minutes to let charge drain.
- Use an insulated screwdriver to touch both terminals at the same time. For large capacitors, use a resistor (10K–100K ohms, 2W) to safely discharge.
- Wear protective gloves and glasses.
Never skip this step. Many beginners get hurt because they forget to discharge the condenser.
Step-by-step: How To Test A Condenser With A Multimeter
Now, let’s go through the full process in detail. There are two main ways to test a condenser:
- Using resistance (ohms) mode
- Using capacitance mode (if your meter supports it)
You’ll learn both, with clear steps and tips for best accuracy.
1. Remove And Isolate The Condenser
First, disconnect the condenser from the circuit. This prevents false readings from other components.
- Mark the wire connections or take a photo for reassembly.
- Unscrew or unplug the wires.
- If you cannot remove the condenser, at least disconnect one lead.
Isolating the condenser is important. If you test it while still connected, you may get a wrong result because other parts will affect your measurement.
2. Discharge The Condenser
Even a small capacitor can hold a charge. Use the steps above to safely discharge it.
3. Set Up The Multimeter
- For resistance test: Set your multimeter to the ohms (Ω) range. Use a higher range (e.g., 10K or 100K) for large capacitors.
- For capacitance test: Set to capacitance mode (F, µF, nF). Select the correct range for your capacitor’s rating.
Some digital multimeters have both options. Check your manual for details.
4. Testing With Resistance (ohms) Mode
This method works for most basic checks.
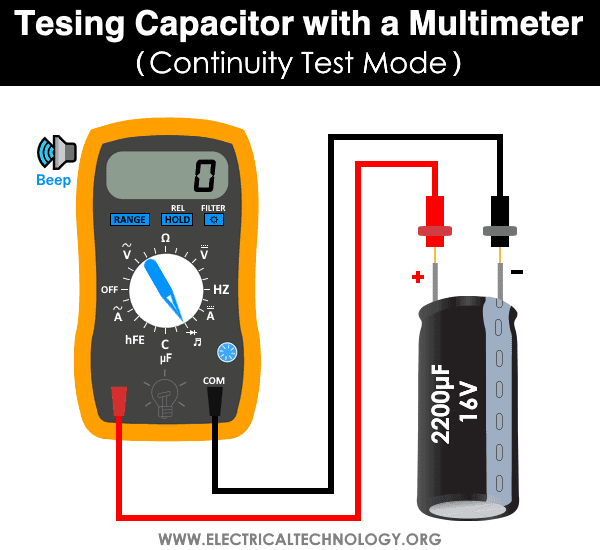
- Connect the probes: Touch the red probe to the positive terminal and the black to the negative.
- Read the display:
- For a good capacitor: The meter will show rising resistance, then move to “open” or infinity. This is because the condenser charges up from the multimeter’s battery and then blocks DC current.
- For a shorted capacitor: The meter stays at zero or low resistance (shows a short circuit).
- For an open capacitor: The meter shows infinity (no movement), meaning there’s no path inside.
Example: If you test a 10 µF capacitor, you might see the resistance jump from a few thousand ohms, then quickly rise to infinity.
Common Mistake
Many beginners reverse the probes and see a different result, especially with electrolytic capacitors (they are polarized). Always connect the red probe to the positive terminal.
5. Testing With Capacitance Mode
This method gives you the actual value in microfarads (µF), nanofarads (nF), or picofarads (pF).
- Plug the probes into the capacitance sockets (some meters have special ports).
- Connect red to positive and black to negative.
- Read the value on the display. Compare it to the number printed on the condenser.
Acceptable range: Most condensers are good if they are within ±10% of their rated value. For example, a 20 µF capacitor should read between 18–22 µF.
If the value is much lower or zero, the condenser is likely bad. If it’s much higher, it may also be faulty.
Special Note
If your multimeter does not have capacitance mode, you cannot measure the exact value. However, the resistance test is still useful for finding open or shorted condensers.
6. Double-check And Interpret Results
Always test two or three times for accuracy. Clean the condenser leads if needed—dirty leads can cause false readings.
If you are not sure, compare your readings to a new capacitor of the same type.
Practical Example: Testing A Motor Start Capacitor
Let’s look at a real-world example. Suppose your air conditioner is not starting, and you suspect the start capacitor is bad.
- Turn off all power and unplug the unit.
- Open the cover and locate the capacitor (usually a cylindrical can with two or three terminals).
- Discharge it using a screwdriver with a resistor.
- Remove the wires, noting their positions.
- Set your multimeter to capacitance mode.
- Connect the probes and read the value. If the rating is 40 µF and you read 12 µF, the capacitor is weak and should be replaced.
This process is similar for fridges, washing machines, ceiling fans, and other appliances.
What Do The Results Mean?
Knowing how to read the results is as important as testing.
| Reading | What It Means | Action Needed |
|---|---|---|
| Rising resistance, then infinity (ohms mode) | Good capacitor | OK to use |
| Zero or low resistance (ohms mode) | Shorted capacitor | Replace |
| Stays at infinity (ohms mode) | Open capacitor | Replace |
| Capacitance value within 10% of rated | Good capacitor | OK to use |
| Capacitance much lower than rated | Weak/failing capacitor | Replace soon |
| Capacitance much higher than rated | Possible internal fault | Replace |
Credit: www.electricaltechnology.org
Advanced Tips And Non-obvious Insights
Most guides stop at the basics, but a few expert tips can make your testing more reliable.
Use The “bang Test” Carefully
Some professionals gently tap the capacitor (with gloves on) and listen for a rattle. A loose sound can mean broken parts inside. This is not a replacement for electrical testing, but it can give extra clues.
Test At Room Temperature
Capacitance can change with temperature. Always test at room temperature (20–25°C) for best accuracy.
Watch For Bulging Or Leaks
A physically damaged capacitor—bulging top, leaking fluid, or rust—should be replaced immediately, even if it tests OK. Internal failure may be starting.
Check Both Terminals
On dual capacitors (common in air conditioners), test between all terminals (C–FAN, C–HERM) to check both sections.
Replace In Pairs
If you find a bad condenser in a circuit with two or more working together, replace both. Often, if one fails, the other is close behind.
Example: Automotive Ignition Condenser
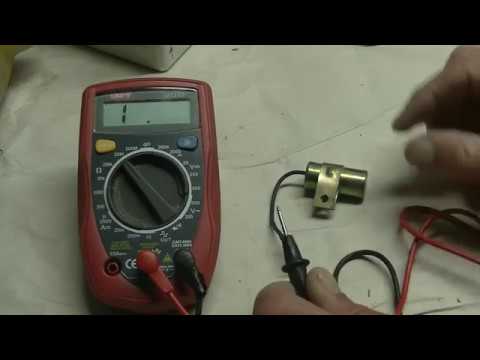
Older cars use a small condenser in the distributor. If your car is hard to start or misfires, check the condenser using resistance mode. A shorted or open condenser can cause weak spark.
Comparing Testing Methods
Testing with a multimeter is the most common method, but it’s not the only way. Here’s a quick comparison:
| Method | Equipment Needed | Accuracy | Best For |
|---|---|---|---|
| Resistance (Ohms) Test | Any multimeter | Basic (good/shorted/open only) | Quick checks |
| Capacitance Test | Digital multimeter with capacitance mode | High (shows value) | Precise testing |
| LCR Meter | Specialized LCR meter | Very high (measures loss angle, ESR) | Lab or professional use |

Credit: www.youtube.com
Common Mistakes To Avoid
Even experienced people sometimes make errors when testing condensers. Here are the top mistakes and how to avoid them:
- Not discharging the condenser: This is dangerous. Always discharge before touching.
- Testing in-circuit: Other parts can affect your reading. Remove or isolate the condenser.
- Wrong meter setting: Using too low or too high a range can give false results.
- Reverse polarity: Especially important for electrolytic capacitors.
- Ignoring physical signs: Cracks, bulges, or leaks mean the part is bad, even if the test is OK.
- Not resetting the meter: Old multimeters need to be zeroed before use.
- Rushing the test: Take your time. Let the resistance reading settle before judging.
- Using dirty probes or terminals: Clean contacts for good connection.
When To Replace A Condenser
Replace a condenser if:
- The reading is much lower or higher than rated.
- It shows a short or open.
- There are physical signs of damage.
- The device fails to start, hums, or does not run smoothly.
- The condenser is more than 10 years old (for critical equipment).
Always use a replacement with the same or slightly higher voltage and matching capacitance value.
Real-world Applications
Testing condensers is not just for hobbyists. Here are some real-life situations where this skill is useful:
- Air conditioners: A bad run/start capacitor can stop the compressor or fan.
- Ceiling fans: Won’t start or spins slowly.
- Refrigerators: Motor hums but does not start.
- Car ignition: Engine misfires or won’t start.
- Audio equipment: Distorted or no sound.
In all these cases, a quick test with a multimeter can point to the problem—saving money on repairs.
Environmental Factors And Condenser Life
Many people overlook how environment affects capacitors.
- Humidity: High moisture can corrode leads.
- Dust: Build-up can short terminals.
- Heat: Shortens life span. Install in cool areas if possible.
If you live in a hot or humid place, consider checking your appliances’ condensers every few years.
Troubleshooting: If Results Are Unclear
Sometimes, the results are not clear. If your meter reading jumps, flickers, or seems random:
- Clean the leads and probes.
- Try a new battery in your multimeter.
- Double-check you are on the right range.
- Test a known good capacitor for comparison.
If you still get unclear results, the condenser is likely faulty.
Learning More And Building Skills
Testing a condenser is just one part of electrical troubleshooting. As you gain confidence, you can move on to testing other parts like resistors, inductors, and semiconductors.
For deeper learning, online resources and textbooks can help. For example, the Wikipedia page on capacitors explains theory, types, and uses in detail.
Credit: www.youtube.com
Frequently Asked Questions
What Is The Difference Between A Condenser And A Capacitor?
They are the same thing. “Condenser” is an older term, still used in some countries and industries. Today, most people say capacitor.
Can I Test A Condenser Without Removing It From The Circuit?
It’s best to remove or at least disconnect one lead. Testing in-circuit can give wrong results because other parts affect the measurement.
What Happens If I Install A Capacitor With The Wrong Polarity?
For electrolytic capacitors, reversing polarity can cause them to fail or even explode. Always connect positive to positive and negative to negative.
My Multimeter Does Not Have Capacitance Mode. Can I Still Test Condensers?
Yes. You can use resistance (ohms) mode to check for shorted or open capacitors. However, you will not get the exact capacitance value.
How Often Should I Check Condensers In Appliances?
Check if you notice problems—motors not starting, humming, or flickering lights. In hot or humid areas, inspect key appliances every 2–3 years as preventive maintenance.
Testing condensers with a multimeter is a valuable skill. With the steps and tips here, you can diagnose problems with confidence and keep your devices running longer. Remember: safety first, and take your time for accurate results.