Testing a 12 volt battery with a multimeter is a basic but essential skill for anyone who drives a car, owns a boat, uses solar panels, or works with electronics. A healthy battery keeps your devices and vehicles running smoothly, but a weak or bad battery can cause trouble, wasted time, and even safety risks.
Many people think battery testing is complicated, but with a multimeter, you can get reliable answers in just a few minutes. Whether you’re a complete beginner or you’ve used tools before, this guide will help you test a 12V battery step by step, understand the results, and avoid common mistakes.
In this article, you’ll learn exactly what you need, how to set up your multimeter, and what each reading means. We’ll also cover safety, troubleshooting, and practical tips that most guides miss. By the end, you’ll be able to confidently test any 12V battery and know what action to take based on your results.
Why Test A 12 Volt Battery?
A 12 volt battery is used in most cars, motorcycles, boats, RVs, and many backup power systems. Over time, all batteries lose their ability to hold a charge. Heat, cold, age, and heavy use can all damage a battery. Testing helps you catch problems early—before your car won’t start or your device fails.
It also helps you avoid replacing batteries that are still good.
Testing is important if:
- Your vehicle won’t start, or starts slowly
- Headlights or electronics seem weak
- You store batteries for long periods
- You want to check charging systems (like alternators or solar)
Many people replace batteries too early or too late. Testing with a multimeter gives you clear data to make better decisions.
What You Need To Test A 12v Battery
Before you begin, collect these basic tools:
- Digital multimeter (with DC voltage range, ideally 0–20V)
- 12 volt battery (car, boat, motorcycle, etc.)
- Protective gloves and eyewear (for safety)
- Clean cloth (to wipe battery terminals)
- Notebook (to record readings, optional)
A digital multimeter is more accurate and easier to read than an analog one. If you don’t own one, you can find reliable options at hardware stores or online for $15–$30.

Credit: www.youtube.com
How A Multimeter Works
A multimeter is a tool that measures electrical values like voltage, current, and resistance. When you test a battery, you’re interested in DC voltage. This tells you how much electrical “pressure” the battery is producing. For a 12V battery, a healthy reading will be a bit higher than 12 volts when fully charged.
The multimeter has:
- Two probes (red for positive, black for negative)
- A dial or buttons to select measurement type and range
- A display screen for results
Knowing how to use the multimeter correctly is key to getting accurate readings.
12 Essential Steps To Test A 12 Volt Battery With A Multimeter
Testing a 12V battery is not just about connecting wires and reading numbers. Each step matters for safety and accuracy. Here are the 12 steps you must follow:
1. Turn Off All Power Sources
Before testing, make sure the battery is not connected to any charger or electrical device. Turn off the vehicle or device, and remove the key from the ignition. This prevents false readings and keeps you safe from sparks or short circuits.
Many people forget this step, leading to confusing results. A battery under load (being used) will show a different voltage than a resting battery.
2. Allow The Battery To Rest
After disconnecting, let the battery rest for 15–30 minutes. This waiting period allows the voltage to stabilize. If you test right after use (or charging), the voltage might be temporarily high or low due to surface charge or discharge.
Patience here gives you a true reading of the battery’s real health.
3. Inspect The Battery Physically
Before using the multimeter, look at the battery carefully:
- Check for cracks, leaks, bulging, or corrosion
- Look for loose or dirty terminals
- Smell for any strong acid or rotten egg odor (a sign of internal damage)
Physical problems can cause bad performance or even be dangerous. Never test a battery that is leaking or swollen—replace it instead.
4. Clean The Battery Terminals
Dirty or corroded terminals can block the flow of electricity and give you low readings. Use a dry cloth or wire brush to clean both the positive (+) and negative (−) posts. Make sure your hands are dry and you’re wearing gloves.
Never use water or chemicals unless the manufacturer says it’s safe.
5. Set The Multimeter To Dc Voltage
Turn your multimeter dial to DC voltage (V with a straight line). Most meters have several voltage ranges. Choose the one just above 12 volts, usually 20V. This gives the most accurate reading for a 12V battery.
If you choose a range that’s too high, you lose detail. Too low, and the meter might not display the result.
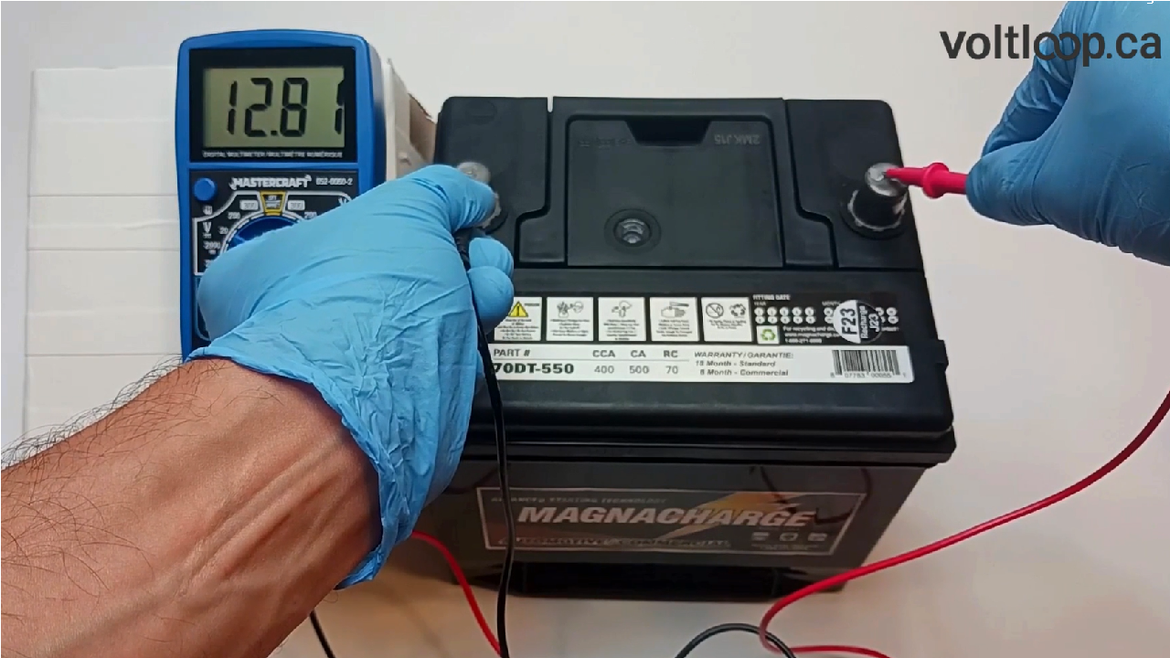
6. Connect The Multimeter Probes
Take the red probe and touch it to the battery’s positive (+) terminal. The black probe goes to the negative (−) terminal. Hold them firmly but do not force or scratch the metal.
If your meter has clips, you can attach them for hands-free testing. Double-check that you have not reversed the probes. If you do, most meters show a negative sign, but the reading is still correct in value.
7. Read And Record The Voltage
Once the probes are in place, look at the display. Write down the voltage, including decimals (for example, 12.61V). A fully charged, healthy 12V battery should show 12.6 to 12.8 volts when resting.
If your reading is much lower or higher, this means the battery is discharged or possibly damaged.
8. Interpret The Results
Understanding the voltage tells you the battery’s condition. Here’s a quick reference:
| Voltage Reading | Status | Action Needed |
|---|---|---|
| 12.6 – 12.8V | Fully Charged | Ready for use |
| 12.4 – 12.5V | 75–90% Charged | Use or recharge soon |
| 12.2 – 12.3V | 50–75% Charged | Recharge recommended |
| 12.0 – 12.1V | 25–50% Charged | Recharge needed |
| 11.8 – 11.9V | 10–25% Charged | Recharge immediately |
| Below 11.8V | Discharged/Bad | Test further or replace |
Many beginners think “12 volts” means fully charged, but actually, a healthy battery is a bit above 12 volts when resting.
9. Test Under Load (optional But Important)
Resting voltage tells only part of the story. Sometimes a battery looks fine until it’s used. To test under load:
- Turn on the headlights or a small electrical device for 2–3 minutes
- With the device still on, measure the voltage again
A good battery should not drop below 11.8 volts during this test. If it does, the battery may be weak, even if it shows a high resting voltage.
Load testing is often missed by beginners, but it’s a powerful way to spot hidden problems.
10. Compare With Manufacturer Specs
Check your battery’s label or manual for the recommended voltage range. Some batteries (like AGM or gel types) may have slightly different numbers. Always compare your reading with what the manufacturer says.
If you’re not sure, most 12V lead-acid batteries follow the chart above. For special batteries, look up specs on the manufacturer’s website or resources like Wikipedia.
11. Check For Parasitic Drain (if Needed)
If your battery keeps losing charge quickly, there may be a parasitic drain—something is using power even when everything is “off.” To check:
- Set your multimeter to measure current (amps or milliamps)
- Disconnect the negative battery cable
- Connect the red probe to the battery post, black to the cable end
A healthy system should show less than 50 milliamps (0.05A) for cars at rest. Higher numbers mean something is draining your battery.
This test is more advanced, but it can help solve mysterious battery problems.
12. Retest After Charging Or Replacement
If your battery was low, recharge it fully (using a charger, not just the car’s alternator). Let it rest, then test again. If the voltage does not rise, or drops quickly after use, the battery is likely worn out and needs replacement.
Never rely on a single test. Batteries can “bounce back” temporarily, but repeated tests show the real story.

Credit: voltloop.ca
Common Mistakes And How To Avoid Them
Even careful people can make errors when testing batteries. Here are some mistakes to watch for:
- Testing right after use or charging: Always let the battery rest first.
- Dirty or loose connections: Clean terminals and hold probes firmly.
- Wrong multimeter setting: Use DC volts, not AC or other ranges.
- Not comparing with specs: Different battery types may have unique voltage ranges.
- Ignoring safety: Wear gloves, avoid sparks, and never test damaged batteries.
A simple habit—double-checking your steps—can prevent confusion and even accidents.
Safety Tips For Battery Testing
Working with batteries is usually safe, but accidents can happen. Here’s how to protect yourself:
- Wear gloves and safety glasses to protect from acid or sparks.
- Work in a well-ventilated area to avoid explosive gases.
- Never smoke or use open flames near batteries.
- Keep metal tools away from battery terminals to avoid shorts.
- Dispose of old or damaged batteries at recycling centers.
12V batteries can deliver high current, so always treat them with respect.
Differences Between Battery Types
Not all 12V batteries are the same. The most common types are:
- Lead-acid (flooded): Used in most cars, cheap but heavy.
- AGM (Absorbed Glass Mat): Sealed, maintenance-free, found in newer vehicles.
- Gel cell: Used in mobility devices, boats, solar systems.
- Lithium-ion: Lightweight, high performance, often in RVs or marine use.
Different types may show slightly different “full” voltages or need special chargers. Always check your battery’s label. For example, a fully charged AGM may show up to 13.0V, while a regular lead-acid is usually 12.6–12.8V.
Here’s a quick comparison:
| Battery Type | Typical Full Voltage | Common Use |
|---|---|---|
| Lead-acid (flooded) | 12.6–12.8V | Cars, trucks |
| AGM | 12.8–13.0V | Modern vehicles, motorcycles |
| Gel cell | 12.6–12.9V | Boats, backup power |
| Lithium-ion | 13.2–13.6V | RVs, solar |
How To Choose The Right Multimeter
Not all multimeters are the same. When buying or borrowing, look for:
- Clear digital display
- DC voltage range up to at least 20V
- Sturdy probes with good insulation
- Auto-ranging is helpful but not required
- CAT rating (safety category) for automotive use
Don’t buy the cheapest option; a reliable multimeter lasts for years and keeps you safe.
Reading Multimeter Results: Real Examples
Let’s walk through some typical test results and what they mean.
Example 1:
You test a car battery after resting. The meter reads 12.65V. This means the battery is fully charged and healthy.
Example 2:
You test after the car wouldn’t start. The resting voltage is 11.95V. After charging, it rises to 12.4V but drops below 11.8V under load. This battery is near the end of its life.
Example 3:
A solar backup battery reads 12.2V after a night of use. This is 50–75% charged. Recharge it soon.
How Results Change With Temperature
Battery voltage can change with temperature. In cold weather, a healthy battery may show slightly lower voltage, and performance drops. In hot weather, readings may be a bit higher, but battery life shortens.
Here’s a rough guide:
| Temperature | Expected Voltage |
|---|---|
| 0°C (32°F) | 12.5–12.6V |
| 20°C (68°F) | 12.6–12.7V |
| 35°C (95°F) | 12.7–12.8V |
Always test batteries at room temperature if possible for best results.
What To Do If Your Battery Fails The Test
If your battery reads low or drops quickly under load:
- Try charging it fully with a quality charger
- Retest after resting
- If voltage stays low or drops quickly, replace the battery
Never try to “revive” a battery with tricks like adding acid or shaking. This is unsafe and rarely works.
For batteries under warranty, bring your test results to the store. Most shops will test and replace faulty batteries for free.
Credit: voltloop.ca
Practical Tips Most Beginners Miss
- Test before you buy: Many shops will let you test a new battery before purchase.
- Record readings over time: Track voltage every few months to spot slow decline.
- Don’t rely on dashboard lights: Battery warning lights often come on too late.
- Check your charger output: Use the multimeter to make sure your charger is working.
- Label old batteries: Write test dates on batteries to remember their age and condition.
These habits save money and prevent headaches.
Frequently Asked Questions
What Does It Mean If My Battery Shows 12 Volts But Won’t Start My Car?
A reading of 12.0 volts may sound “normal,” but it actually means the battery is only about half charged. If it drops below 11.8V under load (while starting), the battery is weak or bad. Sometimes, the battery has enough voltage but not enough current (amps) due to internal damage.
Can I Test A 12v Battery While It’s Still In The Car?
Yes, you can test with the battery connected, but make sure the car is off and all accessories are off. For best results, disconnect one terminal to eliminate any small draws from the vehicle’s electronics.
How Often Should I Test My Car’s Battery?
Test every 3–6 months, before long trips, and before winter or summer seasons. If your vehicle sits unused, test monthly.
Is A Higher Voltage Always Better?
No. A reading above 12.9V (without charging) can mean surface charge, overcharging, or a faulty charging system. Always let the battery rest and compare with manufacturer specs.
Do I Need To Test Both Voltage And Current?
Voltage testing is enough for most cases. Testing current (amps) is needed only if you suspect a parasitic drain or want to measure the battery’s ability to deliver power (using a special load tester).
Testing a 12 volt battery with a multimeter is quick, easy, and reliable when you follow these steps. You’ll avoid guesswork, save money, and stay safe on the road or at home. With a little practice, you’ll be able to spot battery problems early and keep your vehicles and devices running smoothly.