If your golf cart isn’t starting or is acting up, the solenoid might be the culprit. But how can you be sure?
Testing your golf cart solenoid with a multimeter is a simple step you can take right now to find out what’s going on. In this guide, you’ll learn exactly how to check your solenoid’s health without needing to be an expert.
Keep reading, and you’ll save time, avoid unnecessary repairs, and get your golf cart back on the road faster than you thought possible.
Golf Cart Solenoid Basics
The solenoid is a key part of a golf cart’s electrical system. It acts like a switch that controls the power flow from the battery to the motor. Understanding how the solenoid works helps diagnose and fix common problems. This section explains the basics of the golf cart solenoid.
Role Of The Solenoid
The solenoid controls the connection between the battery and the motor. When you press the accelerator, the solenoid closes the circuit. This lets electricity flow to the motor. Without the solenoid, the motor would not get power. It helps the golf cart start and run smoothly.
Common Solenoid Issues
Solenoids can fail or wear out over time. A common issue is a solenoid that won’t close the circuit. This stops the motor from getting power. Another problem is a solenoid stuck in the closed position. It can drain the battery. Dirt, corrosion, or loose wires also cause solenoid problems.

Credit: www.youtube.com
Tools You Need
Testing a golf cart solenoid requires specific tools. Having the right equipment ensures accurate results and safety. This section covers the essential tools needed for this task.
Choosing The Right Multimeter
Select a multimeter with a DC voltage and continuity test feature. A digital multimeter offers clear readings. Look for one with easy-to-read numbers. The multimeter should measure voltage, resistance, and continuity. This versatility helps test different solenoid parts. Choose a model with a durable design for frequent use.
Safety Equipment
Wear insulated gloves to protect against electric shock. Safety goggles shield your eyes from sparks or debris. Use rubber-soled shoes to avoid grounding yourself. Work in a dry area to reduce risk. Keep a fire extinguisher nearby as a precaution. These tools help maintain safety during testing.
Preparing The Golf Cart
Preparing the golf cart is the first step to test the solenoid with a multimeter. This step ensures safety and easy access to the solenoid. Taking time to prepare the cart helps avoid mistakes and damage. Follow these simple actions to get ready for the test.
Turning Off The Power
Always turn off the golf cart’s power before starting. Remove the key from the ignition to prevent accidental starts. Disconnect the battery cables, starting with the negative terminal. This step stops any electric current from flowing. It protects you and the cart’s electrical parts.
Accessing The Solenoid
Locate the solenoid under the seat or near the battery compartment. Remove any covers or panels blocking access. Use basic tools like screwdrivers to open the panels carefully. Keep all screws and parts safe for reassembly. The solenoid is a small box with wires connected to it.
Credit: discover.hubpages.com
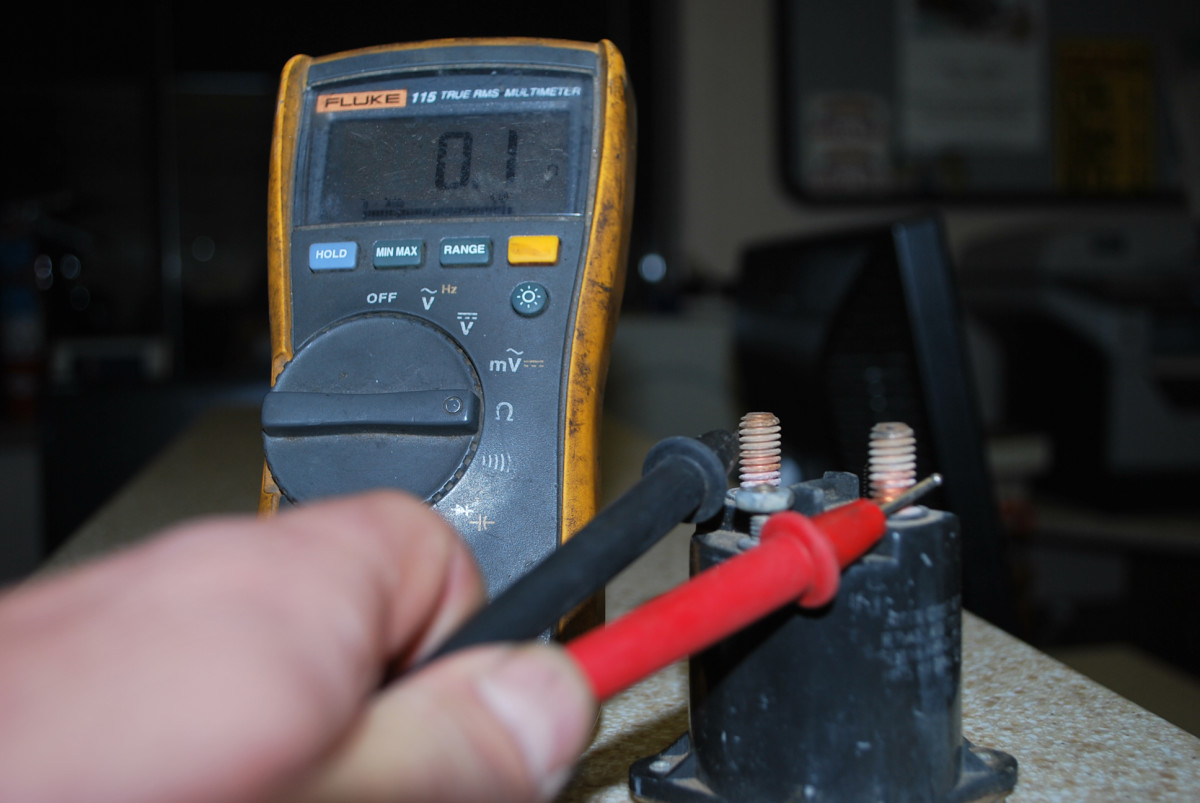
Testing Solenoid Continuity
Testing solenoid continuity helps check if the solenoid coil works well. A solenoid with good continuity lets electricity flow through. A break in continuity means the coil is damaged. Testing this is simple with a multimeter. Follow clear steps to get accurate results.
Setting The Multimeter
First, turn the multimeter on. Set it to the continuity test mode. This mode often has a symbol like a sound wave or diode. If your multimeter lacks this mode, use the lowest ohm setting. Prepare the multimeter probes by checking their condition. Clean probes give better results.
Measuring Continuity
Next, touch the multimeter probes to the solenoid terminals. Place one probe on each terminal carefully. Watch the multimeter display or listen for a beep. A beep or low reading means the coil has continuity. No beep or infinite reading shows a broken coil. Repeat the test to confirm results.
Checking Solenoid Coil Resistance
Checking the solenoid coil resistance is an important step in testing your golf cart solenoid. This test helps find out if the coil inside the solenoid is working correctly. A bad coil means the solenoid will not activate, and the cart won’t run. Using a multimeter to check resistance gives a quick and clear result. It tells if the coil is broken or shorted.
Before testing, make sure your golf cart is off and the key is removed. Safety first. Then, use the multimeter to measure the resistance across the coil terminals. The value you get will show the coil’s condition. Let’s see how to find these terminals and read the results correctly.
Locating Coil Terminals
The solenoid coil has two small terminals. These are different from the big battery terminals. You can find them near the solenoid’s side or on top. They often have labels like “S” or “C”. Sometimes they are small screws or spade connectors. Use a flashlight if needed.
Disconnect wires from these terminals before testing. This stops any current flow that might affect your reading. Use the multimeter’s probes to touch each terminal gently. Hold steady for an accurate measurement.
Interpreting Resistance Readings
The multimeter will show resistance in ohms (Ω). A good solenoid coil usually reads between 0.2 and 5 ohms. Readings much higher or lower mean a problem. If the meter shows “OL” or infinity, the coil is open or broken. If the reading is near zero, the coil may be shorted.
Compare your reading to the golf cart’s manual if available. This helps confirm the normal range for your solenoid model. If the resistance is out of range, replace the solenoid to avoid starting issues.

Credit: 10l0l.com
Testing Solenoid Activation
Testing a golf cart solenoid with a multimeter checks if it activates correctly. Measure voltage and continuity to find faults. This simple test helps keep your golf cart running smoothly.
Applying Voltage
Start by connecting your multimeter to the solenoid terminals. Set the multimeter to measure voltage. Apply power from the golf cart battery to the solenoid coil. This step activates the solenoid. Watch the multimeter reading closely. It should show battery voltage when power is applied. No voltage means a problem with the wiring or battery. Confirm the connections are secure and clean.
Observing Click Sound
Listen carefully as you apply voltage to the solenoid. A clear clicking sound means the solenoid is activating. This sound shows the internal switch is moving. No click indicates the solenoid might be faulty. Test the solenoid a few times to confirm the result. A weak or inconsistent click may mean a weak coil. Replace the solenoid if it does not click properly.
Troubleshooting Common Problems
Troubleshooting common problems with your golf cart solenoid helps keep it working well. Using a multimeter, you can check the solenoid for faults. Testing the solenoid is simple and can save time and money on repairs.
No Continuity Detected
No continuity means the circuit inside the solenoid is broken. Set the multimeter to continuity mode. Place the probes on the solenoid terminals. If the meter shows no beep or reading, the solenoid coil is likely damaged. A broken coil stops the solenoid from working. Replace the solenoid if no continuity is found.
Abnormal Resistance Values
Resistance tests show the health of the solenoid coil. Set the multimeter to the ohms setting. Measure resistance between the two small terminals. A normal reading is usually low, around 0.5 to 2 ohms. High or very low resistance means a problem. High resistance can mean a damaged coil. Very low resistance could mean a short circuit. Replace the solenoid if resistance is abnormal.
Solenoid Fails To Engage
If the solenoid does not click or engage, it might not get power. Use the multimeter to check voltage at the solenoid. No voltage means a wiring or switch issue. If voltage is present but no click occurs, the solenoid is faulty. Check the battery and connections too. Clean all terminals to ensure good contact. Replace the solenoid if it still fails to engage.
When To Replace The Solenoid
Knowing when to replace your golf cart solenoid is important. A solenoid controls the power flow from the battery to the motor. If it fails, the golf cart will not run properly. Testing with a multimeter helps find issues early. But some signs mean it is time to change the solenoid.
Signs Of Wear
Slow or no response when pressing the accelerator is a clear sign. A clicking sound without movement means the solenoid may be stuck. Dim or no lights can also show a weak solenoid. Burning smell or visible corrosion on the solenoid means damage. If the solenoid fails multimeter tests, replacement is needed.
Cost Vs Repair
New solenoids usually cost less than complex repairs. Repairing an old solenoid can take more time and money. Buying a new solenoid ensures better performance and safety. Consider the age and condition of your golf cart too. Sometimes replacing the solenoid is the best choice for long-term use.
Frequently Asked Questions
How Do I Test A Golf Cart Solenoid With A Multimeter?
To test a golf cart solenoid, set your multimeter to ohms. Check for continuity between the solenoid terminals. A reading near zero means good continuity; infinite means a faulty solenoid.
What Multimeter Setting Is Best For Solenoid Testing?
Use the ohms (Ω) or continuity setting on your multimeter. This helps check if the solenoid coil is intact or broken.
How Do I Know If My Solenoid Is Faulty?
If the multimeter shows no continuity or infinite resistance, the solenoid is faulty. Also, listen for a clicking sound when activating the solenoid.
Can A Bad Solenoid Affect Golf Cart Starting?
Yes, a faulty solenoid can prevent the golf cart from starting. It acts as a switch to control the motor power.
Conclusion
Testing a golf cart solenoid with a multimeter is simple and clear. You only need a few steps to check if it works well. This test helps find problems fast and saves money on repairs. Always handle the multimeter carefully for safe and accurate results.
Regular checks keep your golf cart running smooth and strong. Now, you can confidently test your solenoid anytime it acts up. Easy, quick, and useful—just what you need.