Calibrating a multimeter is a vital step for anyone who relies on accurate measurements in electrical work, electronics repair, or scientific experiments. If your readings are wrong—even by a small amount—you risk damaging equipment or making dangerous mistakes. That’s why understanding how to calibrate a multimeter is so important.
This guide will explain the full process, from preparation to final verification, using simple words and practical tips. Whether you’re a student, hobbyist, or professional, you’ll find clear steps, common mistakes to avoid, and insights that save you time and money.
Why Calibration Matters
A multimeter is your main tool for measuring voltage, current, and resistance. But over time, it can lose accuracy. Temperature, humidity, rough use, or even the age of the components inside can make readings drift. If you don’t calibrate, your measurements can be off by 1–5%—sometimes more. That margin can mean the difference between a safe circuit and a dangerous one.
Professional labs recalibrate their tools every six months. Most home users check once a year or after dropping the device. If you use your multimeter for critical work, calibration is not optional—it’s essential.
Types Of Multimeters And Their Calibration Needs
Not all multimeters are the same, and their calibration needs can differ.
| Type | Features | Calibration Complexity |
|---|---|---|
| Analog Multimeter | Needle display, basic functions | Simple (fewer settings) |
| Digital Multimeter (DMM) | LCD display, many ranges | Moderate (more precise) |
| Autoranging DMM | Automatic range selection | Complex (more circuits) |
Analog multimeters usually have basic adjustment screws and are less precise. Digital models may store calibration settings in memory and require more careful handling. Autoranging units may need a service manual for advanced calibration. Always check your user manual first.
Credit: www.youtube.com
When To Calibrate Your Multimeter
Many people wait until they notice strange readings, but that’s risky. Here are some good rules:
- After buying a new multimeter—factory errors happen.
- Annually, if you use it often.
- After a hard drop or exposure to moisture.
- If you see inconsistent or drifting readings.
Some multimeters have a calibration sticker or label showing the last date it was checked. If yours doesn’t, set a reminder yourself.
What You Need Before Calibration
Calibrating a multimeter is not something you can do with just any equipment. Here’s a list of must-haves:
- Reference standards: Known voltage and resistance sources. Precision resistors and voltage sources are best.
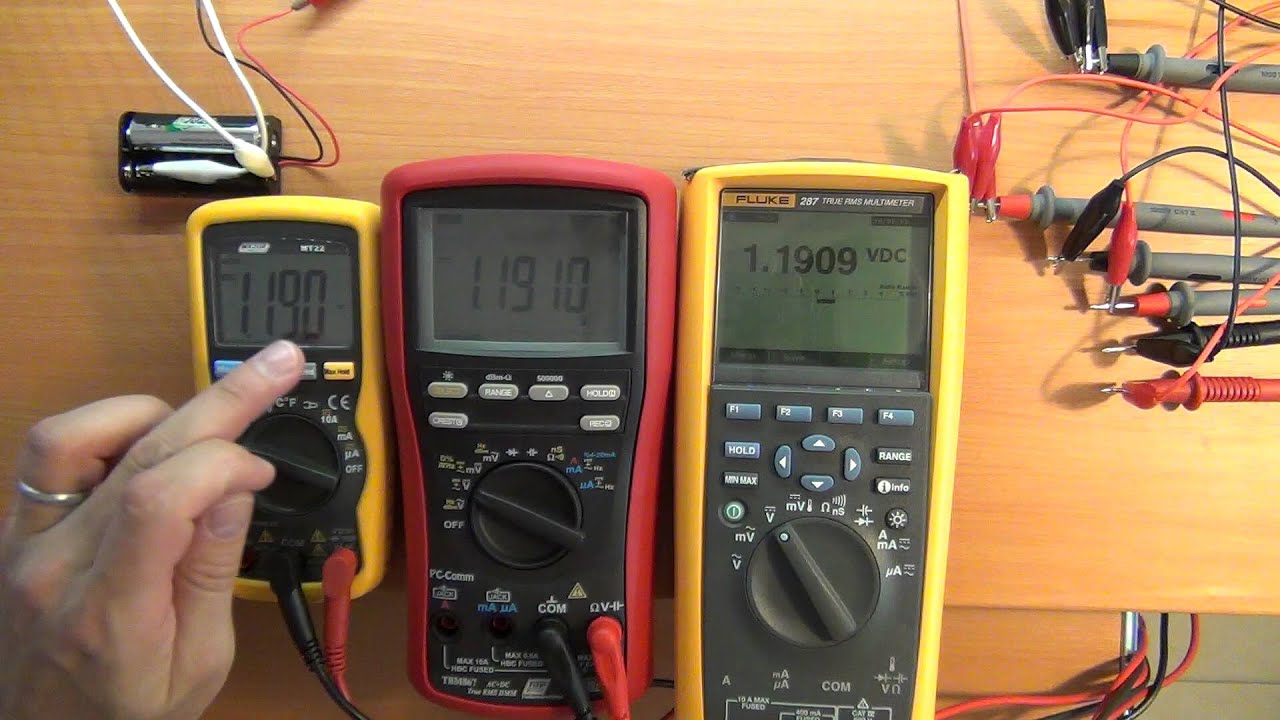
- A second, trusted multimeter: Use one with a recent calibration if you don’t have lab-grade standards.
- Insulated screwdrivers: For adjusting internal trimmers.
- User manual or service manual: For finding adjustment points.
- Clean workspace: No static, dust, or moisture.
For high accuracy, some technicians use calibrators—special devices that output exact voltages and currents. For home use, a precision 9V battery and 1% tolerance resistors are usually enough.
Safety Precautions
Before you open or adjust your multimeter, remember:
- Turn off and unplug the device before opening.
- Avoid calibration near strong magnetic or electric fields.
- Discharge your body’s static by touching a grounded metal object.
- Use only insulated tools to prevent shocks.
- If you’re unsure, leave internal calibration to a professional.
Never try to calibrate a multimeter while it’s connected to a live circuit.
Step-by-step Guide: Calibrating A Multimeter
The main keyword here is calibrate a multimeter. Let’s walk through the process in detail.
1. Set Up Your Reference Standards
First, you need a known source for each range you plan to calibrate.
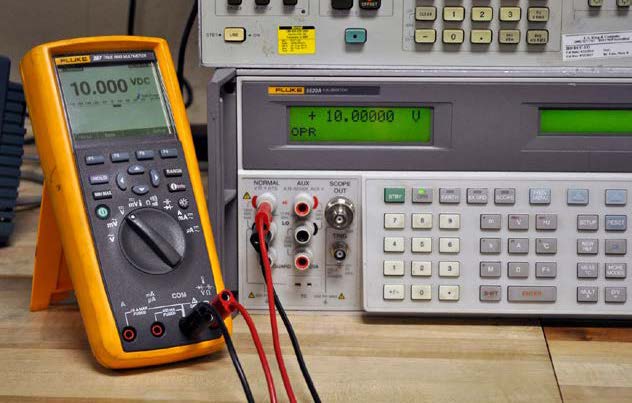
- Voltage: Use a fresh 9V battery or a voltage calibrator. Some labs use a voltage reference IC.
- Current: Use a precision current source or a resistor with a known load and voltage.
- Resistance: Use 1% tolerance resistors (e.g., 1kΩ, 10kΩ, 100kΩ).
Write down the exact value of each reference. For resistors, use a trusted multimeter to check their value first.
2. Prepare Your Multimeter
- Set the multimeter to the range you want to calibrate (voltage, current, or resistance).
- If your model has a “calibration” or “adjust” mode, enter it according to the manual.
- For analog models, locate the adjustment screws—usually marked “zero,” “span,” or “cal.”
3. Check The Zero Reading
Before connecting anything, set your multimeter to the lowest DC voltage or resistance range.
- For voltage, touch the probes together. The display should read zero.
- For resistance, do the same. Most meters have a zero-adjust knob for this.
If the zero reading is off, adjust the screw or knob marked “zero. ”
4. Calibrate Dc Voltage
- Connect the positive probe to the positive side of your voltage source and the negative probe to the negative.
- Wait for the reading to stabilize—digital meters may take a second.
- If the reading is off by more than the specified tolerance (usually 0.5%–1%), locate the “DCV Cal” adjustment inside the meter.
- Use a small insulated screwdriver to gently turn the trimmer until the display matches your reference voltage.
Some meters have separate adjustments for each range (e. g. , 2V, 20V, 200V). Repeat this for each range you use often.
5. Calibrate Ac Voltage
- Use a known AC voltage source, such as a voltage calibrator or an isolation transformer set to 120V or 230V, depending on your region.
- Connect the probes as before and check the reading.
- Adjust the “ACV Cal” or similar trimmer so the reading matches the standard.
- If you don’t have a reference, use your wall outlet, but be careful—this is less precise and more dangerous. Wear rubber gloves and never touch the probes with bare hands.
6. Calibrate Resistance
- Insert a precision resistor between the probes.
- Select the closest range (e.g., 2kΩ for a 1kΩ resistor).
- Wait for the reading to stabilize.
- Adjust the “Ohms Cal” or resistance trimmer until the display matches the resistor value.
Repeat for other resistor values if your multimeter has separate ranges.
7. Calibrate Current (amperes)
Current calibration is tricky at home. If you have a precision current source, use it. If not:
- Create a simple circuit: Connect a 9V battery, a precision resistor, and your multimeter in series.
- Calculate the exact current using Ohm’s law (Current = Voltage / Resistance).
- Set your multimeter to measure current and connect it in series.
- Adjust the “mA Cal” or similar trimmer until the reading matches your calculated current.
Always use a resistor rated for the power it will handle—otherwise, it can overheat and fail.
8. Recheck All Ranges
After adjusting, go back and repeat the measurements. Sometimes, adjusting one range can affect others. If you notice changes, fine-tune the trimmers until all ranges are as close as possible to the reference values.
9. Seal And Label
Once satisfied, close the multimeter carefully. If your meter has a calibration sticker or seal, write the date and your initials. This helps you or others know when it was last calibrated.
Credit: www.crossco.com
Common Calibration Mistakes
Even experienced technicians make mistakes. Here are some common ones and how to avoid them:
- Skipping warm-up time: Multimeters need a few minutes powered on before calibration. Otherwise, readings drift as the device warms up.
- Using low-quality references: Cheap resistors or batteries can have wide tolerances. Use the best you can get.
- Ignoring temperature: Extreme heat or cold changes readings. Calibrate in a room at 20–25°C (68–77°F).
- Over-adjusting: Turning trimmers too far can break them or push readings out of range. Make small changes and check results each time.
- Forgetting to recheck ranges: Always verify all ranges after adjustment.
Understanding Tolerance And Accuracy
Every multimeter has a tolerance—the allowed error. For example, a ±0.5% accuracy means a 100.0V reading could be anywhere from 99.5V to 100.5V. Don’t chase perfection—match your calibration to the specification in your manual.
Here’s how accuracy compares for different classes:
| Type | Typical Accuracy | Best For |
|---|---|---|
| Basic Analog | ±2.5% to ±5% | Rough checks |
| Standard DMM | ±0.5% to ±1% | Most tasks |
| Lab DMM | ±0.05% to ±0.1% | Precision work |
If your work requires better accuracy than your meter can give, consider sending it to a professional calibration lab.

Credit: electronics.stackexchange.com
When To Seek Professional Calibration
Sometimes, home calibration is not enough. Get a professional calibration if:
- You work in a certified lab or with safety-critical devices.
- Your multimeter is expensive or has advanced features.
- You need a calibration certificate for quality standards (like ISO 9001).
- The device is still inaccurate after home calibration.
Professional labs use high-precision standards and provide certificates. Costs range from $40 to $200, depending on the device.
How Digital Multimeter Calibration Differs
Digital multimeters (DMMs) are more precise but sometimes harder to calibrate. Many new models store calibration settings in memory, not with physical trimmers. Here’s what’s different:
- Some require special software or codes from the manufacturer.
- You may need a service manual (often available online).
- Memory calibration means you can reset to factory defaults if you make a mistake.
- Some models have “self-calibration” features that adjust automatically with reference inputs.
If your DMM has a USB or serial port, check the manual for calibration procedures. Never try to hack or guess digital codes—incorrect values can make your meter unusable.
Practical Calibration Tips
Here are some non-obvious tips that save time and improve results:
- Use a logbook: Write down every adjustment, reference value, and result. This helps track drift over time.
- Label your standards: Mark resistors and batteries with their exact measured values.
- Work in good light: Small screws and displays are easy to misread in poor lighting.
- Check battery voltage: A low battery inside your multimeter can cause calibration errors. Always replace before calibrating.
- Keep dust out: Even small dust particles can cause problems in analog meters. Clean the inside gently if you open the case.
Most beginners miss that temperature and humidity can affect calibration. Try to do your work in a stable, climate-controlled room for best accuracy.
Comparing Diy And Lab Calibration
You might wonder if home calibration is good enough. Here’s a simple comparison:
| Aspect | DIY Calibration | Professional Lab Calibration |
|---|---|---|
| Cost | Low (basic tools) | Moderate to high |
| Accuracy | Good (with care) | Excellent (certified) |
| Time | 1–2 hours | Several days (shipping) |
| Certificate | No | Yes |
| Best for | Hobbyists, students | Labs, professionals |
For most DIY users, careful home calibration is enough. If your work is audited or safety is critical, use a certified lab.
How To Know If Your Calibration Worked
After you calibrate a multimeter, how do you know it’s now accurate? Here’s what you should do:
- Double-check with multiple standards: Don’t trust just one resistor or voltage source.
- Compare with another calibrated meter: If both agree within tolerance, you’re in good shape.
- Measure a real-world circuit: Try checking a household battery or a known resistor in a device.
- Check over time: Repeat measurements weekly for a month. If readings drift, the meter may have internal problems.
If you see large differences, repeat the process or ask for help from a technician.
Troubleshooting Calibration Problems
Sometimes, calibration doesn’t go smoothly. Here’s how to solve common issues:
- Readings won’t stabilize: Check for loose connections, dirty probes, or static electricity.
- Meter won’t adjust: The trimmer may be broken, or the circuit inside is damaged. Don’t force the screw.
- Big errors remain: Try new reference standards. If problems persist, the meter may need repair or replacement.
If your multimeter is very old or has been dropped hard, internal damage may prevent proper calibration.
Calibration And Multimeter Longevity
Calibrating your multimeter does more than give accurate results. It also:
- Extends the life of the meter by finding problems early.
- Protects your circuits from accidental over- or under-measurement.
- Builds confidence in your work—no guessing or double-checking needed.
A well-maintained multimeter can last 10–20 years. Many professionals still use trusted brands from the 1990s, thanks to regular calibration and care.
Advanced Calibration Tools
If you plan to calibrate many meters or want the best accuracy, consider these tools:
- Voltage/Current Calibrators: Devices that produce exact values, down to 0.01%. Brands like Fluke and Keysight are trusted.
- Precision Reference ICs: Like the LM4040 or AD584, provide accurate voltages for under $10.
- Wheatstone Bridge: For resistance calibration, this classic device gives very accurate results.
For most users, a set of precision resistors and a good battery will suffice, but these tools can take your calibration to the next level.
Real-world Example: Calibrating A Digital Multimeter
Let’s go through a quick example with a common DMM:
- You have a Fluke 17B+ multimeter.
- Using a 1.000V precision source, the meter reads 0.995V.
- Manual says accuracy is ±0.5% (0.995V to 1.005V is acceptable).
- No adjustment needed—your meter is within tolerance.
- If reading was 0.980V (2% error), you’d open the case, find the “DCV Cal” trimmer, and adjust until the display shows 1.000V.
- Repeat for other ranges and functions.
This process works for most brands—just check your manual for special instructions.
Frequently Asked Questions
How Often Should I Calibrate My Multimeter?
It depends on usage and environment. For home use, once a year is usually enough. For professional or lab use, every 6–12 months is best. Calibrate after any hard drop, exposure to moisture, or if readings become inconsistent.
Can I Calibrate A Multimeter Without Special Equipment?
You can do basic calibration using fresh batteries and high-precision resistors. For best results, use a second, trusted multimeter as a reference. For high-accuracy work, professional calibrators or lab standards are recommended.
What If My Multimeter Can’t Be Calibrated Accurately?
If your meter cannot be adjusted to match reference values, it may be damaged or worn out. Check batteries, clean the device, and try again. If problems persist, consider professional repair or replacement.
Is There A Risk Of Damaging My Multimeter During Calibration?
If you follow safety steps—power off, use insulated tools, and don’t force trimmers—risk is low. Never calibrate with the device connected to a live circuit. If you feel uncertain, consult a technician or send the meter to a service center.
Where Can I Find More Detailed Calibration Standards?
For deep technical information, consult the National Institute of Standards and Technology. They provide standards, guides, and resources for calibration and measurement in many fields.
Calibrating a multimeter may sound technical, but with patience and the right tools, anyone can do it. Accurate measurements protect your work, save money, and keep you safe. Take your time, follow these steps, and your multimeter will serve you well for years.