Testing a circuit breaker is a skill every homeowner and DIY enthusiast should know. Circuit breakers keep your home safe from electrical fires and shocks. They stop the flow of electricity when there is a problem, such as a short circuit or overload.
But sometimes, a breaker may fail, or you might suspect it’s not working properly. Knowing how to check a circuit breaker with a multimeter can help you fix electrical issues quickly and safely.
This guide explains how to use a multimeter to test a circuit breaker step by step. Whether you are new to electrical work or have some experience, these instructions are clear and easy to follow. You will learn what tools you need, how to prepare, the correct testing process, and tips for getting accurate results.
We will also discuss safety, common mistakes, and how to interpret your readings. By the end, you’ll feel confident testing circuit breakers on your own—and know when to call a professional.
Why Test A Circuit Breaker?
A circuit breaker is designed to protect your home’s wiring and prevent electrical fires. But like any device, it can wear out or become faulty over time. If a breaker stops working, your lights or appliances may not function. Worse, a bad breaker can put you at risk of electric shock or fire.
Here are the main reasons to test a circuit breaker:
- Frequent tripping: If a breaker trips often, it could be faulty or overloaded.
- No power: If an outlet or appliance loses power, a bad breaker may be the cause.
- Old electrical panels: Older homes may have outdated breakers that need checking.
- Routine maintenance: Regular testing helps spot problems before they become dangerous.
Testing a breaker helps you decide if it needs replacing or if there’s another problem in the circuit.
Tools And Materials Needed
Before starting, gather all necessary tools. Using the right equipment makes the job safer and easier.
- Multimeter: A digital multimeter is best for accuracy and ease of use.
- Insulated screwdriver: For removing panel covers.
- Safety gloves: Protect your hands from electric shock.
- Safety goggles: Shield your eyes from sparks or debris.
- Flashlight: Helpful if your panel is in a dark area.
- Notebook and pen: To record readings and observations.
Some people try to test breakers without a multimeter, but this is risky and unreliable. A multimeter measures voltage and continuity, giving you clear results.
Understanding Circuit Breakers And Multimeters
Before testing, it helps to know how circuit breakers and multimeters work.
What Is A Circuit Breaker?
A circuit breaker is a switch that automatically turns off electricity when there is too much current. It protects wires from overheating. When you reset it, the circuit is restored.
There are different types of breakers:
- Single-pole: Used for most home outlets and lights (120V).
- Double-pole: Used for large appliances like dryers or ovens (240V).
- GFCI and AFCI: Special breakers that offer extra protection.
What Is A Multimeter?
A multimeter measures electrical values like voltage, current, and resistance. Most people use a digital multimeter, which displays readings on a screen. You can use it to check if electricity is flowing and if a breaker is working.
Multimeters have two main probes (red and black) that you touch to wires or breaker terminals to test them.
Safety Precautions Before Testing
Electrical work can be dangerous. Even a small mistake can cause shock, burns, or fires. Always follow strict safety steps:
- Wear safety gear: Gloves and goggles are a must.
- Turn off devices: Unplug appliances connected to the circuit.
- Clear the area: Keep children and pets away.
- Use one hand: When possible, use one hand to avoid creating a path for electricity through your body.
- Inspect your multimeter: Make sure it is working and the probes are undamaged.
- Know your limits: If you feel unsure at any point, call a professional electrician.
Many beginners skip safety checks, but this is a serious mistake. Taking a few minutes to prepare can prevent accidents.
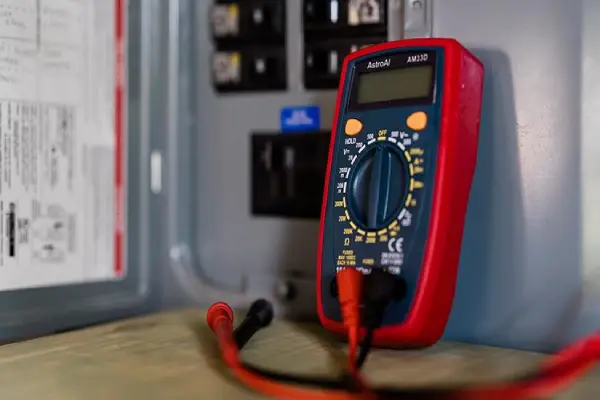
Step-by-step Guide: How To Test A Circuit Breaker With A Multimeter
Now, let’s walk through the full process of testing a circuit breaker with a multimeter. These steps work for most residential breakers.
1. Turn Off The Main Power (if Needed)
In most cases, you do not need to shut off the main breaker to test a single circuit breaker. However, if you feel nervous or if the panel is old or damaged, it’s safer to turn off the main power.
This will cut electricity to the entire panel and reduce the risk of shock.
If you keep the main power on, be extra careful. Only touch the parts you need to test, and keep your hands dry.
2. Open The Breaker Panel
Use an insulated screwdriver to remove the screws on the electrical panel cover. Set the cover aside carefully. You will see several breakers lined up inside.
Warning: Even with the cover off, parts of the panel may still have live electricity. Do not touch any wires or metal parts inside the panel unless you know they are safe.
3. Set Your Multimeter
Set your multimeter to the right setting before starting:
- To check for voltage: Set to AC Voltage (V~). For home circuits, 200V or 600V is usually correct.
- To check continuity: Set to Continuity or Ohms (Ω).
Always double-check the setting before testing.
4. Test For Voltage
To see if a breaker is working, first check if it is sending voltage.
- Place the black probe on the neutral bar (a metal bar with many white wires).
- Touch the red probe to the screw terminal on the breaker you want to test.
- Read the display.
For a single-pole breaker, you should see about 120 volts. For a double-pole breaker, it should be close to 240 volts.
If the reading is much lower than expected (for example, zero or less than half), the breaker may be faulty or off.
Example
Suppose you test a breaker marked “Kitchen” and see a reading of 0 volts. The breaker is switched on, but there is no voltage. This means electricity is not flowing through the breaker, and it may need to be replaced.
5. Test For Continuity (breaker Removed)
Sometimes, a breaker may look fine but still be bad inside. To check this, you need to test continuity. This measures if current can flow through the breaker.
Important: For this test, you must remove the breaker from the panel.
- Turn off the main power for safety.
- Use your screwdriver to carefully pull the breaker from its slot.
- Set your multimeter to continuity or the lowest ohms setting.
- Place one probe on the input terminal (where the breaker connects to the panel).
- Place the other probe on the output terminal (where the wire connects to the breaker).
If the multimeter beeps or shows a low resistance (usually less than 1 ohm), the breaker is good. If there is no beep or the reading is “OL” (open line), the breaker is bad.
6. Reinstall The Breaker And Panel Cover
After testing, carefully place the breaker back in its slot. Screw the panel cover back on. Restore power if you turned off the main breaker.
7. Record Your Results
Write down your voltage and continuity results. If you found a bad breaker, mark it for replacement.
Reading And Interpreting Multimeter Results
Knowing how to read your multimeter is key to understanding your breaker’s health. Here is a quick comparison of typical readings and what they mean.
| Test | Expected Reading | What It Means |
|---|---|---|
| Voltage (Single-Pole) | 110-125V | Breaker is working |
| Voltage (Double-Pole) | 220-250V | Breaker is working |
| Voltage (Any) | 0V | Breaker is off/faulty |
| Continuity | Beep or <1Ω | Breaker is good |
| Continuity | No beep/OL | Breaker is bad |
If your readings do not match these values, double-check your multimeter settings and connections. Sometimes, a loose probe can give a false reading.
Common Problems And Troubleshooting
Sometimes, you may get confusing results. Here are some common issues and how to solve them:
1. Breaker Trips Instantly When Reset
- Possible causes: Short circuit, ground fault, or overloaded circuit.
- Solution: Unplug all devices from the circuit, then reset the breaker. If it still trips, the problem may be inside the wiring.
2. No Voltage But Breaker Is On
- Possible causes: Faulty breaker, loose wire, or burned contact.
- Solution: Check for loose wires at the breaker terminal. If wires are tight, replace the breaker.
3. Voltage Is Lower Than Expected
- Possible causes: Poor connections, old breaker, or shared neutral wire problem.
- Solution: Tighten connections and retest. If problem remains, call an electrician.
4. Breaker Passes Voltage But Fails Continuity
- Possible causes: Internal damage or partial failure.
- Solution: Replace the breaker.
5. Multimeter Does Not Work
- Possible causes: Dead battery, wrong setting, or broken probe.
- Solution: Test the multimeter on a known power source (like a working outlet) to confirm it is working.
Many beginners think a breaker is fine if it does not trip, but hidden problems can stop it from protecting your home. Always test both voltage and continuity for a complete check.
Tips For Accurate And Safe Testing
Getting reliable results is not just about following steps. Here are some expert tips to improve your testing process:
- Use the right multimeter range: If your multimeter allows, set it slightly higher than your circuit voltage.
- Keep hands dry: Sweat or water can conduct electricity.
- Test in daylight: Good lighting helps you see connections and avoid mistakes.
- Label your panel: Write down which breaker controls which room or device. This saves time in the future.
- Replace old breakers: If a breaker is more than 20 years old or shows signs of damage, consider replacing it even if it tests fine.
When To Replace A Circuit Breaker
Testing tells you if a breaker is working, but sometimes replacement is still needed. Replace a breaker if you notice:
- Visible damage: Cracks, burns, or melted plastic.
- Frequent tripping: Trips with normal use, even when loads are low.
- Failed voltage or continuity test: As described above.
- Old age: Most breakers last 20–30 years, but may fail sooner in harsh conditions.
- Strange smells: Burning or chemical smells mean the breaker is overheating.
Do not try to repair a breaker. Always buy a new one that matches your panel’s make and model.
Different Types Of Circuit Breakers And Testing Differences
Not all breakers are the same. Here’s a quick overview of common types and what to watch for when testing.
| Type | Common Use | Testing Notes |
|---|---|---|
| Single-Pole | Outlets, lights (120V) | Test for 120V; easy to remove |
| Double-Pole | Large appliances (240V) | Test for 240V; needs both sides tested |
| GFCI | Wet areas (kitchen, bath) | Test with built-in button and multimeter |
| AFCI | Bedrooms, living rooms | Test with AFCI tester and multimeter |
For GFCI and AFCI breakers, use their test buttons first. If they do not trip, they may be faulty even if voltage is present.
Credit: mrelectric.com
Two Non-obvious Insights Beginners Often Miss
- Breakers Can Fail Silently: Many people assume a breaker is fine if it does not trip. But internal parts can wear out and stop providing protection, even if power still flows. This is why both voltage and continuity tests are important.
- Neutral Bar Is Key: When testing for voltage, always use the neutral bar (not the panel frame) for your black probe. Touching the panel frame can give false readings or even shock you if the panel is not grounded properly.
Real-world Example: Diagnosing A Kitchen Outlet Issue
Imagine your kitchen outlets stop working, but the breaker does not look tripped. Here’s how you could solve it:
- Check the breaker with your multimeter. If voltage is present, the breaker is working.
- If voltage is missing, test continuity. No continuity means the breaker is bad, even if it appears “on.”
- Replace the breaker and retest. If power returns, the problem is solved.
This approach saves time compared to guessing or replacing outlets first.

Credit: mccarrickelectric.com
Professional Vs. Diy: When To Call An Electrician
While testing breakers is safe if you follow steps, some situations need a professional:
- Old or damaged panels: If you see rust, water damage, or loose breakers.
- Strange smells or sounds: Humming, buzzing, or burning smells are serious.
- Complex wiring: If you’re unsure which wires belong to which breaker.
Electricians have specialized tools and experience. Never risk your safety to save a few dollars.
For more detailed information about multimeters and electrical safety, see the Wikipedia Multimeter page.
Frequently Asked Questions
How Often Should I Test My Circuit Breakers?
Test breakers every 1–2 years, or whenever you notice electrical problems. Frequent testing is important in older homes or if breakers trip often.
Can I Test A Breaker Without Removing It From The Panel?
Yes, you can check voltage without removing it. But for a full continuity test, you must remove the breaker to test its internal path.
Is It Safe To Test A Breaker If I Am Not An Electrician?
Yes, if you follow all safety steps—wearing gloves, keeping hands dry, and avoiding exposed wires. If you feel unsure, call a professional.
What Should I Do If My Multimeter Gives Different Readings Each Time?
Check the battery, probe connections, and settings. Make sure you are touching the correct points. If results still vary, your multimeter may be faulty.
Do All Circuit Breakers Fail The Same Way?
No, some fail by tripping too often, others stop supplying power, and some lose their protective function without any obvious sign. Always test both voltage and continuity to be sure.
Testing a circuit breaker with a multimeter is a practical skill that can save you time, money, and keep your home safe. With careful steps and attention to detail, anyone can learn to do it confidently. Remember, safety comes first—never rush, and always call a professional if you’re unsure.

Credit: www.youtube.com