Are you holding a non-digital multimeter but unsure how to use it? You’re not alone.
Many people find these classic tools confusing at first. Yet, once you know the simple steps, your non-digital multimeter can become your most trusted companion for checking circuits, testing batteries, and solving electrical problems. This guide will walk you through everything you need to master it quickly and confidently.
Keep reading, and you’ll soon feel empowered to tackle any electrical task with ease.
Multimeter Basics
A non-digital multimeter is a useful tool for measuring electrical values. It helps check voltage, current, and resistance. Knowing the basics makes it easier to use and understand this tool.
This section explains the essential parts and types of non-digital multimeters. It also covers important safety tips to keep you protected.
Types Of Multimeters
There are two main types of multimeters: analog and digital. Analog multimeters have a needle that moves over a scale. They show values with a pointer. Digital multimeters show numbers on a screen. Non-digital multimeters are usually analog. They are simple and do not need batteries.
Parts Of A Non-digital Multimeter
The main part is the dial or selector switch. It chooses what you want to measure. The needle and scale show the measurement. Test leads connect the multimeter to the circuit. The black lead is usually for common or ground. The red lead measures voltage, current, or resistance.
Safety Precautions
Always check the multimeter before use. Look for damaged wires or parts. Never touch the metal tips while testing. Use the right settings for the measurement. Start with the highest range to avoid damage. Avoid working on live circuits without protection. Keep your hands dry and wear safety glasses. These steps reduce the risk of electric shock.

Credit: www.wikihow.com
Preparing The Multimeter
Preparing the multimeter is the first step to get accurate readings. It ensures safety and proper measurement. Take your time to set up the device correctly before testing.
Selecting The Right Function
Turn the dial to choose the measurement type. Options include voltage, current, and resistance. Select the function matching the value you want to measure. This prevents damage to the multimeter and the device tested.
Choosing The Correct Range
Set the range just above the expected value. If unsure, start with the highest range. Adjust down for a clearer reading. Correct range selection improves accuracy and avoids overloading the meter.
Connecting The Probes
Insert the black probe into the common (COM) socket. Place the red probe into the socket labeled for your function. Hold the probes firmly. Proper connection is key for safe and precise measurements.
Measuring Voltage
Measuring voltage with a non-digital multimeter is a useful skill. Voltage tells how much electric power flows through a device. This helps check batteries, circuits, and electrical appliances. The process is simple if you follow the right steps. Always be careful when working with electricity.
Setting To Voltage Mode
Turn the multimeter dial to the voltage setting. Choose “V” with a straight line for DC voltage. Pick “V” with a wavy line for AC voltage. Set the range higher than the expected voltage. This avoids damage to the meter. If unsure, start with the highest range.
Measuring Dc Voltage
Connect the black probe to the COM port. Attach the red probe to the V port. Touch the black probe to the negative side of the power source. Place the red probe on the positive side. Read the voltage value on the scale. Hold the probes steady for a clear reading.
Measuring Ac Voltage
Keep the probes in the same ports as for DC. Touch the probes to the two points in the AC circuit. It may be a wall socket or appliance terminals. The meter needle will move to show the voltage. Read the value carefully on the AC scale. Avoid touching metal parts during measurement.
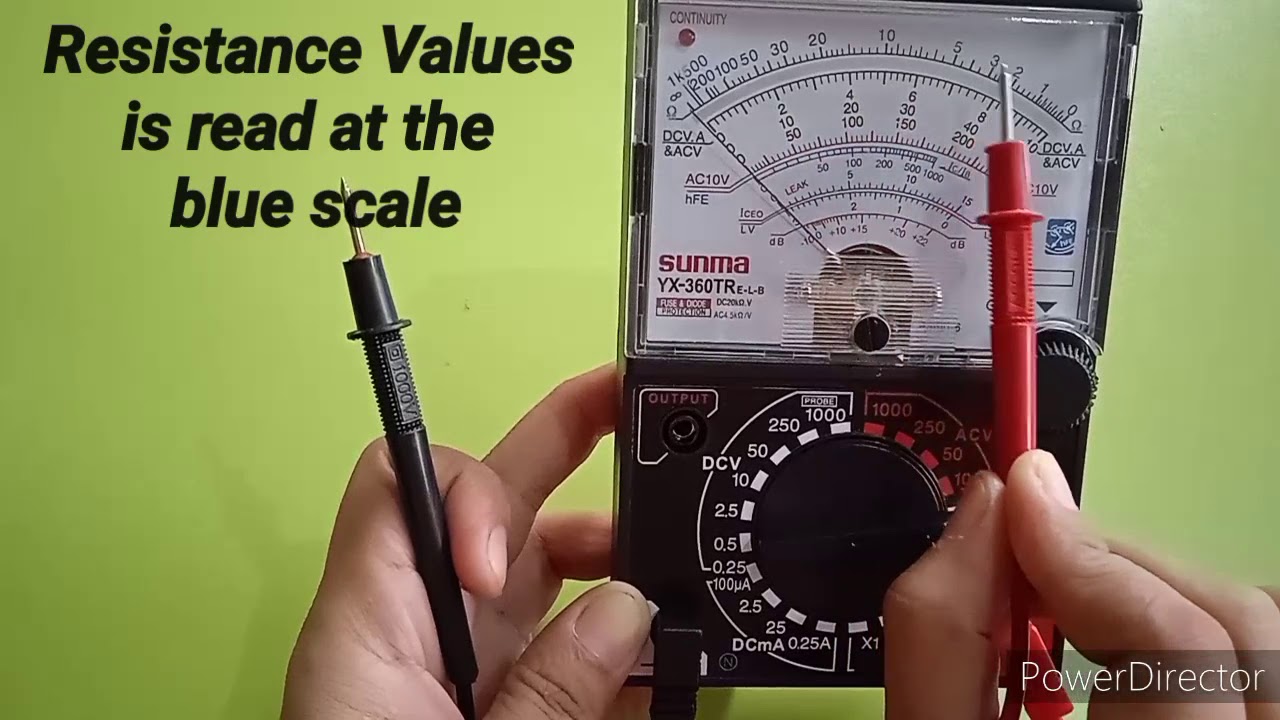
Checking Resistance
Checking resistance is a key task when using a non-digital multimeter. Resistance tells how much a component stops electric current. This helps find broken parts or test if resistors work well. The process is simple and quick. It requires careful setup and reading of the meter’s needle.
Setting To Resistance Mode
First, turn the dial to the resistance setting, often marked with the Greek letter omega (Ω). This mode measures ohms, the unit of resistance. Make sure the multimeter is off before changing the dial. After setting, connect the test leads to the correct ports. Usually, the black lead goes to the common port, and the red lead to the port for resistance tests. Hold the leads steady for accurate readings.
Testing Resistors
Touch the test leads to each end of the resistor. The needle will move and stop at a number on the scale. This number shows the resistance value. Compare this value with the resistor’s color bands or label. Close values mean the resistor is good. If the needle does not move or shows a very high number, the resistor may be damaged or open.
Identifying Open Circuits
Open circuits have no connection, so resistance is very high or infinite. Place the test leads on the circuit points you want to check. If the needle stays at zero or low resistance, the circuit is closed. If it moves to the far right or does not move at all, the circuit is open. This means there is a break or disconnection. Use this test to find faults in wires and connections.
Measuring Current
Measuring current with a non-digital multimeter helps you check how much electric flow passes through a circuit. Current is the flow of electrons, which powers devices. Knowing the current helps find problems or confirm a device works well. This section explains how to measure current safely and accurately.
Switching To Current Mode
First, turn the multimeter dial to the current (A) setting. Choose the correct range if your meter has multiple current options. Start with the highest range to protect the meter from damage. Lower the range later to get a more accurate reading. Make sure the test leads connect to the right ports. Usually, the red lead goes to the port labeled for current.
Series Connection For Current Measurement
To measure current, you must connect the meter in series with the circuit. This means the current flows through the meter. Turn off the power before breaking the circuit. Insert the meter probes at the break point. Turn the power back on and read the current on the display. Do not connect the meter across power or it may blow a fuse.
Avoiding Common Errors
Never try to measure current without switching the dial to current mode. Do not connect the meter in parallel when measuring current. Avoid using a low current range first to prevent blowing the fuse. Always check test lead connections before powering the circuit. Follow safety rules to avoid electric shock or meter damage.
Testing Continuity
Testing continuity is a simple way to check if a circuit is complete. A non-digital multimeter can help you find breaks or faults in wires and components. This test tells you if electricity can flow through the path you are checking. It is useful for fixing electrical problems in cars, appliances, and home wiring.
Using The Continuity Function
First, set your multimeter to the continuity mode. This mode usually has a symbol like a sound wave or diode. Connect the two probes to the multimeter’s ports. Touch the probes together to check if the meter beeps or the needle moves. This confirms the meter is working correctly.
Now, place the probes on the two ends of the wire or circuit you want to test. Keep the probes steady and make sure they touch the metal parts. The meter will show if the circuit is complete.
Interpreting Needle Movement
The needle on your multimeter moves to show continuity. If the needle swings quickly to the right, the circuit is closed. This means electricity can flow through. If the needle does not move or moves slowly, the circuit is open or has high resistance. No needle movement means no continuity, showing a break or fault.
Listen for a beep sound if your meter has one. The beep also means the circuit is complete. Watch the needle carefully for any small movements. These can tell you about partial connections or weak points.
Practical Continuity Tests
Test simple wires first to get used to the meter. Touch the probes to both ends of a wire. A strong needle movement or beep shows the wire is good. Try testing switches by placing probes on their terminals. When the switch is on, the meter should show continuity.
Check fuses by placing probes on each end. If the needle moves, the fuse is good. No movement means the fuse is blown. Use continuity testing on circuit boards to find broken traces or bad connections. This saves time and helps avoid more damage.
Maintaining Your Multimeter
Maintaining your non-digital multimeter keeps it accurate and extends its life. Regular care prevents damage and ensures reliable readings. Simple steps help your device work well every time.
Proper Storage Tips
Store your multimeter in a dry, cool place away from dust. Avoid leaving it in direct sunlight or damp areas. Use a protective case to prevent scratches and impact damage. Keep the test leads coiled neatly to avoid tangles and breakage. Proper storage reduces wear and keeps the device ready for use.
Battery Care
Check the battery regularly for leaks or corrosion. Replace weak batteries to avoid inaccurate measurements. Remove the battery if you do not use the multimeter for a long time. Use the recommended battery type for best performance. Good battery care prevents damage and saves you money.
Calibrating The Device
Calibration ensures your multimeter gives correct readings. Use a known reference source or standard to check accuracy. Adjust the calibration screw carefully if the readings are off. Regular calibration keeps your device reliable and safe to use. Mark the date of calibration to track when the next check is due.
Credit: www.youtube.com

Credit: www.instrumentationtoolbox.com
Frequently Asked Questions
How Do I Read A Non Digital Multimeter?
To read a non digital multimeter, observe the needle’s position on the scale. Align the dial to the correct measurement type and range. The needle points to the value you are measuring, like voltage, current, or resistance.
How To Select The Right Setting On A Multimeter?
Choose the setting based on what you want to measure: voltage, current, or resistance. Always start with the highest range to avoid damaging the meter. Adjust the dial accordingly for accurate readings.
Can A Non Digital Multimeter Measure Ac And Dc?
Yes, a non digital multimeter can measure both AC and DC. Select the correct mode on the dial to switch between AC voltage, DC voltage, or current measurement.
How To Check Battery Voltage With A Multimeter?
Set the multimeter to DC voltage, usually marked as V with a straight line. Place the probes on the battery terminals, red to positive and black to negative. Read the needle to find the battery voltage.
Conclusion
Using a non-digital multimeter is simple with practice and care. Always check the device settings before measuring. Keep the probes steady to get accurate readings. Remember, safety comes first when working with electricity. This tool helps you find issues in circuits fast.
With these steps, you can test voltage, current, and resistance easily. Take your time, and soon it will feel natural to use. Regular use builds confidence and skill. This basic tool remains useful in many tasks around home or work.