Testing a 9V battery is something almost everyone needs at some point, whether you use them for smoke detectors, guitar pedals, or small gadgets. Over time, batteries lose power, and many devices won’t work well unless the battery is strong. So, how do you know if your 9V battery still has life? One of the best ways is to use a multimeter. A multimeter lets you check the voltage and sometimes the battery’s health in just a few seconds. But for many beginners, the process can seem confusing or intimidating.
This guide walks you through everything you need to know about how to test a 9V battery with a multimeter. You’ll learn how batteries work, the right way to set up your multimeter, how to read the results, and even common mistakes to avoid.
You’ll also see practical examples and get answers to questions many people ask.
Understanding 9v Batteries
Before you start testing, it helps to understand what a 9V battery is and how it works. A 9V battery is a rectangular battery with snap connectors on top. It’s widely used in devices that need a steady supply of power. Most common 9V batteries are either alkaline or lithium, but you might also find rechargeable NiMH versions.
Each 9V battery contains several smaller cells inside, connected in series to give a total of about 9 volts when new. As the battery gets used, the voltage drops. If the voltage falls below a certain level, your device might beep, flash, or simply stop working.
Key facts about 9V batteries:
- Standard size: About 48.5mm x 26.5mm x 17.5mm
- Typical capacity: 400–600mAh for alkaline, up to 1200mAh for lithium
- Terminal type: Snap connector (one positive, one negative)
- Main uses: Smoke alarms, wireless microphones, guitar pedals, remote controls
Knowing the type of battery you have is important, as different chemistries behave differently as they discharge.
What Is A Multimeter?
A multimeter is a tool that measures electrical values like voltage, current, and resistance. There are two main types: analog and digital. Most people use a digital multimeter (DMM) today because it gives a clear number display and is easier to use.
Main functions of a multimeter:
- DC Voltage (V–): Measures direct current voltage, such as from batteries.
- AC Voltage (V~): Measures alternating current voltage, like from wall outlets.
- Current (A): Measures how much current is flowing in a circuit.
- Resistance (Ω): Measures how much a material resists the flow of electricity.
For testing a 9V battery, you only need the DC voltage function.
Why Test A 9v Battery With A Multimeter?
People often wonder, “Why not just try the battery in the device?” There are several reasons why using a multimeter is better:
- Accuracy: Devices might still work even if a battery is weak. A multimeter gives the real voltage.
- Quick Results: You can test many batteries quickly without swapping them in and out of devices.
- Prevents Damage: Some devices can be damaged by weak or leaking batteries.
- Saves Money: You won’t throw away good batteries or keep dead ones by mistake.
- Checks Rechargeables: Rechargeable batteries can lose capacity over time; voltage checks help track this.
Tools And Materials Needed
Testing a 9V battery is simple, but you need the right tools:
- Digital multimeter (almost any brand or model will work)
- 9V battery (alkaline, lithium, or rechargeable)
- Test leads (usually included with the multimeter)
- Pen and paper (optional, for notes)
No special skills are required, but you should work in a safe, dry area and follow basic safety rules.
How To Test A 9v Battery With A Multimeter
Let’s walk through the process step by step. Even if you’ve never used a multimeter before, you’ll find it easier than you think.
Step 1: Turn On The Multimeter
Find the power button or turn the dial from “OFF” to any measurement mode. Most digital multimeters turn on when you select a function.
Step 2: Set To Dc Voltage
You want to measure DC voltage (not AC). Look for a “V” with a straight line and dashed line underneath it. Set the dial to a range that covers 9 volts. If your meter has “auto range,” you don’t need to select a range.
Example: If your multimeter has 2V, 20V, and 200V ranges, pick 20V.
Step 3: Insert The Test Leads
Plug the black lead into the “COM” (common) port. Plug the red lead into the port marked “VΩmA” or just “V.”
Double-check the leads are firmly inserted.
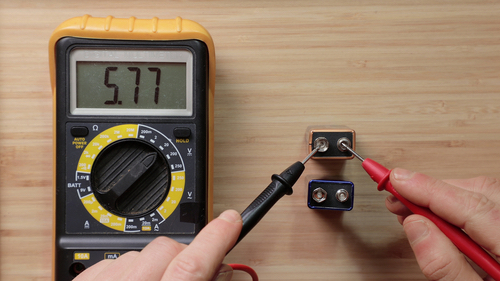
Step 4: Connect The Test Leads To The Battery
Hold the battery so the terminals are facing up. Touch the black lead to the smaller (negative) terminal and the red lead to the larger (positive) terminal. Hold steady for a few seconds.
Be careful not to short the battery by touching the leads together.
Step 5: Read The Display
Look at the number on the multimeter screen. This is the battery’s voltage.
- If you see a negative sign (–), you have the leads reversed. Don’t worry—just swap them.
- If the screen jumps or shows “0,” check your connections.
Write down the voltage if you want to compare several batteries.
Step 6: Interpret The Results
Now, what does the number mean? Here’s a helpful guide:
| Measured Voltage | Battery Condition | Action |
|---|---|---|
| 8.6V – 9.6V | Good (new or nearly new) | Use with confidence |
| 7.5V – 8.5V | Still usable | Okay for low-drain devices |
| 6.5V – 7.4V | Weak | Replace soon |
| < 6.5V | Dead/very weak | Recycle or discard safely |
Most devices need at least 7V from a 9V battery to work reliably.
Example: Testing A Real 9v Battery
Let’s say you pull a 9V battery from your smoke detector and test it. Here’s what you might see:
- You set your multimeter to 20V DC.
- You touch the leads to the battery.
- The screen shows “8.12.”
From the table above, this means the battery is still usable, but not as strong as new. It’s probably safe for a remote but may not be good enough for a smoke detector.
Comparing New, Used, And Rechargeable 9v Batteries
Here’s a quick comparison of what you might see when you test different types of 9V batteries:
| Battery Type | Brand New Voltage | End-of-Life Voltage | Notes |
|---|---|---|---|
| Alkaline | 9.2V – 9.6V | 6.0V – 6.5V | Common in stores |
| Lithium | 9.0V – 9.5V | 6.0V – 6.5V | Long shelf life |
| Rechargeable NiMH | 8.2V – 8.7V | 6.0V – 6.2V | Lower starting voltage |
Non-obvious insight: Rechargeable 9V batteries often start with a lower voltage (around 8.4V) even when fully charged. This is normal and doesn’t mean they’re bad.
Testing Under Load: Why It Matters
Some batteries can show a “good” voltage when not connected to a device but drop quickly when in use. This is called the loaded voltage test.
To test under load:
- Connect a small resistor (e.g., 1kΩ) across the battery terminals while measuring the voltage.
- If the voltage drops a lot under load, the battery is weak even if it showed a high value before.
This method is more accurate but less common for beginners. Still, it’s useful for critical devices like smoke alarms.
Practical tip: If a battery reads over 8V with no load but drops below 7V with a 1kΩ resistor, it’s near the end of its life.
Common Mistakes To Avoid
Many people make small mistakes when testing batteries. Here’s what to watch out for:
- Wrong meter setting: If you use the AC range, you’ll get nonsense readings. Always use DC voltage.
- Leads reversed: You’ll see a negative number. Swap them if this happens.
- Dirty terminals: Old batteries might have corrosion or dirt. Clean with a dry cloth before testing.
- Holding leads too long: You only need a few seconds. Leaving the leads too long can heat them up.
- Testing in the device: Remove the battery first. Devices can affect readings.
- Assuming all 9V batteries start at 9V: Rechargeables are different—don’t panic if a full one reads 8.4V.
Safety Tips
Even though 9V batteries are small, safety matters:
- Never short the terminals with metal objects. It can heat up or even cause burns.
- Recycle old batteries safely. Don’t throw them in the trash.
- Keep batteries away from children and pets.
- Store batteries in their original packaging or with terminal covers to avoid accidental shorts.
Credit: tameson.com
How To Choose A Good Multimeter
Not all multimeters are equal. If you want the best results, look for these features:
- Auto-ranging: This makes choosing the right voltage range easier.
- Clear display: Large numbers are easier to read.
- Sturdy case: Multimeters can be dropped; rugged ones last longer.
- Replaceable leads: Leads wear out; make sure yours can be changed.
- Battery indicator: So you know when your multimeter itself needs a new battery.
A basic digital multimeter costs $10–$25 and is enough for battery testing. Advanced models can cost more but are not necessary for this task.
What To Do With Old Or Dead 9v Batteries
When your test shows a battery is weak or dead, don’t just toss it in the trash. Old batteries can leak chemicals or cause fires if shorted. Here’s what you should do:
- Tape the terminals: Put tape over the top to avoid accidental shorts.
- Recycle at a battery drop-off: Many stores and recycling centers accept old batteries.
- Never burn or crush batteries: This is dangerous and illegal in most places.
For more recycling information, see the EPA’s battery recycling guide.

Credit: www.youtube.com
Real-world Applications: Why Accurate Testing Matters
Testing 9V batteries is not just for curiosity. It can have real-life effects:
- Smoke alarms: A weak battery could mean the alarm doesn’t work in an emergency.
- Guitar pedals: A dying battery can cause strange sounds or cut out during a show.
- Medical devices: Some devices use 9V batteries for backups; you want to be sure they’re strong.
- Remote controls: Weak batteries can make remotes unreliable.
Non-obvious insight: Some devices stop working long before the battery is “dead” by voltage. For example, a smoke detector may beep to warn you when the battery drops below 7.5V, even though it could still power a small LED flashlight.
Troubleshooting: If Your Multimeter Shows Odd Results
Sometimes you might see unexpected numbers. Here’s how to troubleshoot:
- Reading is zero: Check that the leads are plugged in correctly and touching the terminals.
- Display flashes or shows “OL”: You may have the range set too low. Try a higher range.
- Number jumps around: Clean the battery terminals and make sure the leads are steady.
- Negative number: Leads are reversed. Swap them.
If your multimeter always shows “0” or “OL” on all batteries, the meter itself may need a new battery or be damaged.
Advanced: Checking Battery Health Beyond Voltage
Voltage isn’t the only sign of battery health. Advanced users sometimes measure internal resistance or test the battery under different loads to see how it performs. High internal resistance means the battery can’t deliver power quickly, even if voltage looks good.
Some high-end multimeters have a “battery test” mode. This is not needed for most people, but if you test batteries often, it can be useful.
Environmental Impact Of Proper Battery Testing
Testing batteries before throwing them away helps the environment. About 3 billion batteries are thrown away each year in the US alone. Testing first means you use every battery to the end of its life, reducing waste and pollution.
Quick Reference: 9v Battery Testing Steps
Here’s a summary for easy recall:
- Set the multimeter to DC voltage (20V range).
- Plug in the test leads (red = V, black = COM).
- Touch leads to battery terminals (red = +, black = –).
- Read and record the voltage.
- Compare to the voltage chart.
- Recycle or use battery as appropriate.
Comparing Multimeter And Battery Tester Devices
Some people ask: “Why not use a dedicated battery tester?” Here’s how they compare:
| Feature | Multimeter | Battery Tester |
|---|---|---|
| Accuracy | High | Moderate |
| Versatility | Measures many types of batteries and circuits | Usually for batteries only |
| Cost | $10–$50+ | $5–$15 |
| Ease of use | Some learning needed | Very easy |
| Loaded test | Possible with resistor | Often built-in |
Pro tip: If you already own a multimeter, you don’t need a separate battery tester.

Credit: www.youtube.com
Frequently Asked Questions
What Voltage Should A New 9v Battery Show?
A brand new alkaline 9V battery should show between 9.2V and 9.6V on your multimeter. If it’s rechargeable, a full battery may read as low as 8.4V, which is normal for NiMH types.
Can I Test A 9v Battery Inside The Device?
It’s best to remove the battery before testing. Devices can affect the voltage reading, making it higher or lower than the true value. For the most accurate results, always test batteries out of the device.
Why Does My Multimeter Show A Negative Number?
A negative reading means the leads are swapped. The black lead is touching the positive terminal, and the red lead is on the negative. It doesn’t harm the battery or multimeter. Just swap the leads to get a positive number.
How Do I Know If A Rechargeable 9v Battery Is Bad?
If a rechargeable 9V battery reads below 7.0V after charging, or if it drops voltage quickly under use, it’s probably at the end of its life. Also, if it doesn’t hold a charge or the voltage drops very fast under load, replace it.
Are Cheap Multimeters Accurate For Battery Testing?
Most cheap digital multimeters are accurate enough for testing 9V batteries. Even models under $15 can measure voltage within 0.1V. For most home uses, you don’t need an expensive meter.
Testing a 9V battery with a multimeter is simple, fast, and saves money and hassle. With the steps and tips above, you can check any 9V battery in seconds and be confident in your results. Whether for safety, music, or everyday gadgets, you’ll never have to guess if your battery is still good.