Is your lawn mower acting up or refusing to start? The problem might be your battery, but how can you be sure without spending money on a replacement?
You don’t need to guess or rely on a mechanic just yet. By using a simple tool called a multimeter, you can quickly test your lawn mower battery right at home. This easy step-by-step guide will show you exactly how to check your battery’s health, saving you time and money.
Keep reading, and you’ll gain the confidence to diagnose your mower’s battery like a pro.

Credit: www.youtube.com
Prepare Your Tools
Preparing your tools is the first step to test a lawn mower battery. Having the right equipment makes the process smooth and safe. It helps you get accurate results without any risk.
Start by selecting a good multimeter. Then, gather the safety gear needed for handling the battery.
Choose The Right Multimeter
Pick a multimeter that can measure DC voltage. The battery voltage is usually 12 volts. Make sure the multimeter has a clear display. It should be easy to use for beginners. Digital multimeters are best for reading accuracy. Check the battery of the multimeter itself before testing.
Gather Safety Gear
Wear safety glasses to protect your eyes from sparks or acid. Use gloves to keep your hands safe from battery acid. Avoid loose clothing that can get caught in parts. Work in a well-ventilated area to avoid harmful fumes. Keep a clean workspace to prevent accidents. Safety is a priority when handling batteries.
Locate The Battery
Before testing your lawn mower battery with a multimeter, you must find the battery first. Locating the battery is the first step in checking its health and charge level. It is usually hidden inside the mower, so you need to know where to look.
Accessing The Battery Compartment
Most lawn mower batteries are inside a compartment for protection. This compartment is often under the mower’s seat or near the engine. Look for a cover that you can remove. Sometimes, screws hold the cover in place. Use a screwdriver if needed. Removing the cover carefully will give you access to the battery. Keep the area clean and dry while working.
Identify Battery Terminals
Once the battery is visible, find the terminals. These are metal posts where you connect the multimeter probes. Usually, the terminals are marked with a plus (+) and minus (-) sign. The positive terminal is often red, and the negative terminal is black or uncolored. Identifying the terminals correctly is important for accurate testing. Touch the right probe to the right terminal to avoid errors.
Set Up The Multimeter
Setting up the multimeter correctly is the first step to test your lawn mower battery. This ensures you get accurate readings and avoid damage to the device. Follow simple steps to prepare your multimeter for the task.
Select Voltage Measurement Mode
Turn on your multimeter and look for the voltage measurement setting. It is usually marked with a “V” symbol. Choose the direct current (DC) voltage mode because batteries provide DC power. This mode often shows a straight line with dashes below it. Avoid alternating current (AC) settings, as they measure different signals.
Adjust Multimeter Range
Set the range on your multimeter to match your battery’s voltage. Most lawn mower batteries are 12 volts, so choose a range slightly higher, like 20 volts. This prevents overloading the meter and gives a clear reading. If your multimeter has an auto-range feature, enable it to simplify the process.
Measure Battery Voltage
Measuring the battery voltage is a key step in testing a lawn mower battery. It shows the battery’s current power level. A healthy battery has a specific voltage range. Using a multimeter helps you check if the battery holds enough charge. This step prevents surprises while mowing your lawn.
Connect Multimeter Probes Correctly
First, set your multimeter to measure DC voltage. Look for the “V” symbol with straight lines. Connect the red probe to the positive (+) battery terminal. Attach the black probe to the negative (-) terminal. Make sure both probes touch the metal parts firmly. Avoid touching the probes together during the test.
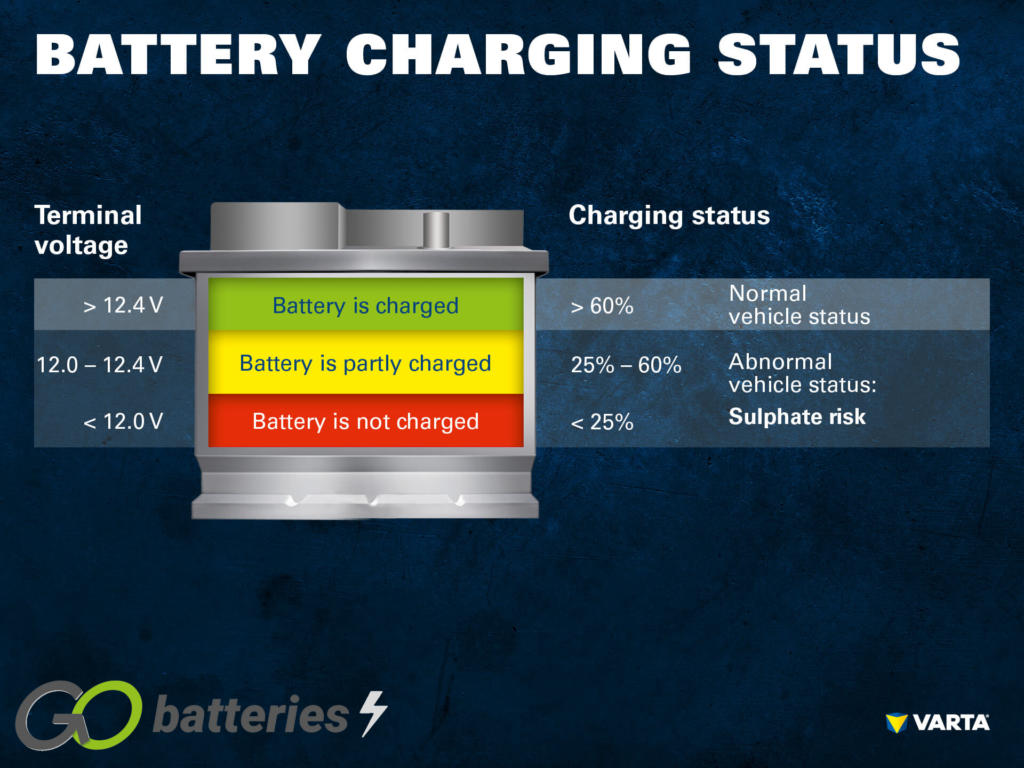
Read And Interpret Voltage
Check the number shown on the multimeter screen. A fully charged 12-volt battery reads around 12.6 volts or higher. If the reading is below 12.4 volts, the battery may be weak. A reading under 12 volts means the battery needs charging or replacement. Use this information to decide the next step for your lawn mower battery.
Check Battery Health
Checking your lawn mower battery health is key to keeping your mower running well. A weak or dead battery can stop your mower from starting. Testing the battery helps you find out if it holds enough power. It also shows if the battery needs charging or replacement. Use a multimeter to get a clear picture of your battery’s condition.
Compare Voltage To Standard Levels
First, set your multimeter to measure DC voltage. Connect the red probe to the battery’s positive terminal. Touch the black probe to the negative terminal. Read the voltage displayed on the multimeter screen. A fully charged 12-volt battery shows about 12.6 volts or more. If the reading is below 12.4 volts, the battery may be weak. Below 12 volts means the battery is likely discharged or bad. This quick check helps you see if the battery holds enough charge.
Test Under Load Conditions
Voltage alone does not tell the full story. Test the battery while it powers the mower’s starter. This is called testing under load. Use a load tester or ask someone to start the mower while you watch the multimeter. If the voltage drops below 10 volts during starting, the battery struggles to deliver power. A good battery stays above this level. This test shows if the battery can perform under real use. It helps avoid surprises when you need your mower most.
Troubleshoot Common Issues
Troubleshooting common issues can save time and money when testing a lawn mower battery. Knowing what to check helps find the problem fast. Two common issues are corroded terminals and loose connections. Both can stop the battery from working well. Use a multimeter to check the battery, but first, look at these parts closely. Fixing these small problems can bring the mower back to life quickly.
Identify Corroded Terminals
Corrosion looks like white or green powder on battery terminals. It blocks electricity flow and lowers battery power. Check both battery posts and cable ends. Use a wire brush or sandpaper to clean corrosion. Wear gloves to protect your hands. After cleaning, test the battery with a multimeter again. Clean terminals can improve the connection and battery performance.
Detect Loose Connections
Loose connections cause poor power flow and mower issues. Check if battery cables fit tightly on terminals. Wiggle the cables gently to see if they move. Tighten any loose nuts or bolts with a wrench. Make sure cables are not damaged or frayed. A secure connection ensures the battery sends power properly. Test with a multimeter to confirm good contact after tightening.
Maintain Your Battery
Maintaining your lawn mower battery helps it last longer and work better. Regular care keeps the battery strong and ready to start your mower quickly. Simple steps can prevent common battery problems and save you time and money.
Clean Battery Terminals
Dirty battery terminals cause poor connections. Use a wire brush to clean off dirt and corrosion. Make sure the terminals are dry before reconnecting. Clean terminals improve power flow and mower performance.
Charge Or Replace Battery
Test your battery voltage with a multimeter. A low reading means the battery needs charging. Use a compatible charger and follow instructions carefully. If the battery does not hold charge, it may need replacing. A good battery ensures your mower starts every time.

Credit: www.youtube.com
Credit: www.gobatteries.co.uk
Frequently Asked Questions
How Do I Test A Lawn Mower Battery With A Multimeter?
Set the multimeter to DC voltage. Connect the red probe to the battery’s positive terminal and the black probe to the negative terminal. A healthy battery should show around 12. 6 volts or more. Lower readings indicate a weak or dead battery.
What Voltage Should A Healthy Lawn Mower Battery Show?
A fully charged lawn mower battery typically shows about 12. 6 volts. If the voltage reads below 12. 4 volts, the battery may be partially discharged. Readings under 12 volts usually indicate the battery needs charging or replacement.
Can A Multimeter Diagnose All Lawn Mower Battery Issues?
A multimeter accurately measures voltage and can detect low charge or dead batteries. However, it cannot test battery capacity or internal damage. For deeper issues, additional tests or professional diagnosis may be needed.
How Often Should I Test My Lawn Mower Battery?
Test your lawn mower battery before each mowing season and after long periods of inactivity. Regular testing helps maintain battery health and prevents unexpected failures during use.
Conclusion
Testing a lawn mower battery with a multimeter is simple and quick. Just follow the steps carefully to get accurate results. A good battery means your mower will start easily and run well. Regular checks can save you from unexpected problems.
Keep your tools ready and your mower in top shape. Testing helps you decide if the battery needs charging or replacing. Stay safe by handling the battery and multimeter with care. Now, you can keep your lawn mower working smoothly all season long.